Discover the world of DIY wooden crafts and unleash your creativity with these 40 easy wood craft ideas and projects. From personalized home decor to handmade gifts, these projects cater to different interests and skill levels. Each project comes with detailed instructions, step-by-step guides, and free video tutorials to help you learn and start crafting. Whether you’re a beginner or a seasoned crafter, these wood craft ideas provide an excellent way to engage in a fulfilling creative pursuit.
Crafting with wood not only offers a unique opportunity to make useful items but also allows you to express your artistic side. These wood craft projects include clear illustrations, visual guides, and material details to help you assemble your masterpiece. From hanging plant holders to desk organizers, these DIY wood art projects offer both fun and functionality. So, grab your supplies and start crafting unique wood decorations that will impress your friends and family.
Small Cedar Wood Plant Stand


If you’re looking for a cheap and easy way to spruce up your home décor, then look no further than these stylish, mid-century wooden plant stands. Made from cedar 1x2s, dowel pins, and wood glue, these beautiful stands can be easily constructed in no time. What’s more, they only cost $4 each to make! With their charm, style, and affordability, these plant stands are sure to please both plant mamas and plant daddies alike. Transform your space into a garden haven today with this fun DIY project!
Block Snowman Wooden Craft to Make

If you’re looking for a fun and creative winter craft project, making a block snowman decoration is a great option. To get started, you’ll need some wood blocks, acrylic paint, a chenille sock, and a Cricut Joy machine.
First, paint and decorate the wood blocks using the Cricut Joy’s features. You can also use the blocks to make the snowman’s nose, arms, and scarf. Once everything is painted and cut, attach the blocks to a 4×4 post and add the finishing touches with the chenille sock.
The end result is a charming handmade snowman decoration that will add a cheerful touch to your winter decor. This project is perfect for anyone looking for a fun and easy DIY project that will keep you feeling creative and festive all season long.
Handmade Desk Organizer – Free Plans

Take your organizing skills to the next level with this amazing DIY desk organizer! With just a few 2″ x 6″ poplar boards, ¼” scrap plywood, and ¼” round dowels, you can make this unique and beautiful organizer. The easy-to-follow instructions will have you efficiently organizing all your must-have desktop items, including a tape measure! This handmade desk organizer is a great addition to any workspace and will help keep your desk clutter-free.
Wooden and Lace Pendant Necklace Craft

Looking for a unique and elegant way to make a statement? Why not try making your own DIY wood and lace pendant necklace? Start by finding a vintage lace piece, perhaps from a special dress, and shaping it with dimensional magic. Then, place it inside a wood bezel with a pearl for that extra shine. Finish off the look by adding a bail and attaching it to your favorite necklace chain and closure for maximum effect. You’ll be sure to turn heads with this stunning accessory.
DIY Wood Sunburst Mirror Project

Looking for a way to add some personality to your home decor? Try making a DIY wood sunburst mirror! This project is easy to create and won’t break the bank. To make your own mirror, you’ll need a 12-inch wood circle cutout, popsicle sticks, pieces of 1/16″ thick basswood, and wood stain. Simply glue the popsicle sticks onto the wood circle in a sunburst pattern, then attach the basswood pieces to the back of the mirror. Finally, stain the wood to your desired color. With just a few simple steps, you can create a stunning statement piece for your home.
Easy DIY Photo Transfer to Wood

Transform your favorite photos into stunning works of art with this simple and easy DIY photo transfer to wood tutorial. All you need is a mod podge, a laser-printed image, a wooden piece, and a washcloth or paper towel.
Follow these step-by-step instructions to create your own unique wood art piece:
- Start by selecting the image you want to transfer onto the wood and printing it out on a laser printer.
- Apply a generous amount of mod podge to the wooden surface and smooth out any bubbles or wrinkles.
- Place the printed image face down onto the mod podge and smooth out any bubbles or wrinkles.
- Allow the mod podge to dry completely for at least 24 hours.
- Once the mod podge is completely dry, use a damp washcloth or paper towel to gently rub away the paper until the image is transferred onto the wood.
- Use a hairdryer on low heat to dry the wood and remove any remaining paper fibers.
This easy DIY project is perfect for creating personalized gifts or adding a unique touch to any room in your home. Start crafting today and let your creativity shine with DIY photo transfer to wood!
Craft a Pallet Wood Serving Tray for Adults

Impress your dinner guests with a handcrafted pallet wood serving tray. This DIY project is easy to make with just a few materials and simple steps. To create your own serving tray, you’ll need pallet wood, wood stain, and dap rapid fuse wood adhesive. Cut the wood pieces to your desired size and arrange them however you like. Then, glue the pieces together with the adhesive and apply your preferred stain for a beautiful finish. This project is perfect for all skill levels and will add a touch of woodworking charm to your dinner parties. So why not create your own serving tray today?
Simple DIY Candle Holders From Pallet Wood

Looking for a way to add a touch of rustic charm to your home decor? This simple DIY project is perfect for you! With just a few easy steps, you can create beautiful candle holders from pallet wood.
To get started, gather some baling wire, an old pallet, and battery-operated candles. Arrange the pallet wood into a frame and secure it with baling wire. Then, simply place the candles inside the frame and you’re done! These candle holders not only look great, but they also make fantastic gifts.
Don’t be afraid to get creative and add your own personal touch to each holder. Let your imagination run wild and enjoy creating beautiful decor for your home or loved ones. With this easy DIY project, you’ll have gorgeous candle holders in no time!
DIY Wooden Folding Step Stool
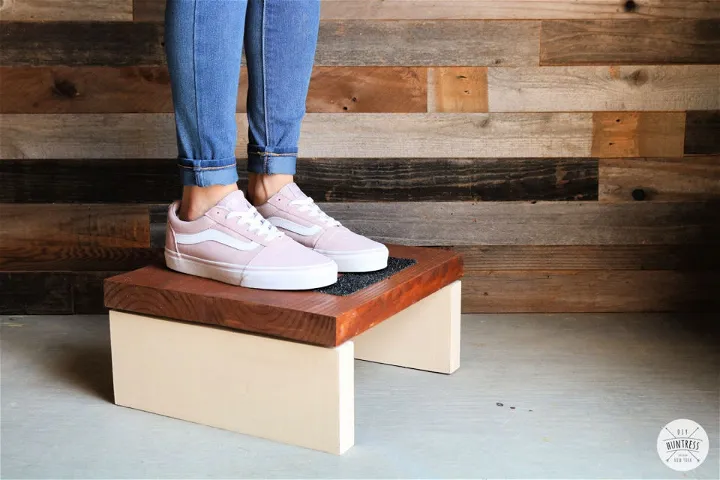
If you’re looking for a simple and space-saving solution for a step stool, this DIY project is perfect for you. Using just a scrap 2×8 board, a scrap 2×6 board, butt hinges, a picture hanging hook, and some paint, you can easily assemble a folding step stool in just a few minutes. This project is beginner-friendly and doesn’t require advanced woodworking skills. Once you’re done using it, you can hang it on a pegboard to save even more space. Start crafting this helpful and creative DIY today!
How to Build a Wooden Chest
Building a wooden chest is an exciting and rewarding project that can be enjoyed by kids of any age. To get started, gather the necessary supplies, including 1″ x 8″ pine, 1″ x 4″ pine, 1″ x 2″ pine, rope, and butt hinges. Begin by cutting the pine boards to size and assembling them using screws and wood glue. Sand the chest to smooth out any rough edges and apply a coat of paint or stain to protect the wood. Finally, attach the rope handles and butt hinges to complete the project. Enjoy the process and create lasting memories with your child.
DIY Nightstand Valet Docking Station Decor

Create a unique organizing station for your nightstand with this fun and easy DIY project! You’ll need a 1×4 board, a 1×1 board, wood glue, and either stain or paint. Once assembled, you can personalize it in any way that suits your needs. This valet docking station is perfect for holding your phone, apple watch, and more while they charge on the nightstand, keeping everything neat and tidy. Try out this room-refreshing idea today and enjoy the satisfaction of making something useful and beautiful for your home.
Create a Vintage-Style Wooden Heart Decoration for Valentine’s Day

Add a touch of traditional charm to your home with this DIY wooden heart decoration. You will need a ¼” plywood sheet, red and white glossy paint, poster board or paper to make a pattern, and some ribbon or wire for hanging. Follow these simple steps to create your own vintage-style heart:
- Trace the heart shape onto the plywood using the pattern you created.
- Cut out the heart shape using a jigsaw or handsaw.
- Sand the edges of the heart to smooth out any rough spots.
- Paint the heart with red and white glossy paint, alternating between the two colors.
- Let the paint dry completely.
- Sand the heart lightly to give it a distressed, vintage look.
- Attach a ribbon or wire to the back of the heart for hanging.
Experiment with different colors, patterns, and materials to make your heart unique and personalized. Hang it on your front porch or anywhere in your home to add a touch of rustic charm this Valentine’s Day.
Unique DIY Cats Art Wood Craft

Create unique and adorable wooden cats with scrap wood and a few tools. All you need are 2x4s, paint, wood glue, a cricut, and a cute cat face cut file. This project is perfect for decorating your home, especially during Halloween. Let your crafting skills soar as you make cats that are truly one-of-a-kind. This project is a great mix of creativity and thriftiness, and will provide you with a fun and satisfying crafting experience.
Mini Plane Wood Craft

Create your own mini wooden plane craft using simple materials and your imagination! All you need are wooden clothespins, popsicle sticks, paint, and either white glue or a hot glue gun. Combine the pieces with precision and decorate to bring your mini wooden plane to life. This is a quick and easy craft that you can enjoy with your family or children. Once you finish, proudly display your work for all to see. Follow these easy steps to create your very own mini wooden plane:
- Gather materials: wooden clothespins, popsicle sticks, paint, white glue or hot glue gun
- Combine clothespins and popsicle sticks to create the body and wings of the plane
- Use paint to decorate the plane as desired
- Attach the wings to the body using glue
- Display your finished mini wooden plane for all to admire!
Try this fun and easy craft today and let your creativity soar!
Wood Coasters With Dyed Veneer Stripes

Create beautiful and unique wood coasters with dyed veneer stripes using high-quality ¼” maple and vibrant-colored veneer. Even if you have little experience working with wood, the optimized instructions will guide you through the process with ease. Simply add a few drops of wood glue and your choice of stylish finishes to complete the project. Impress your loved ones with these eye-catching DIY wood coasters.
Crafting Your Own Headphone Stand

Looking for a unique and creative gift for your tech-savvy loved one? Why not make them a DIY headphone stand? With just a few materials, including ¾” plywood and wood glue scraps, you can create a one-of-a-kind stand that they can use to show off their headphones in style. Finish it off with a layer of wipe-on polyurethane to give it long-lasting beauty. Your loved one will appreciate the care and creativity that went into this amazing gift.
Making a Reclaimed Wood Chevron Pallet Heart
![]()
Add a touch of rustic charm to your living room with this DIY reclaimed wood chevron pallet heart. This unique home décor item is made from old or pallet wood, giving it a warm and cozy feel. Customize the shape and color of your masterpiece to fit your personal style. To create the heart pattern, use colorful deep-sea coral acrylic paint and cool white acrylic paint. Add details using a bristle paint brush to make it extra special. This DIY project is perfect for unleashing your creativity and impressing your guests. Try it out today and see the stunning results for yourself!
DIY Log Slice Pencil Holder

Looking for a unique way to organize your desk? Try making a DIY log slice pencil holder! This rustic-inspired pencil holder is easy to make and only requires a log slice about 4 inches tall and 4 inches wide, as well as a drill with a ½-inch spade bit. Not only will it stylishly organize your pencils, pens, and other stationery items, but it will also add a touch of nature to your workspace. This is a perfect gift idea for any creative or crafty person. So why not give it a try and make one today? You deserve it!
Hanging Mason Jar Using Scrap Wood
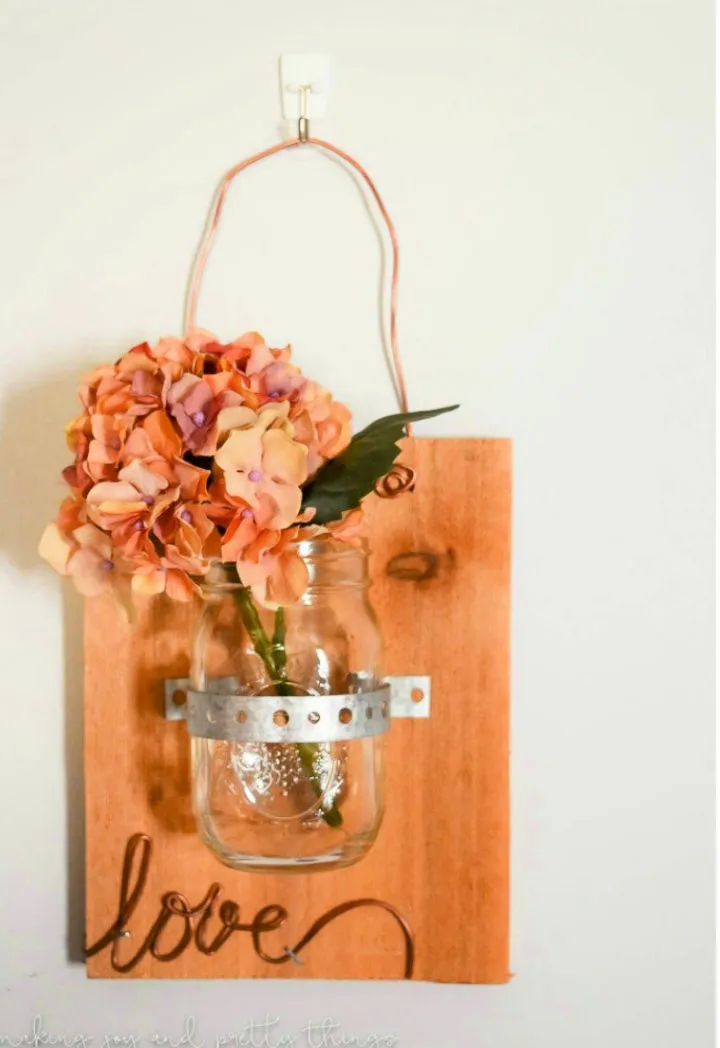
If you want to add a touch of rustic charm to your home decor, this DIY tutorial is perfect for you. To create this project, you will need cedar planks, copper wire, mason jars, pipe strapping, and tin snips. By following these simple steps, you can create a beautiful and unique hanging mason jar decoration that will impress your guests. Hang your creation in a prominent spot in your home to showcase your crafting skills and add warmth and style to your living space.
DIY Garden Sign from Reclaimed Wood Fence Stakes

If you’re looking for a unique and eco-friendly way to add some charm to your garden, try making a DIY garden sign from old wooden fence stakes. This project is quick and easy, and all you need are some wooden stakes, wet rags, wooden letters, and either paint or permanent markers.
To create your handmade sign, simply arrange the wooden stakes in the shape of your choice, dampen them with wet rags to help them bend, and secure them together with screws or nails. Then, add your wooden letters and either paint or use permanent markers to decorate your sign.
This DIY garden sign is a great way to personalize your outdoor space and add a touch of creativity. So, let your personality shine through and get crafting!
Wood Burned Leaf Magnets Design on Wood Slices

Making your own wood-burned-leaf magnets is a fun and creative craft. To get started, you will need wooden circles, a woodburning tool, mod podge, clear acrylic sealer, and magnets. Follow these simple steps to create your own set of lovely wooden magnets:
- Sketch your favorite leaf designs onto the wooden circles using a pencil.
- Use a woodburning tool to burn the designs onto the wooden circles.
- Apply a coat of mod podge over the burned designs to seal them.
- Once the mod podge has dried, apply a coat of clear acrylic sealer to protect the designs.
- Finally, adhere magnets to the back of the circles and use them as refrigerator decorations or give them away as a homemade gift.
This easy but engaging craft is a great way to get creative and make something unique.
Wooden Hanging Plant Holder

If you’re looking for a simple yet stylish way to display your plants, try making a DIY wooden hanging plant holder. This project is perfect for both beginners and experienced crafters, and it’s a great way to add a personal touch to your space without breaking the bank. To make this plant holder, all you need is some plywood, leather rope, large beads, and a few simple tools. Follow the step-by-step guide below to create your own unique plant holder and be proud of your handmade creation!
Affordable and Easy-to-Make Shop Stool

If you’re looking for a budget-friendly and straightforward DIY project, this shop stool plan is perfect for you. With just three 2x4x8 boards, you can create a versatile stool that can be used in your workshop or anywhere else in your home. The best part? It only costs $10 to make! The stool is incredibly simple to construct, making it an ideal project for beginners or those with limited woodworking experience. Additionally, it can be repurposed as a side table, plant stand, or anything else you can imagine. Give these plans a try and create a practical and functional piece of furniture for your home.
Make Your Own Cedar Name Wood Plaque
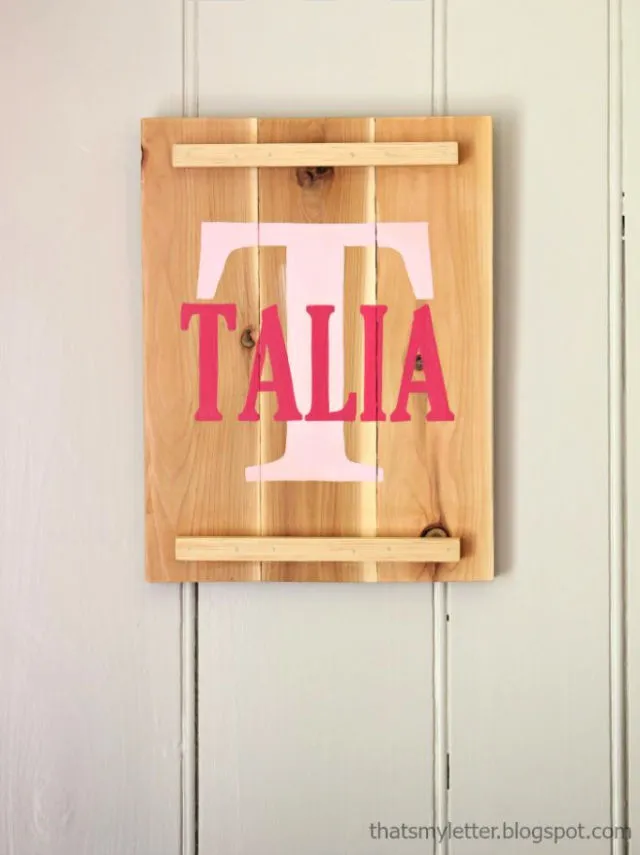
Looking for a last-minute wall decor solution that won’t break the bank? Why not try making your own DIY cedar name plaque using 1×4 cedar boards? It’s quick and easy to assemble, and you can customize it to your liking. This cute plaque can also double as a door hanger. With a little bit of finishing, you’ll have a personalized and affordable piece of home decor in no time. Check out lollyjane for more details.
Kitchen Decor From Vintage Cutting Boards

Transform your vintage cutting boards into rustic kitchen decor with this easy DIY wood craft idea. Give your cutting board a fresh coat of paint and add some jute twine and wooden letters to create a custom piece. Spell out your favorite phrase or an inside joke to make it personal. You can use this repurposed cutting board as a decorative piece or as a functional serving tray. This creative project is a great way to repurpose old items and add some character to your kitchen. Plus, it’s a delightful conversation starter for guests.
DIY Wood Slat Wall Shelf

Looking for a way to add some rustic charm to your decor? Look no further than this DIY wooden craft idea: a slat wall shelf! With just 1”x2” furring strips and ¾′ dowels, plus your choice of paint or stain, you can create a customized and functional shelf for your entryway. Whether you build one large wall or section it off for multiple shelves, this project is sure to pull together your room and make an impressionable impact on your decor. Stay organized and make lasting memories with a beautiful and functional slat wall shelf.
Creative Desktop Pencil Cup Wood Craft
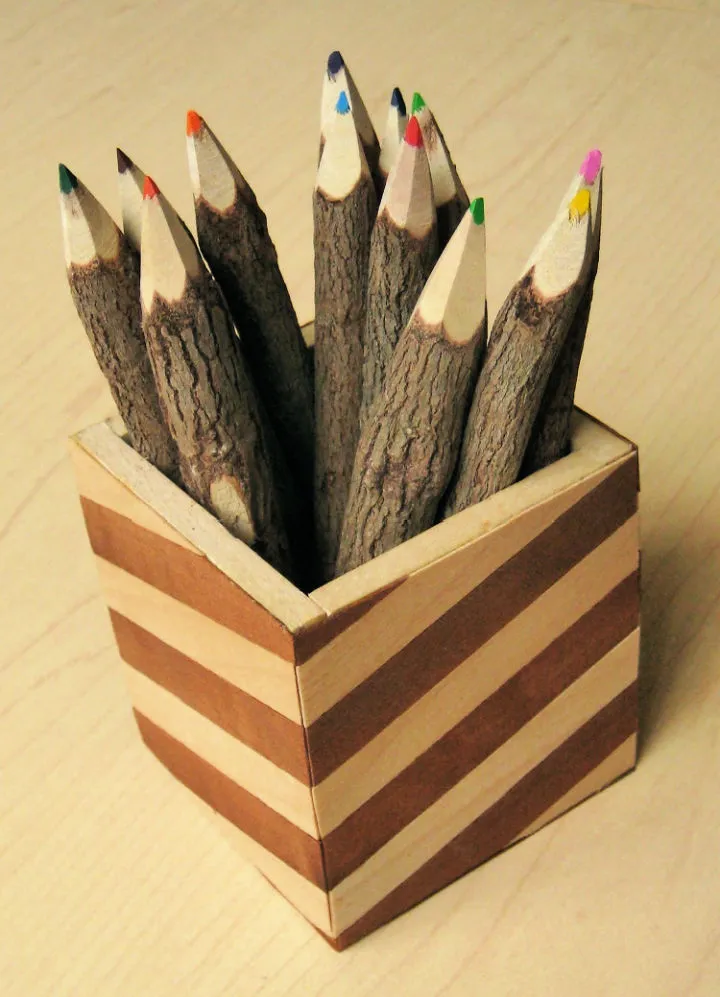
If you’re tired of a cluttered workspace, this DIY wood craft project is perfect for you. With just a few simple materials, you can create a custom pencil holder that adds a touch of style to your desk. Using ¼ inch-thick wood, you can get creative with the shape of your pencil holder and add paper and wood veneer for a more finished look. This project is perfect for those who want to spend less time dealing with messy desks and more time completing tasks creatively. Give your workspace a personalized touch with this easy-to-make desktop pencil cup.
Wooden Houses From Scrap Wood for Beginners
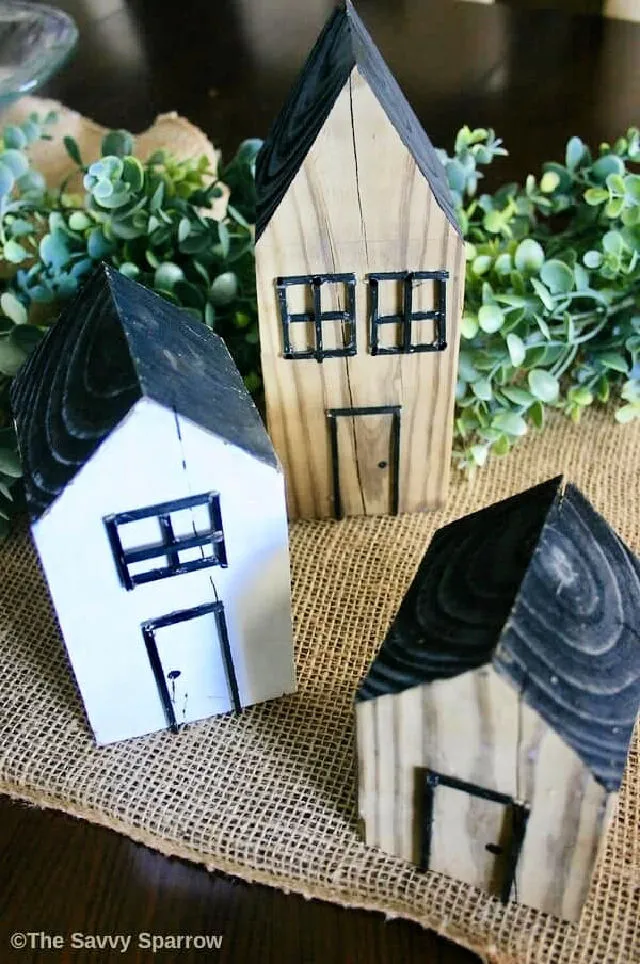
If you are looking for a fun and easy DIY project to add to your farmhouse decor, then these DIY decorative wooden houses made from scrap wood are perfect for you. Even if you are a beginner, you can still make the most adorable rustic wood houses with just 4×4 fence posts, white and black acrylic paint, and thin wooden sticks. These DIY wooden block houses are a great way to add a personalized touch to your home. Here are some steps to get started:
- Cut the 4×4 fence posts into different sizes to create the different levels of your wooden houses.
- Sand the edges of the posts to create a smooth finish.
- Paint the posts with white acrylic paint and let them dry completely.
- Use thin wooden sticks to create the roof and window frames of the wooden houses.
- Paint the roof and window frames with black acrylic paint and let them dry.
- Glue the roof and window frames onto the painted fence posts.
- Display your new DIY wooden block houses in your home and enjoy!
With just a few simple materials and steps, you can easily create these charming wooden houses from scrap wood. They are a great way to add a touch of rustic charm to your home decor.
Homemade Primitive Wooden Bookmarks

Looking for a unique and fun way to mark your pages? Why not try making your own wooden bookmarks using a Cricut machine! With just a few simple materials like wood veneer, ribbon, wax paper, baby wipes and/or moist paper towels, a Cricut deep point blade, and a strong purple grip cutting mat, you can create charming bookmarks that are truly one-of-a-kind. Follow these easy steps to cut the wood veneer and use the brayer to secure everything in place. Then, let your creativity shine as you craft your very own primitive wooden bookmarks!
Make Your Own Painted Wood Sign

Creating a personalized wood sign is an excellent way to add character to your home decor. To get started, you will need a 1×4 piece of pine and a 1×2-inch wood strip. Begin by staining the wood with gray stain to achieve a weathered look. Use a cricut or silhouette machine to cut out vinyl lettering to add a personal touch to your sign. Once you have your vinyl lettering, affix it onto the wood. You can use a transfer tape to apply the vinyl lettering with ease. Now you have a chic and unique wooden sign that you can display in your home.
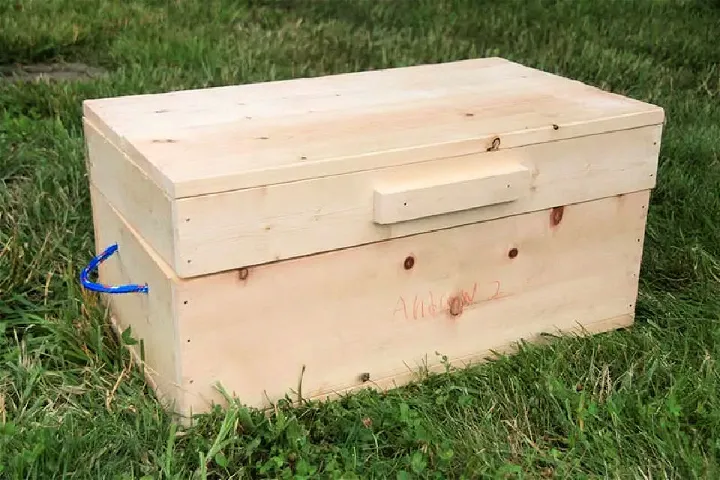
How to Make Men’s Wood Box
Making a custom men’s wood box is a great way to show someone how much you care. With these simple steps, you can create a unique and personalized gift that will be cherished for years to come.
Materials Needed
To make a men’s wood box, you will need the following materials:
- Wood (preferably hardwood)
- Saw
- Sandpaper
- Wood glue
- Clamps
- Wood stain or paint
- Varnish or sealant
- Hinges
- Screws
- Screwdriver
Step-by-Step Instructions
- Cut the wood into the desired shape and size using a saw.
- Sand the edges and surfaces of the wood to ensure a smooth finish.
- Apply wood glue to the edges of the wood and clamp them together until the glue dries.
- Sand the entire box to ensure a smooth finish.
- Apply wood stain or paint to the box and let it dry.
- Apply a varnish or sealant to protect the wood.
- Attach the hinges to the lid of the box using screws and a screwdriver.
- Your men’s wood box is now complete and ready to be gifted!
By following these simple steps, you can create a one-of-a-kind men’s wood box that will be cherished for years to come. Show off your creativity and craftsmanship by making this special gift today.
DIY Bookends Using Wood
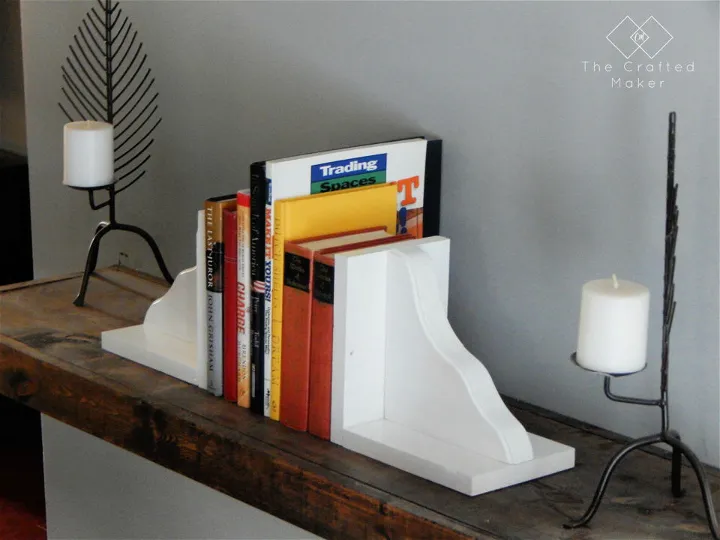
Add some personality to your bookshelf with DIY wooden bookends. You’ll need shelf brackets, a 1×6 board, and spray paint in your preferred color. This simple project will make your bookshelf both functional and visually appealing. Follow these steps to create your own bookends:
- Cut the 1×6 board to the desired length of your bookends.
- Sand the board until it’s smooth.
- Paint the board and shelf brackets with your chosen color.
- Attach the shelf brackets to the board using screws.
- Place the bookends on your shelf and arrange your books.
This project is an affordable and easy way to add a personal touch to your bookshelf. Plus, it’s a great way to showcase your DIY skills.
Summary
You have discovered some great DIY wood craft ideas that will inspire you to get creative. From simple projects like wooden coasters and picture frames to more advanced projects like a wooden bench or bookshelf, there is something for everyone. With the right tools and materials, you can easily create beautiful and functional pieces for your home or as gifts for friends and family. Don’t be afraid to experiment and try new techniques to make your projects unique and personalized.