Looking to add a little ambiance to your outdoor space? Look no further than the trusty tiki torch. This pole-mounted device uses a fuel source to hold a flame at one end, creating a warm and inviting atmosphere for nighttime entertaining. Whether placed on a table or along a pathway, tiki torches are a versatile addition to any outdoor area.
Not only do tiki torches add to the aesthetic of your space, but they can also be customized to fit your personal style without breaking the bank. From themed parties to casual sit-outs, tiki torches are a great way to create a cozy and inviting atmosphere for any occasion.
DIY Tiki Torch With Mason Jar
Looking to add a warm and inviting ambiance to your outdoor space? Look no further than this DIY Tiki torch with a Mason jar. The best part about this project is that it can be personalized to match your unique style and preferences. Follow the basic steps in this tutorial to create a custom pole stand for your torch, or get creative and find a way that fits in with your backyard decor. Once you make your own, you’ll be hooked – these Tiki torches look amazing when lined up along your yard, patio, or garden. Here’s what you’ll need to get started:
- Mason jar
- Tiki torch wick
- Tiki torch fuel
- Metal coupling
- Metal pipe
- Screws
- Drill
- Pliers
Simply follow the steps outlined below to create your own DIY Tiki torch:
- Drill a hole in the center of the metal coupling.
- Attach the metal coupling to the metal pipe using screws.
- Insert the Tiki torch wick into the coupling.
- Fill the Mason jar with Tiki torch fuel.
- Screw the Mason jar onto the metal coupling.
- Use pliers to adjust the height of the Tiki torch wick.
With just a few simple steps, you can create a beautiful and functional Tiki torch that will add a touch of warmth and charm to your outdoor space. So why not give it a try today?
DIY Copper Tiki Torch
Looking for a simple and modern design for your DIY copper Tiki torches? Look no further! These torches are much easier to assemble than traditional bamboo torches, and don’t require any soldering. Plus, they can be fastened on fast-setting concrete, simplifying the process even more. With step-by-step instructions and a video tutorial, these torches are perfect for beginners and experienced metalworkers alike. Whether you’re spicing up your outdoor BBQ or just want to add some ambiance to your backyard, these DIY copper Tiki torches are sure to impress.
Tiki Torch Bottle

Looking for an easy and inexpensive way to light up your camping trips? Look no further than the DIY Tiki Torch Bottle. This lightweight and easy to assemble torch is perfect for impromptu picnics or camp nights. Plus, it’s a great way to keep critters away in bear country.
To make your own Tiki Torch Bottle, simply grab a beer or wine bottle and fill it with kerosene. Add a few bits of steel wool to the top of the bottle and light it up. The wool will burn for a few seconds, and then you’re all set with a warm and inviting flame.
While it’s not as convenient as a kerosene lantern with built-in fuel, the DIY glass bottle Tiki torch is a great last resort option that’s easy to make and won’t break the bank. So why not give it a try on your next camping trip?
DIY Tabletop Tiki Torch
Impress your friends with your creativity by making your very own DIY tabletop Tiki torch. With just a jar and a few everyday materials, you can create the ultimate Tiki table set-up in your home in just three simple steps. For best results, consider using Dollar Tree’s Extra Fine Blend wood pellets, which are the most popular blend for making Tiki torches.
Here’s what you’ll need:
- A jar
- Tiki wick
- Tiki torch fuel
- Decorative rocks or sand (optional)
- Extra Fine Blend wood pellets (optional)
Instructions:
- Fill your jar with Tiki torch fuel.
- Insert the Tiki wick into the jar, making sure it is securely in place.
- If desired, add some decorative rocks or sand to the bottom of the jar for added flair.
With these simple steps, you can create a beautiful and functional DIY tabletop Tiki torch that will add a touch of tropical ambiance to any outdoor gathering.
Uses of DIY Tiki Torches
DIY tiki torches are versatile and can be used in many ways. They are perfect for decorating your wall, deck, or yard, and can be used for special occasions. DIY tiki torches are the perfect mood setters for outdoor parties and get-togethers. They are affordable and convenient because you don’t have to spend money on hiring people to set up lighting. You can easily make your own using sticks and oil bottles. DIY tiki torches are effective, safe, and decorative. They can be used for a variety of things, including reducing your cooling bill. Tiki torches are easy to make and are an economical way to add some fun to your outdoor parties.
DIY Tiki Torch
Looking for a fun and easy way to add some unique flair to your backyard setup? Why not try making your own DIY Tiki Torch? With a few simple materials, you can create a customizable torch that fits your personal style. Here are some ideas to get you started:
- Choose a color scheme that fits your desired aesthetic, whether it’s nautical blues or bold tropical colors
- Use materials like bamboo or copper piping to create the base of the torch
- Customize the top of the torch with seashells, beads, or other decorative elements
- Fill the torch with citronella oil to keep pesky bugs away during outdoor gatherings
Whether you’re a seasoned DIY pro or just looking for a fun weekend project, creating your own Tiki Torch is a great way to add some personality to your outdoor space. So grab your materials and get creative!
DIY Mason Jar Tiki Torch

If you want to add a little bit of ambiance to your outdoor space, then a DIY Mason Jar Tiki Torch is a great way to do it. Not only is it easy to make, but it’s also very affordable. Here’s what you’ll need:
- Mason jar
- Citronella oil
- Wick
Instructions:
- Fill the Mason jar with citronella oil.
- Insert the wick into the oil, making sure that it is fully submerged.
- Light the wick and enjoy your new DIY Mason Jar Tiki Torch!
These torches are perfect for those who have the space to set them up because there is no need for a table for them to lean on. Just stick them into the ground and light them up! Mason jars are perfect for this project and can be picked up at a low price from your local department store. Your tiki torches can look as cute or rugged as you wish – there are no rules! With just a few simple steps, you can create a beautiful and functional addition to your outdoor space.
DIY Tabletop Tiki Torch
Create your own DIY tabletop tiki torch in just a few minutes with these easy steps. You’ll need a copper cap, coupling, pipe, chain, split ring, and a steel washer that can be attached to a propane tank. Follow these instructions to make a homemade tiki torch that can be placed on any tabletop or shelf.
Materials:
- Copper cap
- Coupling
- Pipe
- Chain
- Split ring
- Steel washer
Instructions:
- Screw the coupling onto the copper cap.
- Insert the pipe into the coupling.
- Attach the split ring to the chain and wrap it around the pipe.
- Place the steel washer onto the propane tank and attach the chain to it.
- Fill the copper cap with tiki torch oil and light the wick.
Enjoy your new DIY tabletop tiki torch in any outdoor setting!
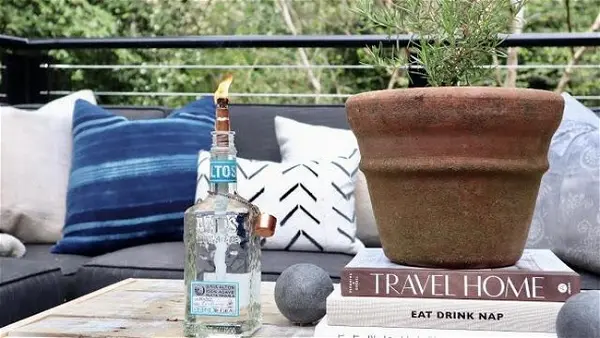
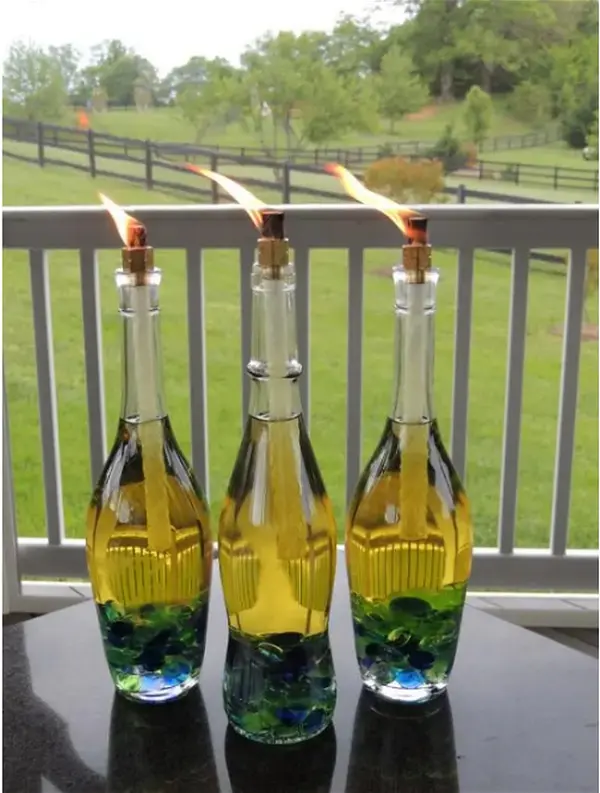
DIY Wine Bottle Tiki Torch
If you’re looking for a quick and easy project to add some ambiance to your outdoor space, the DIY Wine Bottle Tiki Torch is a perfect choice. Not only is it a great way to repurpose your leftover wine bottles, but it also keeps the bugs away with the citronella in the torch oil.
Here’s how to make your own Wine Bottle Tiki Torch:
- Gather your materials: a wine bottle, tiki torch wick, tiki torch fluid, and a coupling fitting.
- Insert the tiki torch wick into the coupling fitting, leaving about 1/4 inch of the wick exposed.
- Fill the wine bottle with tiki torch fluid, leaving about an inch of space at the top.
- Screw the coupling fitting with the wick onto the top of the wine bottle.
- Light the wick and enjoy the beautiful amber glow of your new Wine Bottle Tiki Torch.
Bonus tip: If you want to add some color to your torch, use glass paint to paint the wine bottle before assembling it.
With this simple DIY project, you can add some personality to your outdoor space while keeping the bugs at bay. So gather your materials and get started on your own Wine Bottle Tiki Torch today!
DIY Wine Bottle Tiki Torch

Entertaining outdoors can be a challenge when the sun goes down, but with this DIY Wine Bottle Tiki Torch, you can keep the party going all night long. This easy-to-make torch is not only functional but also stylish, adding a touch of elegance to any outdoor gathering. To make your own, all you need is an empty wine bottle, a wick, and some citronella oil. Simply fill the bottle with the oil, insert the wick, and light it up. You can also use other oils if you prefer a different scent. For an added decorative touch, consider wrapping the bottle in stylish paper.
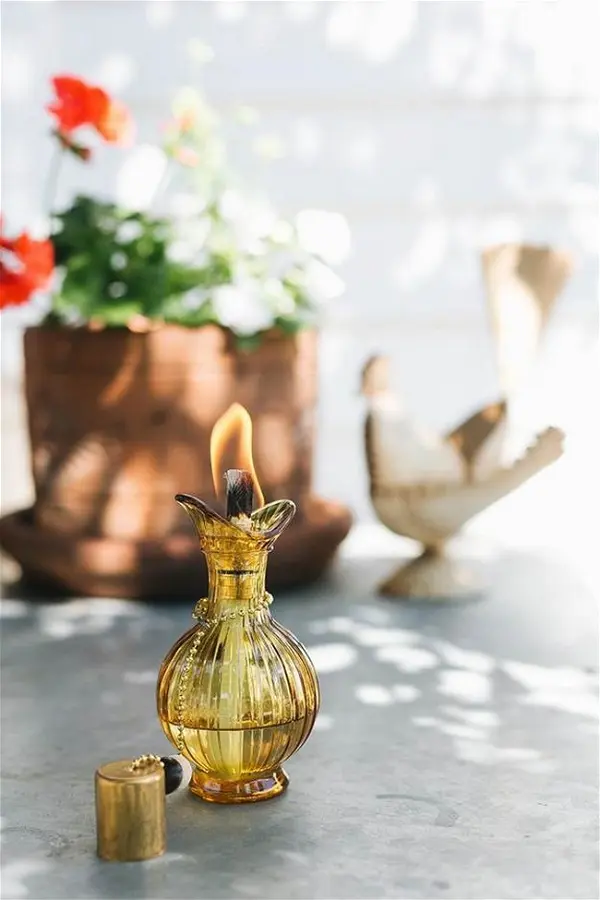
Glass Bottle Tiki Torch
The Wildcraft DIY Glass Bottle Tiki Torch is an eco-friendly and cost-effective alternative to traditional torches. This torch eliminates the need for batteries, canisters, and creates zero waste. By using a 12 oz beer bottle and a stick, you can create a glowing amber light that will add a magical touch to any evening. The torch is versatile and can be used on your front porch or deep in the woods. If the glass bottle breaks, you can easily replace it with another bottle or leave it as an offering to the spirits. This torch is a perfect addition to any outdoor gathering and is sure to impress your guests.
For more details on how to create your own Glass Bottle Tiki Torch, click the link provided.
Tiki Torches
Keep those pesky mosquitoes away with DIY Tiki Torches! By using a few supplies from the hardware store and a few minutes of your time, you can create torches that will light up your yard or patio and also provide beautiful decorations. These torches are perfect for summer evenings, as they emit a wonderful aroma of citronella, which mosquitos hate. By using these torches, you and your guests can enjoy bug-free evenings. Plus, the warmth of the flame adds to the ambiance. Get creative and make these outdoor torches that are sure to be a conversation starter.
Industrial Style Tiki Torch

Looking for a stylish Tiki torch to light up your outdoor space? Look no further than the industrial-style Tiki torch. This DIY torch is made from fence poles and a steel light bulb cage, giving it a unique and eye-catching look. With a little construction skill and some basic materials, you can easily make this torch yourself and add a touch of personality to your backyard get-togethers. Whether you’re hosting a party or just enjoying a quiet evening outside, this industrial-style Tiki torch is the perfect addition to any outdoor space.
Glass Bottle Tiki Torch
Elevate your outdoor entertaining game with the Glass Bottle Tiki Torch. This unique piece adds a cozy and whimsical feel to your outdoor area with minimal effort. All you need to do is add a wine bottle and lamp oil (sold separately) to create a warm and inviting atmosphere.
Not only is this a great conversation starter, but it also helps keep pesky bugs away. The sleek design of the wick holder allows it to fit into the neck of most standard wine bottles, making it easy to repurpose your favorite empty bottle.
Add some extra class to your patio decor with this stylish and functional piece. It’s perfect for those warm summer nights when you want to enjoy the outdoors without being bothered by insects. Keep your space stylish and warm this season with the Glass Bottle Tiki Torch.
DIY Skull Tiki Torch

Looking for a spooky and unique way to decorate your outdoor space for Halloween? Look no further than these DIY Skull Tiki Torches! With just a few supplies, you can create a truly spooktacular display that will impress all of your guests. Here’s what you’ll need:
- A plastic skull
- Citronella Tiki torch
- Optional: black spray paint
To create your Skull Tiki Torch, simply remove the top of the Tiki torch and insert it into the eye socket of the skull. If desired, you can spray paint the skull black for an even more eerie effect. Once assembled, light the Tiki torch and enjoy your new spooky decoration! These DIY Skull Tiki Torches are a quick and easy project that will make a big impact on your Halloween display.
Mosquito Repellent Tiki Torch
You can easily make a mosquito repellent Tiki torch with just a few household items. To start, drill a small hole in the center of an old bottle cap so that the wick can stick out. Then, fill an empty wine bottle with regular cellophane lamp oil and insert the wick. Next, wrap rope around the neck of the bottle and tie it in a knot to secure the wick in place. Now, light the wick and enjoy your mosquito-free outdoor space. These versatile torches can be placed around your yard to keep the critters at bay.
Importance of DIY Tiki Torches
Good lighting and ambiance are crucial for any party, and DIY Tiki torches are an inexpensive and easy way to achieve both. Not only are they not flammable, but they can also be made from things that most people already have lying around, making them a unique and fun way to bring a rustic touch to your next backyard party.
Tiki torches are not just for the beach; they can be used to add more life to the decor of your home’s exterior, spice up your backyard, and attract more attention than normal tiki torches. With DIY Tiki torches, you can get creative with your lighting and add more comfort and warmth for you and your friends.
Consider finding some nice ways to use DIY Tiki torches in your garden, sunroom, or patio. They are a great way to add a touch of ambiance and create a cozy atmosphere for any occasion.
Homemade Tiki Torch Out of Can
Transform your backyard into a tropical paradise with a DIY Tiki torch made entirely from recycled materials. This super quick and easy project requires an empty can, some fabric or a wick, Tiki fuel, and a few basic crafting tools. Follow these simple steps to create your own Tiki torch:
- Clean and dry an empty can.
- Use a hammer and nail to create holes in the can near the top edge.
- Cut a piece of fabric or wick to fit inside the can and extend out of the holes.
- Fill the can with Tiki fuel.
- Insert the fabric or wick into the can and let it soak up the fuel.
- Light the fabric or wick and enjoy the warm glow of your homemade Tiki torch.
This fun and simple activity is perfect for the entire family and will have your summer barbecue guests impressed with the atmosphere you’ve created. Plus, you’ll be doing your part for the environment by using recycled materials. Get creative and make a few of these Tiki torches to light up your garden or yard.
Easy DIY Tiki Torch

Looking for an affordable way to add some ambiance to your backyard? Look no further than these DIY Tiki torches! Not only are they stylish and fun, but they also serve the practical purpose of deterring bugs during outdoor gatherings.
To create your own Tiki torch, all you need is a few simple materials, including a glass jar, tiki torch fuel, a wick, and some decorative elements like shells or beads. Simply fill the jar with the fuel, insert the wick, and add your decorative elements as desired.
Once your Tiki torch is complete, place it around your backyard or pool area for a festive touch. You can even take your outdoor table setting to the next level by incorporating these easy DIY Tiki torches into your decor.
Overall, these DIY Tiki torches are a simple and affordable way to add some fun and functionality to your outdoor gatherings.
Candlestick Tiki Torch
If you’re looking to add some charm to your next outdoor dinner party, Candlestick Tiki Torches are the perfect addition to your tabletop. These torches are easy to build with everyday materials and can be completed quickly. They’re the perfect size for a regular dining table and won’t fall over with the slightest breeze. With this step-by-step DIY tutorial, you’ll learn how to make candlestick-shaped Tiki torches that sit flat and add the ambiance you crave.
To make Candlestick Tiki Torches, you’ll need the following materials:
- Candlesticks
- Copper caps
- Copper coupling
- Copper tubing
- Tiki fuel
- Matches or a lighter
Follow these steps to make your own Candlestick Tiki Torches:
- Attach the copper caps to the top of the candlesticks.
- Cut the copper tubing to the desired length, making sure it’s long enough to reach the bottom of the candlestick.
- Insert the copper tubing into the copper coupling.
- Fill the candlestick with Tiki fuel.
- Insert the copper tubing into the Tiki fuel.
- Light the Tiki fuel with matches or a lighter.
Now you have your own Candlestick Tiki Torches that are perfect for outdoor dining. Enjoy the ambiance they bring to your next dinner party!
DIY Copper Tabletop Tiki Torch
Looking for a stylish and durable tabletop torch? Look no further than a DIY copper tabletop Tiki torch! These torches are easy to make, and offer endless possibilities in design. Plus, they’re super affordable to make – you may even have all the materials you need at home. Here’s what you’ll need to make your own:
- Copper pipe
- Tiki torch fuel
- Tiki torch wick
- A drill
- A hammer
- A pair of pliers
Simply drill a hole in the copper pipe, insert the Tiki torch wick, and fill the pipe with Tiki torch fuel. Then, use pliers to bend the pipe into the desired shape and hammer the end shut. Voila – a sleek and sturdy tabletop torch that will last for years to come!
DIY Oberon Tiki Torch
Transform your outdoor space with this unique and budget-friendly DIY project. With the Oberon Tiki torch as your guide, you can easily create your own Tiki torches using your favorite beer or soda bottles. Not only will this add style and relaxation to your space, but it’s also an eco-friendly way to upcycle your bottles and keep them out of the landfill.
To create your own Tiki torches, follow these simple steps using the materials and tools provided with the Oberon Tiki torch:
- Remove the wick from the Oberon Tiki torch and set it aside.
- Clean your bottle thoroughly and remove any labels or stickers.
- Insert the wick into the bottle and fill it with Tiki torch fuel.
- Screw the top of the Oberon Tiki torch onto the bottle.
- Light the wick and enjoy your new Tiki torch!
With this DIY project, you can customize your torches to fit your personal style and taste. Whether you prefer a sleek and modern look or a rustic and vintage feel, the possibilities are endless. Plus, your friends and family will be impressed with your creativity and resourcefulness.
Tiki Torch Tree

If you’re looking to add a touch of the tropics to your backyard, a DIY Copper Tiki Torch Tree is an affordable and simple way to do so. This project involves a bit more effort than other DIY projects, but the results are well worth it. With just a few materials and techniques, you can create a functional and eye-catching addition to your outdoor space. The tiki torches provide a warm and inviting atmosphere perfect for entertaining or relaxing around a campfire. Not only is this project functional, but it can also brighten up your home all year long. Don’t miss out on this tutorial and create your own Tiki Torch Tree today!
Summary
Looking for some creative DIY tiki torch ideas? Look no further! With just a few simple materials, you can create your own unique and stylish tiki torches to add ambiance to your outdoor space. From repurposing old wine bottles to using bamboo sticks, the possibilities are endless. Get inspired and start creating your own personalized tiki torches today!