Looking to smoke your own meats but don’t want to spend a fortune on a top-end smoker? Consider DIY-ing one yourself! We’ve compiled a list of the top 21 plans for DIY smokers that you can build at home, including options like a flowerpot grill and smoker, a cardboard smoker, and even a $5 DIY smoker. With a huge variety of models to choose from, you’re sure to find one that fits your needs and budget.
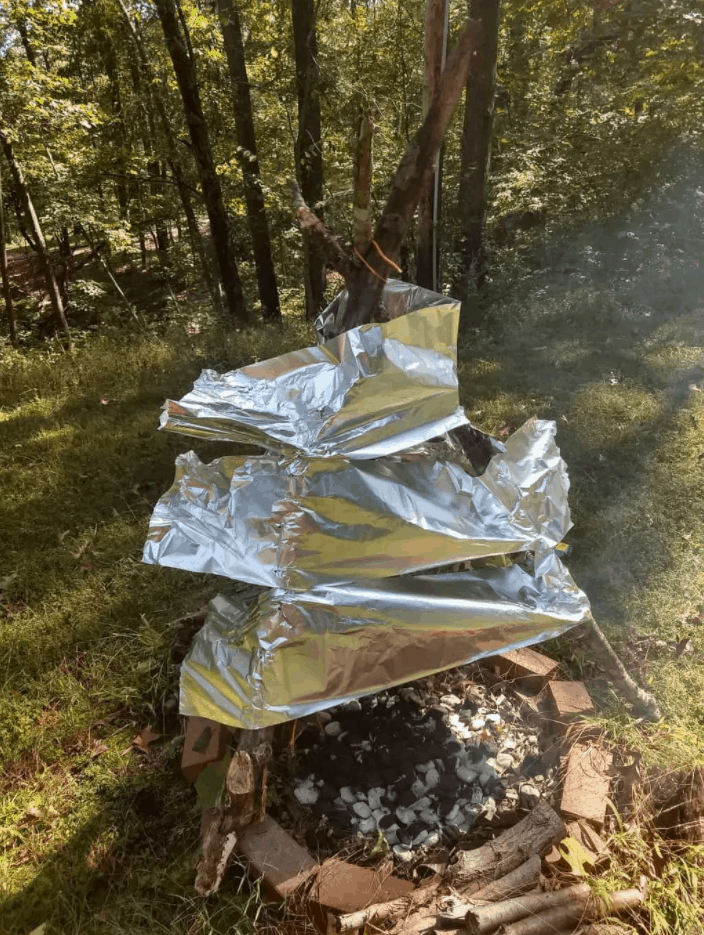
How to Make a Cardboard Smoker
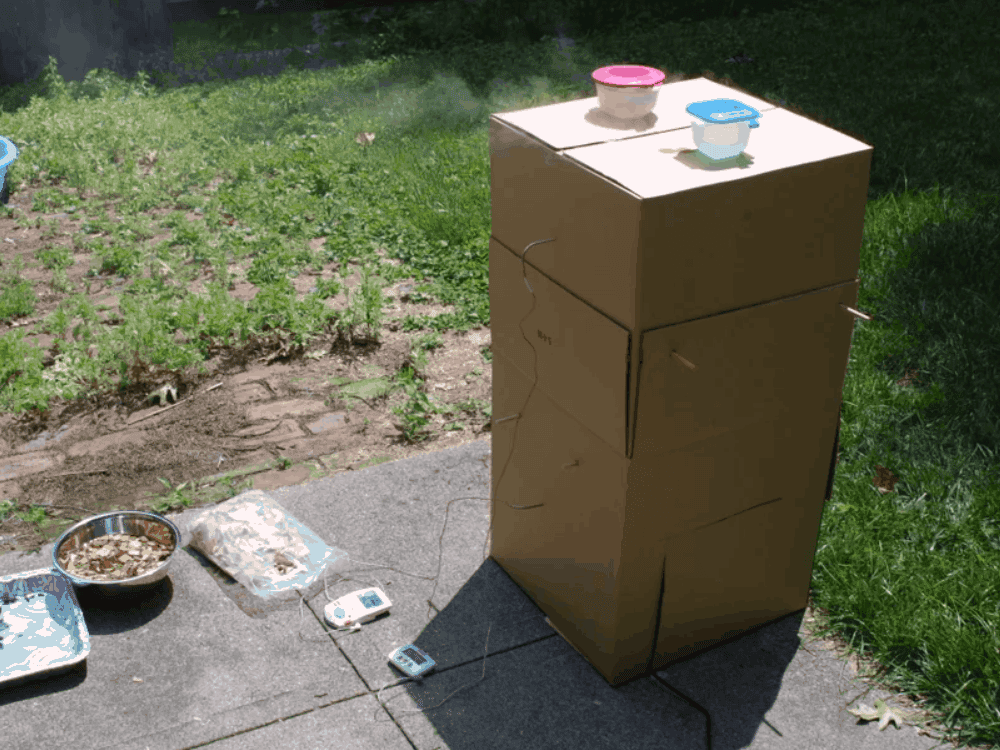
Making a smoker from a cardboard box is a cheap and easy option for smoking food in your yard. Here are the steps to follow:
- Cut off the top flaps of the cardboard box and tape up any holes or gaps.
- Cut a square hole in the side of the box, near the bottom, for the air intake.
- Cut another square hole in the opposite side of the box, near the top, for the exhaust.
- Line the inside of the box with aluminum foil to reflect heat and prevent the cardboard from burning.
- Add a metal tray filled with wood chips to the bottom of the box, and place a wire rack on top of the box.
- Place your food on the wire rack and close the box.
- Place the box on a heat-resistant surface and light the wood chips.
- Adjust the air intake and exhaust holes to control the temperature and smoke.
This smoker may not be as durable as a metal one, but it’s a great option for those on a tight budget. Give it a try and enjoy delicious smoked food in your own backyard!
How to Make a Homemade Smoker for Less Than $20
If you’re on a tight budget but still want to enjoy delicious smoked meats at home, building a DIY smoker can be a great option. Chef Maddog Maggert has shared plans for a smoker that can be constructed for only $20. Here’s what you’ll need to make it:
- A large tin can with a removable lid
- A smaller tin can that fits inside the larger one
- A wire rack that fits inside the larger can
- Wood chips for smoking
To assemble the smoker, simply cut a hole in the bottom of the large can and place the smaller can inside. Fill the smaller can with wood chips and place the wire rack on top. Then, place your meat on the rack and cover the smoker with the lid. You can use this smoker on a stovetop or outdoor grill. Give it a try and enjoy the delicious, smoky flavor of your homemade meats!
DIY Smoker on a Budget
Looking for a way to smoke your meats without breaking the bank? Look no further than this DIY smoker on a budget. While it may not be as fancy as some smokers on the market, it will get the job done and allow you to achieve decent results. Here are the steps to follow:
- Get a large pot with a lid and drill holes in the lid for ventilation.
- Place a metal rack in the bottom of the pot and fill it with wood chips.
- Place your meat on a wire rack and put it on top of the pot.
- Use a sous vide machine to set the temperature and cook your meat to perfection.
With a little bit of effort and ingenuity, you can have your own smoker without spending a fortune. Give it a try and see how it turns out!
DIY Woodstove Meat Smoker
Looking for a way to smoke your meat without spending a lot of money? This DIY woodstove meat smoker is just what you need. With this highly useful unit, you can smoke your meat both hot and cold. The video tutorial provides step-by-step instructions to help you recreate your own smoker. Get inspired and try it yourself!
Build a 55-Gallon Drum Meat Smoker
Looking to make a large smoker without building a whole smoke room? Check out this YouTuber’s plan for a 55-gallon drum smoker. The process is relatively simple and after watching, most people should be able to produce something similar. Here are the materials you’ll need:
- 55-gallon drum
- Charcoal basket
- Cooking grate
- Thermometer
- Air vent
- High-heat paint
Follow these steps to build your smoker:
- Clean and prepare the drum.
- Cut out the door and air vent.
- Build the charcoal basket.
- Install the cooking grate and thermometer.
- Paint the drum with high-heat paint.
With these steps, you’ll have your own 55-gallon drum smoker in no time.
Homemade Smoker
If you’re looking for a more permanent and reliable smoker, building your own is a great option. With the right materials and tools, you can create a solid smoker that will last for years and produce delicious food. Check out this YouTuber’s video for inspiration and guidance on building your own smoker. With some DIY skills and patience, you too can have a high-quality smoker that will impress your friends and family.
How to Make a DIY Smoker for Your Next Neighborhood Cookout
If you’re looking to add some smoky flavor to your next cookout, consider making your own DIY smoker. Here are some steps to get you started:
- Choose a container: You can use anything from a metal trash can to a clay pot to a filing cabinet. Just make sure it’s sturdy and can handle the heat.
- Create a firebox: You’ll need a separate space to build your fire. This can be a metal box or even a small grill.
- Add vents: You’ll need to add vents to both the container and the firebox to regulate the temperature and smoke flow.
- Install a thermometer: You’ll want to keep an eye on the temperature inside the smoker to make sure your meat is cooking properly.
- Add wood chips: You can use a variety of wood chips to give your meat different flavors. Just make sure to soak them in water first so they don’t catch fire.
- Smoke your meat: Once your smoker is set up, add your meat and let it smoke for several hours until it’s cooked to perfection.
With a little bit of effort, you can create your own DIY smoker and impress your neighbors with your delicious smoked meats.
How to Build a Smokehouse
Building a smokehouse is a large and challenging project, but it can be very rewarding. Here are the basic steps to follow:
- Choose a location for your smokehouse that is away from any flammable materials and has good ventilation.
- Decide on the size and shape of your smokehouse. The most common shape is a rectangular box.
- Build the frame of your smokehouse using pressure-treated lumber.
- Cover the frame with plywood or other suitable material.
- Install a door and vents to control the airflow.
- Install shelves for the food you will be smoking.
- Install a heat source, such as a propane burner or electric heating element.
- Install a smoke generator, such as a wood chip tray or sawdust burner.
- Test your smokehouse to make sure it is working properly before using it to smoke food.
With these steps, you can build your own smokehouse and enjoy delicious smoked food in your backyard.
How to Build a DIY Smoker
Building your own smoker can be a fun and rewarding project, and it allows you to customize the smoker to your specific needs and preferences. Here are some steps to follow when building a DIY smoker:
- Choose your smoker type: There are several types of smokers you can build, including drum smokers, offset smokers, and box smokers. Choose the type that best suits your needs and budget.
- Gather materials: You will need materials such as metal drums, grates, thermometers, and vents. Make sure to gather all necessary materials before starting the project.
- Prepare the smoker: Cut the drum in half and remove any unwanted parts. Install the grates and thermometer, and drill holes for the vents.
- Build the firebox: The firebox is where the wood or charcoal will be burned to create smoke. Build a separate box and attach it to the smoker.
- Test your smoker: Before using your smoker, test it to make sure it is working properly. Start a fire in the firebox and monitor the temperature inside the smoker.
By following these steps, you can build a DIY smoker that is perfect for your needs and preferences.
Build Your Own $50 Kamado Smoker
Looking for a simple and inexpensive way to create a smoker that can match the performance of a Kamado model? Check out this YouTuber’s tutorial on building a smoker for less than $50 – with no tools required! By following the steps outlined in the video, you can build your own DIY smoker that is perfect for outdoor cooking and entertaining. With a little bit of creativity and some basic materials, you can enjoy delicious smoked meats and vegetables without breaking the bank.
How to Build Your Own Backyard Smoker
Building your own backyard smoker can be a challenging but rewarding project. This plan requires some cutting and welding, but the end result is a durable smoker that will last for years. Here are the steps to build your own backyard smoker:
- Gather materials: You will need metal sheets, a metal pipe, a metal grate, a thermometer, and welding equipment.
- Cut and shape the metal sheets to form the smoker body and lid. Weld them together to create a sealed unit.
- Cut a hole in the smoker body and attach the metal pipe to serve as the chimney.
- Weld the metal grate in place to hold the food.
- Attach a thermometer to the lid to monitor the temperature.
- Paint the smoker with heat-resistant paint to protect it from the elements.
- Season the smoker by heating it up with wood chips to remove any impurities.
With these steps, you can build your own backyard smoker and enjoy delicious smoked meats and vegetables for years to come.
A Beginner’s Guide to Building a DIY Smoker

Building your own smoker is a rewarding and cost-effective way to enjoy delicious smoked meats. To get started, you’ll need to gather materials and tools, such as a metal drum, a drill, and a saw. Follow these steps to build your own smoker:
- Prepare the drum by cleaning it thoroughly and cutting a hole in the lid for the chimney.
- Build a fire basket out of expanded metal and attach it to the bottom of the drum.
- Install a thermometer and attach the chimney to the lid.
- Add cooking grates and a drip pan to the inside of the drum.
- Season the smoker by burning a small fire for several hours before cooking your first batch of meat.
With a little effort and some basic tools, you can create a smoker that produces mouth-watering results. Check out our tutorial for more detailed instructions and tips on how to get the most out of your DIY smoker.
Build Your Own Filing Cabinet Smoker for $35!
https://youtu.be/V6JiiwDlErM
Looking for a unique and budget-friendly smoker option? Why not build your own filing cabinet smoker! This creative option is a great way to repurpose an old filing cabinet and create a functional smoker for under $35. With a few modifications, you can turn a standard metal filing cabinet into a smoker that produces delicious, smoky flavors. Plus, the sturdy construction of the cabinet ensures that your smoker will last for years to come. Follow these simple steps to create your own filing cabinet smoker:
- Remove all drawers and hardware from the filing cabinet
- Cut a hole in the top of the cabinet for the chimney
- Install a grate in the bottom of the cabinet for the charcoal
- Add a thermometer to monitor the temperature
- Seal any gaps with high-temperature silicone
- Enjoy delicious smoked meats and veggies from your DIY smoker!
With a little creativity and some basic tools, you can build a filing cabinet smoker that rivals even the most expensive models on the market. Give it a try and impress your friends and family with your DIY skills!
How to Build Your Own Smoker for $5
If you’re looking for a budget-friendly way to build a DIY smoker, this tutorial is for you. While this model may not produce the best results, it is the least expensive option available. Here’s what you’ll need to get started:
- A large metal can with a lid
- A smaller metal can that fits inside the larger can
- Charcoal
- A wire rack
- A thermometer
Instructions:
- Cut the bottom off the larger can and poke several holes in the sides near the bottom.
- Fill the bottom of the larger can with charcoal and light it.
- Place the wire rack on top of the charcoal.
- Put the smaller can on top of the wire rack. This will be where you place your food.
- Put the lid on the larger can and insert the thermometer through one of the holes in the lid.
- Monitor the temperature and adjust the amount of charcoal as needed.
With just a few simple steps and minimal cost, you can have your very own DIY smoker.
DIY Flowerpot Grill and Smoker
Looking for an easy and affordable way to create a smoker for your next outdoor gathering? Check out this YouTube video that guides you through the process of using a large flowerpot to make a smoker. With just a few simple steps, you can create a smoker that will cook up the most delicious food for your friends and family. This DIY flowerpot smoker is a simple yet effective idea that you can easily replicate at home. Give it a try and impress your guests with your homemade smoker!
Here are some key takeaways from the video:
- A large flowerpot can be used as the base for the smoker.
- You will need to drill holes in the flowerpot to allow for ventilation.
- A hot plate or electric burner can be used as the heat source.
- Wood chips can be added to create smoke for flavor.
- The smoker can be used to cook a variety of meats and vegetables.
Overall, this DIY flowerpot smoker is a great option for those who want to try their hand at smoking food without breaking the bank. With a little creativity and some basic supplies, you can create a smoker that will produce delicious results every time.
How to Turn Your Ordinary Grill into a DIY Barbecue Smoker

If you already have a regular grill, you can easily convert it into a DIY barbecue smoker. Here are the basic steps you can follow:
- Prepare your grill by removing the grates and cleaning it thoroughly.
- Cut a hole in the side of the grill for the smoke to escape. You can use a jigsaw or a drill with a hole saw attachment.
- Install a vent on the top of the lid to control the temperature and smoke flow.
- Place a metal pan filled with water on the bottom of the grill to help regulate the temperature and keep the meat moist.
- Add wood chips or chunks to the fire to create smoke.
- Place the meat on the grill grates and close the lid.
With these simple steps, you can turn your ordinary grill into a DIY barbecue smoker and enjoy delicious smoked meats at home.
Build Your Own Smokehouse for Less Than $100
Looking to build a smokehouse on a tight budget? With just a few pieces of scrap wood and some other common materials, you can easily construct your own smokehouse for under $100.
Here are some tips to get you started:
- Begin by selecting a location for your smokehouse. Choose a spot that is away from any flammable materials and has good ventilation.
- Gather your materials, including scrap wood, metal roofing sheets, and wire mesh.
- Build the frame of your smokehouse using the scrap wood. Make sure to leave enough space for your smoking rack.
- Attach the metal roofing sheets to the top of the frame to create a roof.
- Line the inside of the smokehouse with wire mesh to keep out insects and other pests.
- Install a smoking rack inside the smokehouse and add hooks for hanging meat.
- Finally, add a door to the front of the smokehouse to keep the smoke inside.
With just a few simple steps, you can easily build your own smokehouse for less than $100. Enjoy delicious smoked meats and fish all year round!
How to Make an Offset Smoker
Making an offset smoker is a great DIY project for those who love to barbecue. With salvaged materials, you can create a smoker that rivals a $2000 bought version. Here are the steps to make your own offset smoker:
- Find a barrel or drum that is at least 55 gallons in size.
- Cut the barrel in half lengthwise to create two halves.
- Weld or attach a hinge to one side of the barrel to create a door.
- Cut a hole in the opposite side of the door for ventilation.
- Weld or attach a shelf inside the barrel for the charcoal and wood.
- Weld or attach a pipe to the top of the barrel for the smoke to escape.
- Weld or attach a pipe to the bottom of the barrel for the ashes to fall into.
- Weld or attach legs to the bottom of the barrel to create a stable base.
- Season the smoker by coating the inside with cooking oil and heating it up.
With these steps, you can create an offset smoker that is both affordable and effective. Happy barbecuing!
How to Turn Your Grill into a Smoker

If you’re looking to turn your grill into a smoker, there are a few steps you can take to make it happen. Follow these tips to get started:
- Remove the grates and place a metal pan filled with water on top of the burners. This will help regulate the temperature and keep the meat moist.
- Add wood chips to the grill. Soak them in water for at least 30 minutes before placing them on the grill.
- Place the meat on the grill grates, away from the direct heat source. Close the lid and adjust the temperature to maintain a consistent temperature.
- Check the meat periodically and add more wood chips as needed.
By following these steps, you can easily turn your grill into a smoker and enjoy delicious, smoky meats at home.
Upgrade Your Barbecue and Smoker with Jeff’s DIY Smoker and Grill Station

Upgrade your existing barbecue and smoker with some simple accessories from Walmart to take your smoking up a notch or two, just like Jeff did. With Jeff’s DIY Smoker and Grill Station, you can easily add more functionality to your existing setup. This project involves adding a few accessories to your existing barbecue and smoker to create a more efficient and effective smoking and grilling station. Check out the tutorial to learn more.
Summary
To make a smoker, you will need to gather materials such as a metal drum, grill grates, and a thermometer. Cut out a door and ventilation holes, then attach the grill grates and thermometer. Build a fire pit and place the smoker on top, adding wood chips or chunks to produce smoke. Monitor the temperature and adjust as needed for perfect smoked meats.