Looking to add some extra charm to your home or garden? Building a DIY planter box is a great way to achieve both! With these 25 free planter box plans and ideas, even beginners can create beautiful and functional designs. From simple rectangular boxes to more complex curvy designs, you’ll find step-by-step instructions to guide you through the process. So why wait? Get ready to enjoy years of beauty and functionality from your very own handmade planter box!
With so many planter box plans out there, it can be overwhelming to know where to start. That’s why we’ve compiled a list of 25 easy DIY planter box ideas, suitable for every skill level. Whether you’re looking for a simple or more advanced project, we’ve got you covered. So grab your tools and let’s get started on creating your own unique planter box today!
How to Build Your Own Planter Box
Building your own planter box is an easy and inexpensive DIY project that can add a personal touch to your indoor or outdoor space. Here are the steps to build your own planter box:
Materials:
- 1×4 boards
- Wood glue
- Brad nails
- Wood stain
- Sealer
- Succulent plants (of your choice)
- Potting soil
Tools:
- Saw
- Tape measure
- Sanding block
- Brad nailer
- Drill & drill bit
Steps:
- Cut the 1×4 boards to the desired length and width of your planter box.
- Sand the boards to remove any rough edges or splinters.
- Apply wood glue to the edges of the boards and use the brad nailer to attach them together.
- Once the glue has dried, apply wood stain to the planter box and let it dry completely.
- Apply a sealer to protect the wood from moisture and weather damage.
- Fill the planter box with potting soil and plant your succulent plants.
You can also use your planter box as a table centerpiece or hang it from the ceiling and decorate it with flowers, herbs, or plants. With these simple steps and materials, you can easily create a beautiful planter box for your outdoor space.
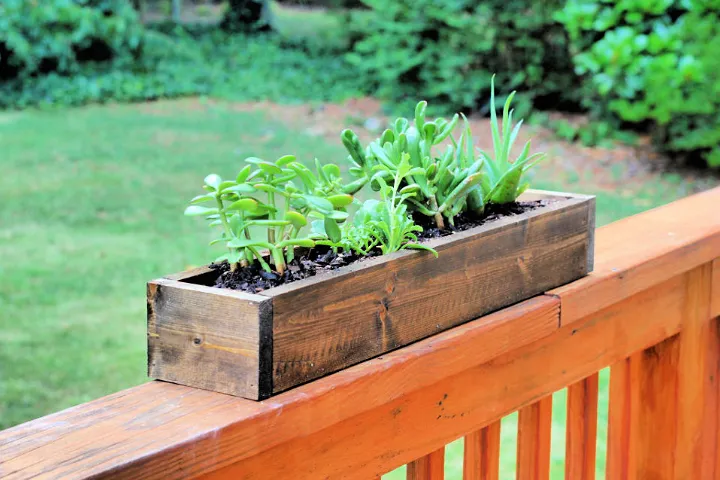
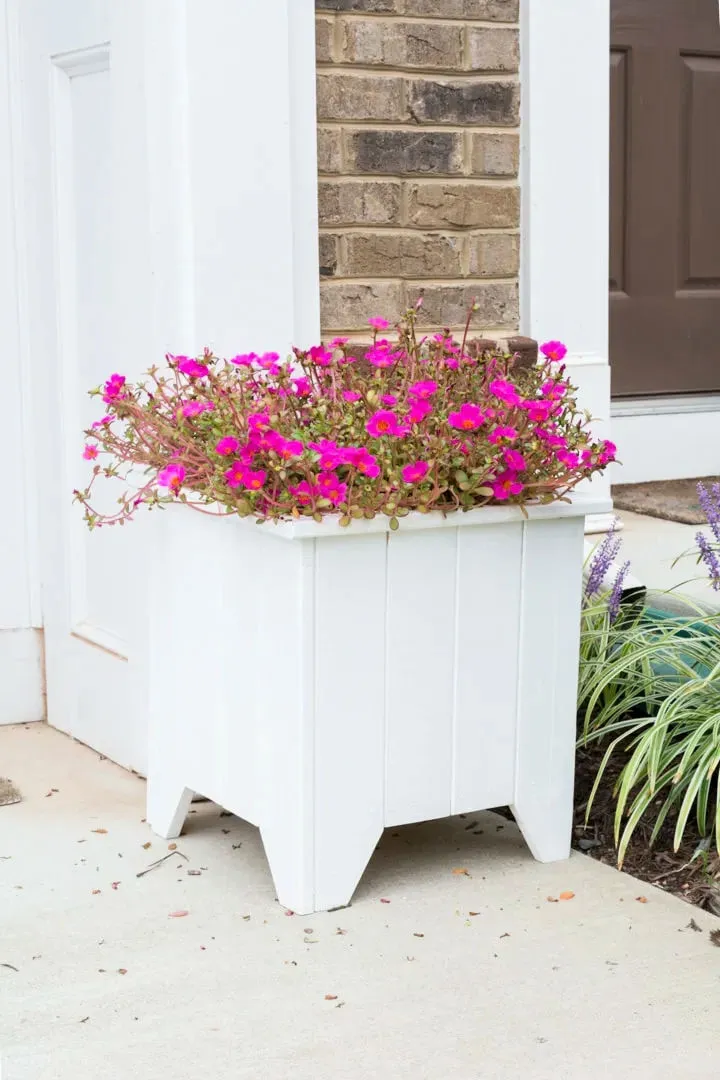
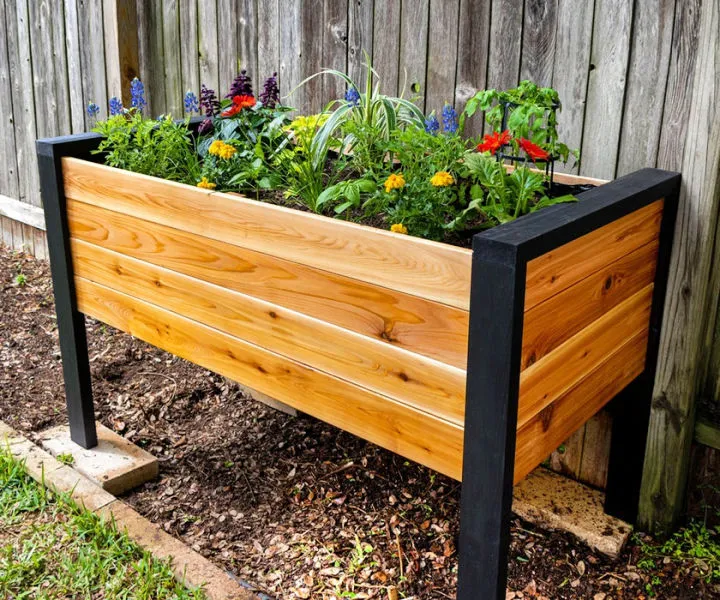
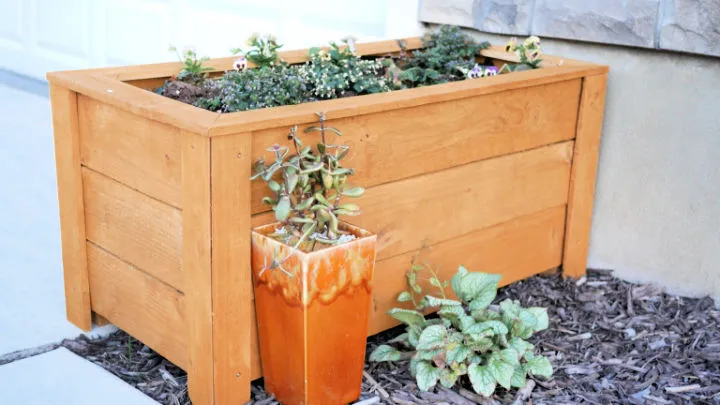
Free Cedar Wood Planter Box Plan

If you are a plant lover and looking for a durable and space-efficient planter box, this DIY cedar wood planter is a perfect project for you. With its perfect size and texture, this planter box is designed to add character and texture to your backyard.
To make this planter box, you will need some materials like cedar wood, wood screws, braces, stain, sealer, and bracket screws. Cedar wood is a durable wood that can withstand weather and has a rich texture that will last for years.
To build this planter box, you will need some tools like a miter saw, drill, screwdriver, and tape measure. This planter box is easy to maintain and can accommodate your plants perfectly. You can grow flowers or herbs in your home with this DIY planter.
Here are the materials and tools you will need to build this cedar wood planter box:
Materials:
- Cedar Wood
- Wood Screws
- Braces
- Stain
- Sealer
- Bracket Screws
Tools:
- Miter Saw
- Drill
- Screwdriver
- Tape Measure
Follow the step-by-step instructions carefully to build this planter box and enjoy growing plants in your backyard.
Making A Planter Box from Old Table

If you have an old table lying around and you’re not sure what to do with it, consider upcycling it into a planter box. This DIY project is a great way to save money and add a unique touch to your garden or backyard.
To get started, you’ll need an old picnic table, plywood, piano hinge, screws, and paint. You’ll also need a miter saw, drill, and screwdriver to complete the project.
First, stencil the old table with a design of your choice. Then, cut the table to the desired length and size to make a frame and legs for the planter box. Add a plywood base to the frame and attach a piano hinge to the top of the frame to protect your vegetation from curious birds.
Next, make legs for the planter box and fill it with soil. You can plant herbs or other plants in the soil and enjoy your new planter box.
This DIY project is a great way to repurpose an old table and add some greenery to your outdoor space. Plus, it’s a fun and easy project that you can do in a weekend.
Easy DIY Indoor Planter Box
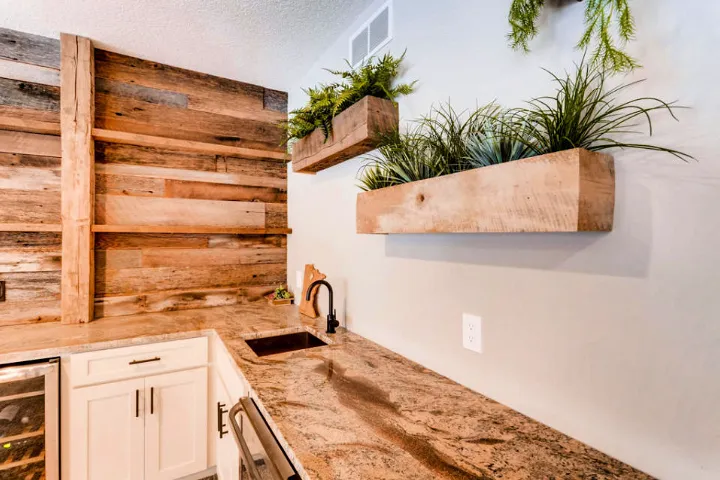
Creating an indoor planter box is an excellent way to add some greenery to your home without much effort and cost. This DIY planter box project is perfect for giving your home a reclaimed and modern look. You can easily create a planter box using reclaimed wood and a few other materials that you already have at home. This planter box is an excellent project for anyone who loves plants but doesn’t have the time or space for a full-fledged garden.
To create this planter box, you will need pine wood or reclaimed wood, paint, nails, staples, wood glue, a table saw, miter saw, painting supplies, tape measure, and clamps. The materials and tools needed for this project are easy to acquire and use. Once you have all the materials and tools, you can start building your planter box.
This planter box looks sleek and classy and can be used year-round. You can hang them from the wall or place them on the floor. It adds a rustic, reclaimed look to your space, and you can easily change it with new plants. This project is perfect for anyone who wants to add some greenery to their home without spending a lot of money or time.
| Materials | Tools |
|---|---|
| Pine Wood | Table Saw |
| Reclaimed Wood | Miter Saw |
| Paint | Painting Supplies |
| Nails | Tape Measure |
| Staples | Clamps |
| Wood Glue |
Overall, this DIY indoor planter box project is an excellent way to add some greenery to your home while giving it a modern and reclaimed look. It is easy to create and can be used year-round.
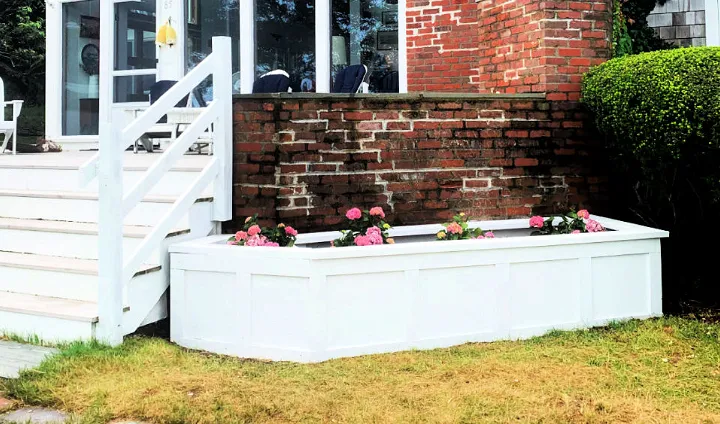
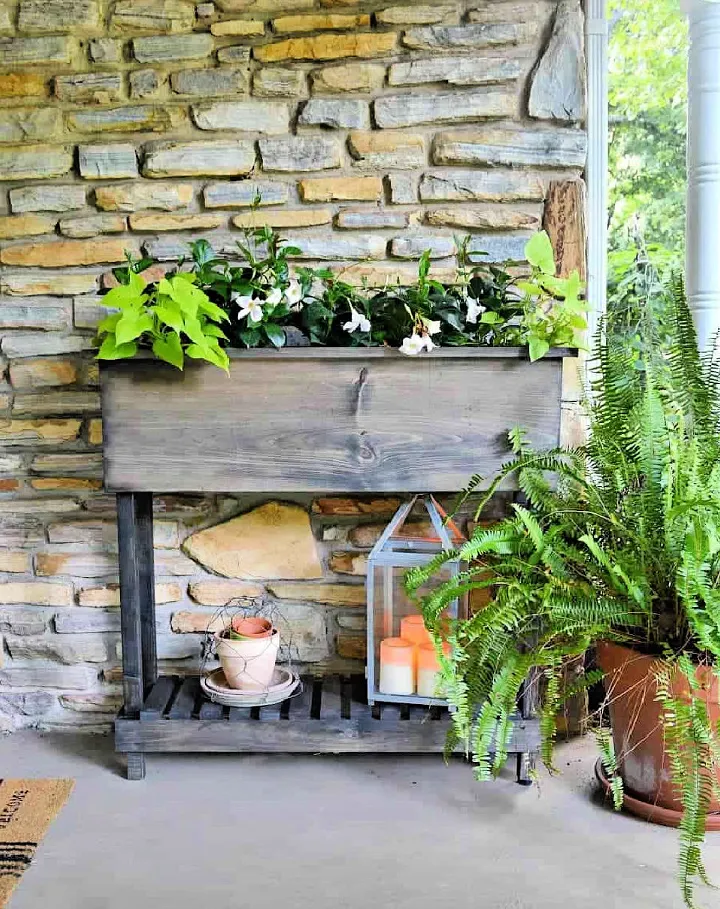
Raised-Bed Planter With a Built-in Bench
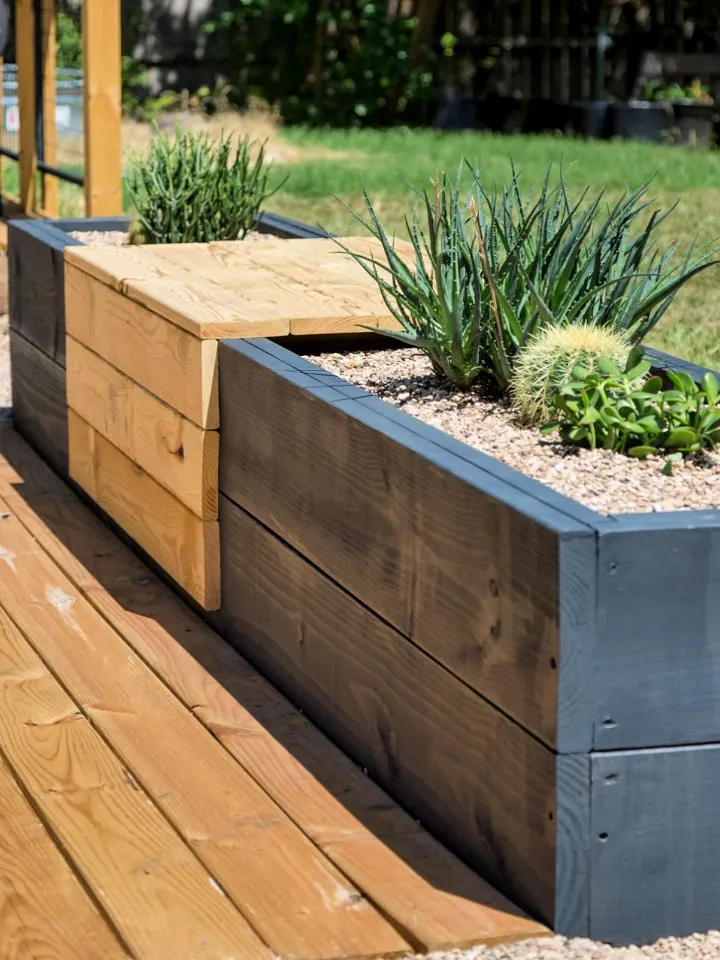
If you’re looking for a way to add some charm and functionality to your outdoor living space, consider building a raised-bed planter with a built-in bench. This DIY project is easy to complete and will provide you with a beautiful and functional addition to your deck or patio.
To build this planter bed, you will need treated pine, exterior stain, deck screws, a drill, level, tape measure, clamps, carpenter’s square, and a circular saw or table saw. Once you have gathered your materials, follow these simple steps:
- Cut the pine boards to the desired length and width for your planter and bench.
- Assemble the planter box using deck screws and clamps.
- Add a shelf or bench seat to the planter box using more deck screws and clamps.
- Stain the exterior of the planter box and bench to protect it from the elements.
This raised-bed planter with a built-in bench is perfect for growing flowers, vegetables, or herbs. It also provides a comfortable place to sit and enjoy your outdoor space. So get started on this fun and functional DIY project today!
Handmade Large Planter Box
Looking for a budget-friendly way to add some extra color and life to your outdoor space? Look no further than this DIY handmade large planter box! With a sleek and consolidated design, this planter box is perfect for both decorative and functional purposes.
Constructed from pressure-treated lumber and deck screws, this planter box is durable and long-lasting, able to withstand harsh winters and regular maintenance. The deep and wide design ensures that your plants’ roots are protected and have ample space to grow.
To build this planter box, you’ll need a few tools including a miter saw, clamps, power drill with drill bits, tape measure, and framing square. Additionally, a styrofoam insulation sheet is used to help insulate the planter box.
Overall, this DIY handmade large planter box is a great addition to any outdoor space and won’t break the bank. With just a few materials and tools, you can create a stylish and functional planter box that will brighten up your garden.
DIY Wooden Porch Planter Box
Looking for a simple and decorative way to enhance your porch decor? Why not build your own DIY wooden porch planter box? This small wooden planter is perfect for adding a touch of greenery to your front porch and can be customized to suit your personal style. The construction process is straightforward and can be completed in just a few hours with the right tools and materials.
To build your own wooden planter box, you will need furring boards, Spax wood screws, wood glue, wood stain, paint, outdoor finish, and planter lining. You will also need a staple gun, miter saw, nail gun, orbital sander, drill, measuring tape, pencil, and bar clamps.
Once you have gathered all of your materials, follow these simple steps to build your DIY wooden porch planter box:
- Cut your furring boards to size using a miter saw.
- Sand the boards to create a smooth surface.
- Use wood glue and Spax wood screws to assemble the planter box.
- Apply wood stain or paint to the planter box and allow it to dry.
- Apply an outdoor finish to protect the wood from the elements.
- Line the planter box with planter lining to prevent water damage.
- Fill the planter box with your favorite flowers or plants.
With your new DIY wooden porch planter box, you can enjoy the beauty of nature right on your front porch.
Homemade Planter Box For Small Spaces
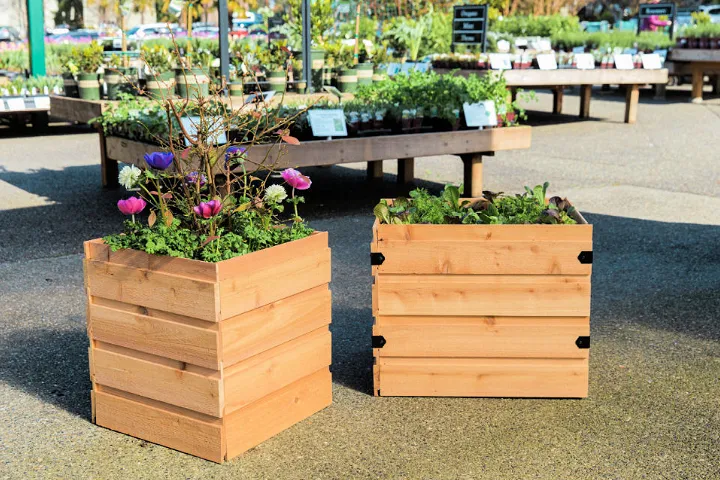
If you’re looking to grow your own edible garden but have limited space, don’t worry! You can create a DIY planter box for small spaces that is both affordable and efficient. All you need is a sunny spot on your balcony or patio, and enough sunlight to keep your plants happy. This project is uncomplicated and cost-effective, making it an excellent way to give your plants the best home possible.
To create your planter box, you will need the following materials: cedar wood, screws, nails, corner brackets, wood glue, bracket screws, and swivel casters. You’ll also need a few tools, including a miter box, power drill, nail gun, bar clamps, tape measure, drill bit, driver bit, nut bit, and hand saw.
By following these simple steps, you can create a planter box that will make your space feel alive and provide you with a small gardening space to grow your own food. With this project, you can enjoy the comfort of growing your own food without any stress.
Rolling Raised Planter Box Design
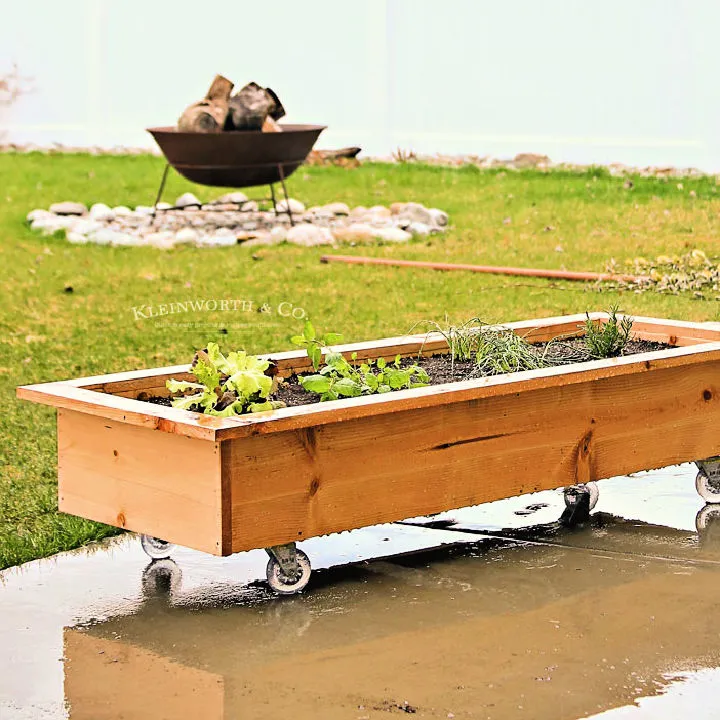
If you want to add some greenery to your space but don’t have a lot of room, this DIY rolling raised planter box is an excellent option. It’s perfect for growing herbs, flowers, or vegetables, and it can be used indoors or outdoors. This planter box has wheels, so you can easily move it around your garden or patio without getting your feet muddy.
To build this planter box, you’ll need plywood, wood board, wood screws, nails, wood stain, and casters. You’ll also need a few tools, including a miter saw, nail gun, sander, and drill.
Not only is this planter box easy to build, but it’s also a great solution for gardening in extreme climates. It allows you to grow plants in your garden even during harsh weather conditions. Plus, it provides privacy while still allowing you to see the plants you’re growing.
Overall, this rolling raised planter box is a fantastic DIY project that will add color and life to any space.
DIY Rolling Planter Box
Create a movable planter box with the DIY rolling planter box plan that you can drag anywhere. This planter box is perfect for adding a touch of decoration and practical gardening to your home. It is easy to build and can be used both indoors and outdoors. With the help of this weather-resistant, portable, and eco-friendly rolling planter box, you can make your patio or garden greener and more attractive.
To build this planter box, you will need untreated decking boards, wood boards, galvanized decking screws, swivel casters, wood glue, and wood stain. You will also need a miter saw, drill, screwdriver, tape measure, and sander.
This DIY rolling planter box is a great way to create a beautiful box with plants that need little care. Plus, its portability allows you to move it around your garden or patio with ease.
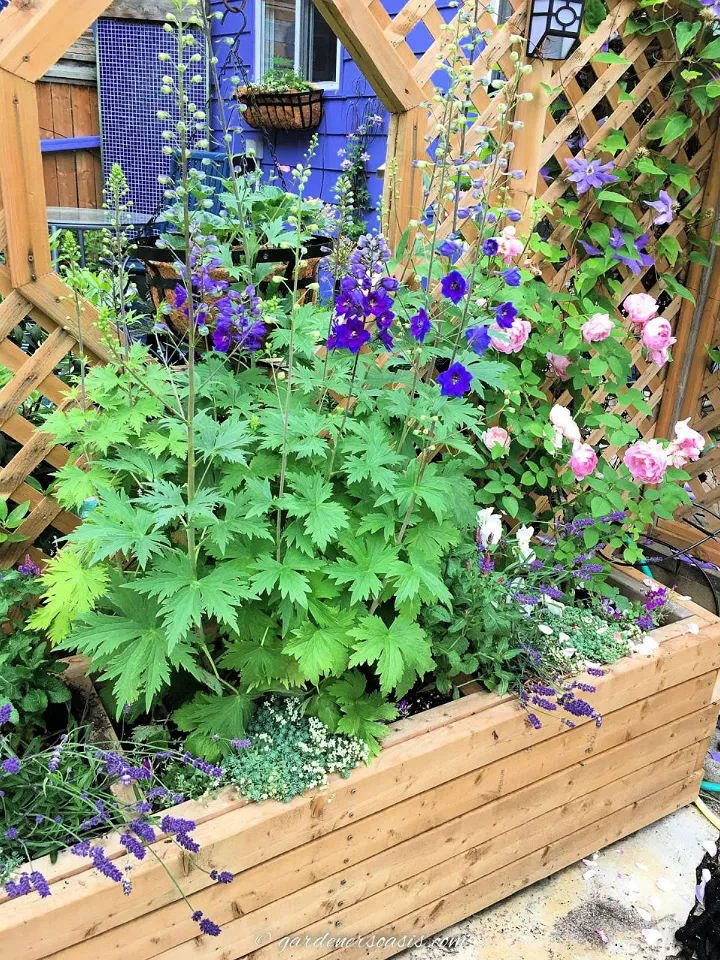
Free Flower Box Plan
Looking for a classic garden planter box that is easy to customize and maintain? The DIY classic garden planter box is a great option for you. This planter box is made with plywood, which makes it super smooth and durable. The left spaces between the boards allow for proper drainage, preventing water from seeping through the planter box and causing problems in your garden.
This DIY planter box has a traditional design that can be easily customized according to your needs. Add your personal touch or paint it any color you like! To make this planter box, you will need treated wood, plywood, galvanized screws, and paint. You will also need a miter saw, drill, tape measure, pencil, and paintbrush.
With these materials and tools, you can create a classic garden planter box that will last for years. Enjoy the beauty of your garden with this easy-to-make and customizable planter box.
DIY Garden Narrow Planter Box
If you have a small outdoor space and want to add some greenery to it, a DIY garden narrow planter box is a great solution. This project is budget-friendly and can be customized to fit your specific needs. Here are the materials and tools you will need to complete this project:
Materials:
- Wood
- Nails
- Wood Glue
- Hanging Hardware
- Water Sealant
- Screws
- Decorative Hardware
Tools:
- Sander
- Nail Gun
- Hammer
- Miter Saw
- Circular Saw
- Drill
To build the planter box, you will need to cut the wood to size, sand it, and assemble the box using nails and wood glue. Once the box is assembled, you can paint it to match your outdoor decor and add decorative hardware if desired. Finally, add hanging hardware or set the planter on your patio or deck.
This DIY garden narrow planter box is a simple and affordable way to keep your plants organized and add some color to your outdoor space. Get creative and make it your own!
Build an Upcycled Planter Box
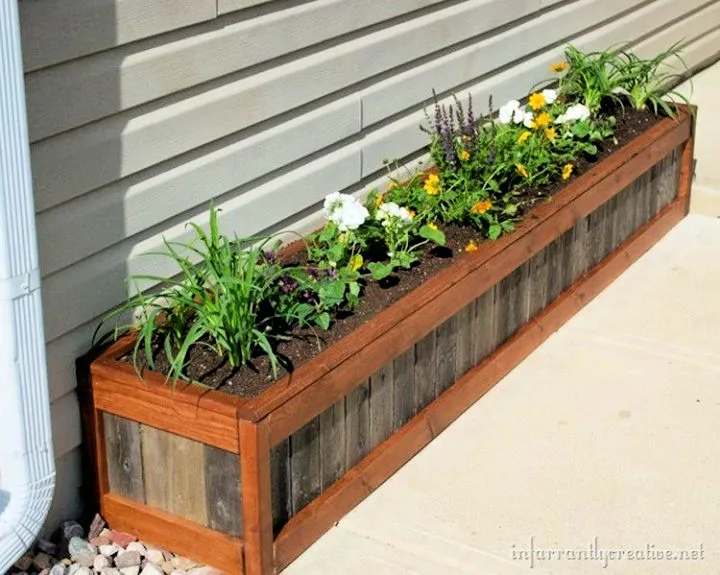
Looking for a way to add some color and texture to your garden or porch? Why not try building your own upcycled planter box? This DIY project is an easy and low-cost way to create a striking and stylish accent piece for your home or garden.
To build your planter box, you’ll need some basic materials, including cedar fence pickets, furring strips, scrap lumber, screws, pre-wood conditioner, Minwax English Chestnut, spacers, landscape cloth, and outdoor wood sealer. You’ll also need a few essential tools, such as a chop saw, cordless drill, Kreg Jig, air nail gun, tape measure, air stapler, and pencil.
Once you have your materials and tools, you can get started on building your planter box. The frame can be as simple or complex as you like, depending on your design preferences. You can also stain or paint the weathered wood to add color and create a more rustic look.
With a little time and effort, you can complete your upcycled planter box in just a few hours. This DIY project is a fun and rewarding way to add some personality to your yard and make it look more radiant.
Rustic DIY Wood Planter Box
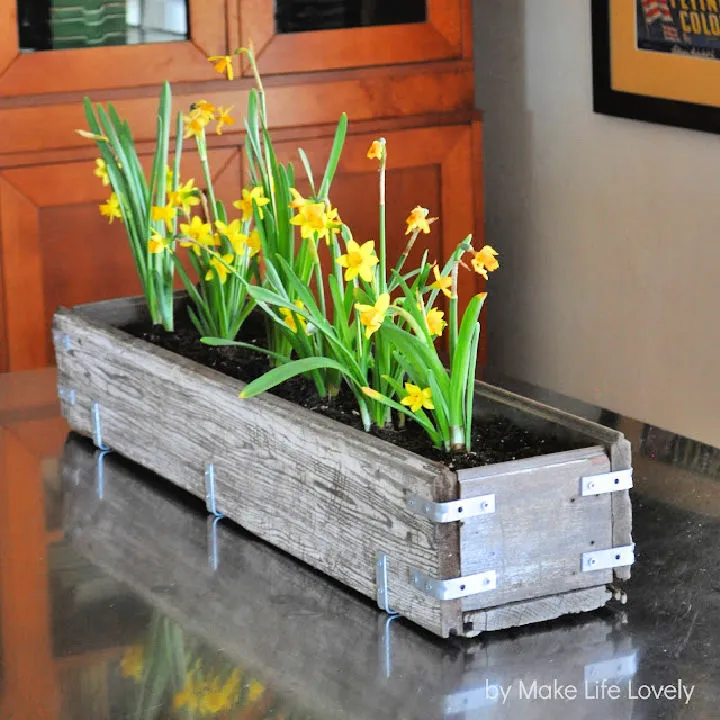
Looking for a rustic and charming addition to your indoor space? A DIY wood planter box may be just what you need. This project is easy to do and requires only basic tools, some old wood, and a little creativity.
To start, you’ll need to gather your materials, including old wood, screws, L brackets, wood stain or brown paint, soil, and flowers. Once you have your materials, you’ll need to distress the wood by sanding it down or using a chemical stripper.
After the wood is distressed, you can begin building your planter box. Use a saw and drill to cut and assemble the pieces, securing them with screws and L brackets. Once the box is complete, apply wood stain or brown paint to create a rustic look.
Finally, fill the planter box with soil and your favorite flowers. This DIY project is a simple and affordable way to add a touch of rustic charm to your home.
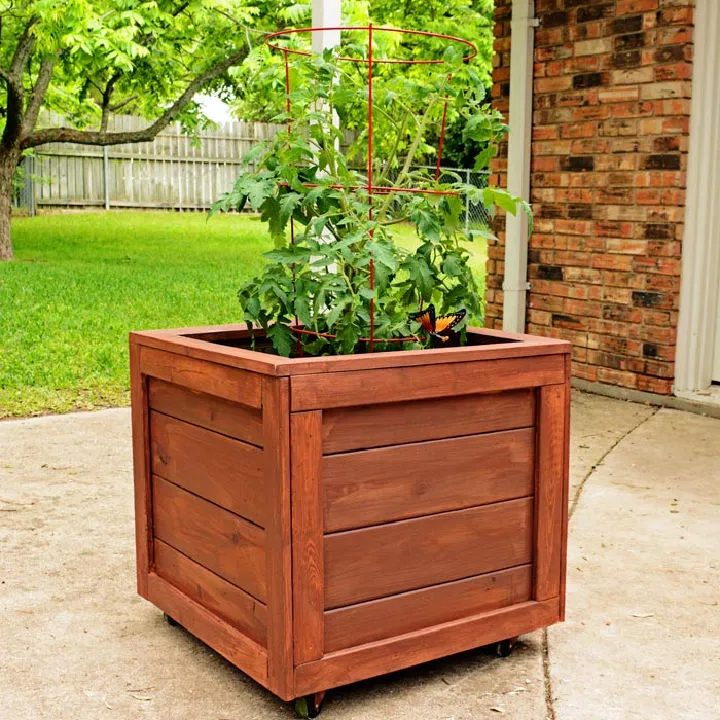
Building A Raised Planter Box
If you’re looking to add some greenery to your outdoor space, a DIY raised planter box is a great option. Not only does it add a modern touch to your garden, but it also makes it easier to care for your plants. This project is super easy and inexpensive, and it will look great in any home or garden.
To build a raised planter box, you will need some cedar wood, wood glue, spar vanish, exterior screws, and exterior paint. You’ll also need some tools, including an impact driver, drill, miter saw, circular saw, Kreg jig, trim router, tape measure, and table saw.
Once you have all your materials and tools, you can start building your planter box. Follow these steps:
- Cut your cedar wood to the desired length and width using a miter saw and table saw.
- Use a Kreg jig to drill pocket holes into the ends of your boards.
- Apply wood glue to the ends of your boards and screw them together using exterior screws.
- Cut your corner posts to the desired height and attach them to the inside corners of your planter box.
- Sand the edges of your planter box and apply spar vanish to protect the wood from the elements.
- Paint the exterior of your planter box with exterior paint in the color of your choice.
With these simple steps, you can easily build a raised planter box that will add style and functionality to your outdoor space.
DIY Spring Woodworking Planter
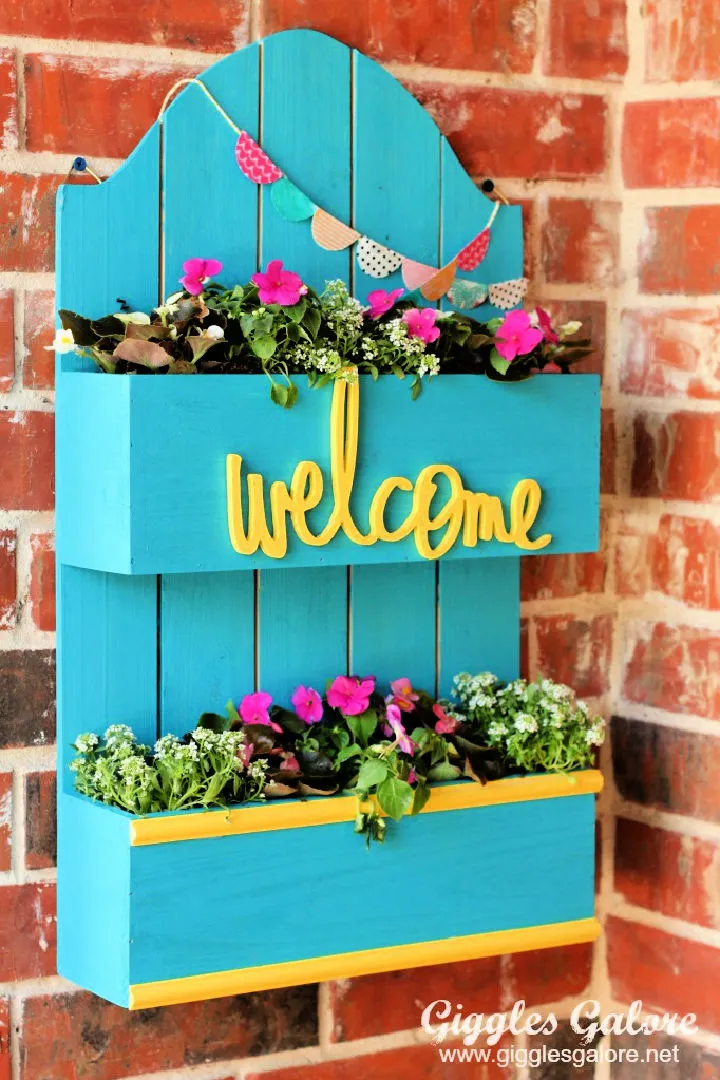
Looking for an easy and fun DIY project to add some color to your front porch this spring? Look no further than this simple and charming spring planter box! With just a few materials, you can create a welcoming and inviting touch to your home.
To make your own spring planter box, start by painting an unfinished hanging planter in your desired color. Then, add some beautiful spring flowers and a welcome sign. Use wood glue and wood trim to add some extra charm to your planter box. Hang your planter box on your front porch and enjoy your fabulous new front porch makeover!
Here are the materials you will need for this project:
- Hanging Planter Box (unfinished)
- Paint Brush
- Wood Glue
- Flowers
- Wood Trim
- Paint
This DIY spring planter box project is super easy, and it will add a fresh and colorful touch to your home. Try it out and enjoy your beautiful new front porch this spring!
DIY Scrap Wood Planter Box
Are you looking for a way to repurpose your scrap wood? Consider building a DIY scrap wood planter box with a trellis to add a natural touch to your outdoor space. This project is easy and inexpensive, and it will look amazing in your garden.
To begin, measure and cut your scrap wood to size. You will also need a lattice sheet (4×8), decking board, plastic window planter box, exterior wood screws, a jig saw, drill, and saw.
Next, assemble the planter box using nails or screws. Add a trellis to the back of the box for added support. Once your box is assembled, fill it with soil and plants of your choice.
This DIY project is a great way to add attraction to your outdoor space without breaking the bank. Plus, it’s a fun and rewarding way to repurpose your scrap wood.
$20 DIY Cedar Wood Planter Box

Looking for a cost-effective way to add a touch of modern farmhouse style to your outdoor space? Look no further than this DIY $20 cedar wood planter box. With its minimalist design and easy-to-follow instructions, this planter box is the perfect addition to your deck, front porch, or patio.
Made from cedar fence pickets and furring strips, this planter box has a natural, organic look that will complement any outdoor decor. And with its low-maintenance design, you won’t have to spend hours tending to your plants and flowers.
To get started on your own cedar wood planter box, all you’ll need are some basic tools, including a pencil, speed square, tape measure, miter saw, brad nailer, sander, ear protection, and safety glasses. Follow the step-by-step instructions carefully, and you’ll have a beautiful new planter box to enjoy in no time.
Materials:
- Furring Strips
- Cedar Fence Pickets
- Brad Nails or Staples
Tools:
- Pencil
- Speed Square
- Tape Measure
- Miter Saw
- Brad Nailer
- Sander
- Ear Protection
- Safety Glasses
Raised Planter Box With Legs & Shelf
Looking for a way to add some charm to your home’s outdoor space? You can easily build a DIY raised planter box with legs and a shelf using a few materials. This project is perfect for adding a pop of color to your front porch or patio.
Pine wood is a great choice for this project because it is rot-resistant and durable. The rustic and natural-looking raised planter box is easy to make and comes with a shelf to hold all your gardening stuff. You can display it on your front porch, deck, or patio.
To build a sturdy planter box that can hold heavy plants without toppling over, you will need pine board, pine wood, wood glue, wire brads, pot liner, sandpaper, wood filler, and wood stain. For tools, you will need a table saw, palm sander, staple gun, and chop saw.
This raised planter box with legs and shelf is an ideal way to add color and rustic allure to your outdoor space. You can make it from scrap wood and pine, and it will last for years. So, get started on your DIY project and enjoy the beauty of your new raised planter box.
Simple DIY Planter Box – Free Plan
Looking for a way to add some greenery to your outdoor space without breaking the bank? Look no further than this simple DIY planter box project. Made from cedar fence pickets and a 2 x 4, this planter box is weather-resistant and will last for years to come. Plus, its no-frills design makes it a versatile addition to any patio or porch.
To get started, gather your materials: cedar fence pickets, a 2 x 4, screws, brad nails, and water sealer. You’ll also need some basic tools, including a miter saw, brad nailer, drill, and screwdriver.
Once you have your materials and tools, it’s time to get building. Follow these simple steps:
- Cut your cedar fence pickets and 2 x 4 to size using a miter saw.
- Assemble the planter box using screws and brad nails.
- Apply a coat of water sealer to protect the wood from the elements.
That’s it! With just a few basic tools and materials, you can create a beautiful, functional planter box that will add a natural, rustic touch to your outdoor space. And because it’s so easy to customize, you can make it your own by adding your favorite plants and flowers. So why wait? Get started on your DIY planter box today!
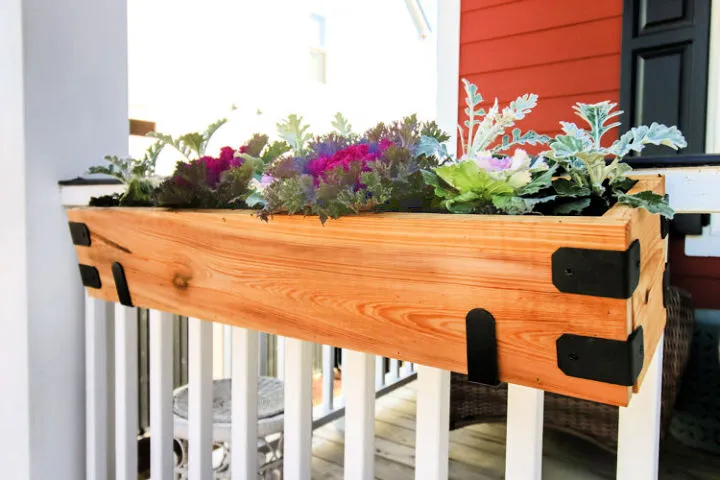
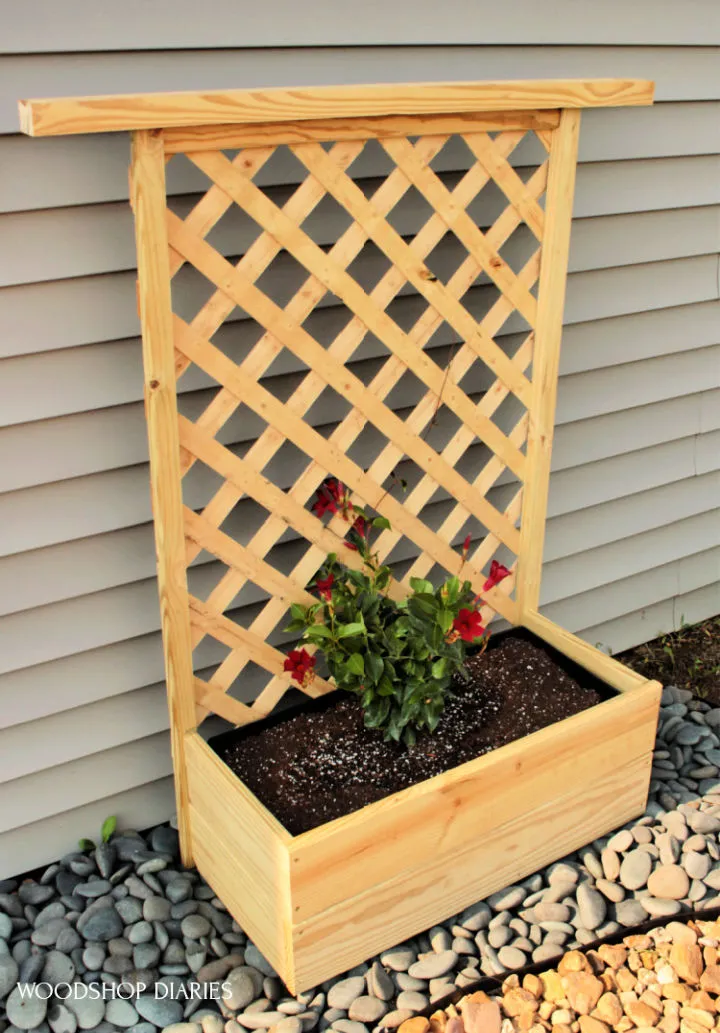
Raised Planter Box with Trellis
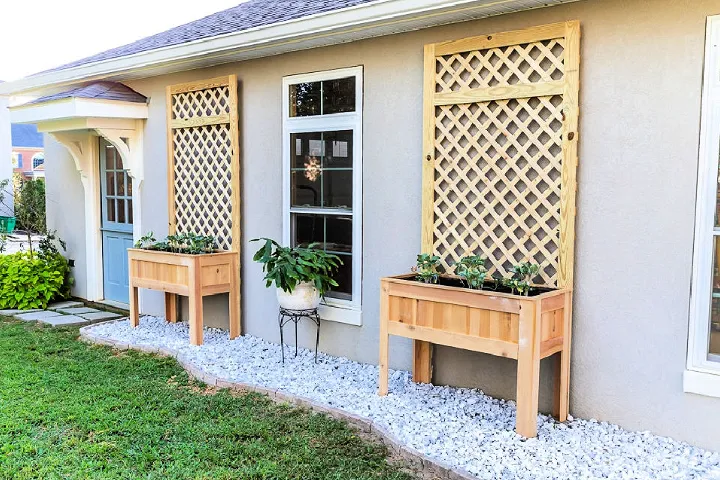
If you are looking for a unique and creative way to decorate your outdoor space, a raised planter box with trellis is a great option. This project is not only charming and functional, but it also allows you to grow fresh fruits, vegetables, and herbs all year round. The trellis design adds a stunning visual appearance to any empty wall, while the succulents add color and life.
To build this planter box, you will need wood boards, cedar fence pickets, lattice panel, wood screws, pocket screws, and landscape fabric. You will also need various tools, including a speed square, tape measure, compound miter saw, circular saw, table saw, brad nailer and nails, electric staple gun and staples, pocket hole jig, safety glasses, dust mask, hearing protection, and cordless drill.
This DIY project is easy to build, affordable, and weather-resistant, making it a great addition to any outdoor space. By following the instructions carefully, you can create a raised planter box with trellis that will bring color and life to your home’s exterior.
DIY $10 Wood Planter Box
Looking for an affordable and visually appealing planter box? Look no further than this DIY $10 Wood Planter Box! This planter box is made from simple materials that can be easily sourced, making it a cost-effective alternative to other plastic or metal planter boxes.
Crafted from plywood, this planter box is both lightweight and water-resistant. Its large size makes it perfect for housing various plants, and its portability means that it can be moved around to suit your needs.
To build this planter box, you will need a few tools such as a Miter Saw, Sander, Circular Saw or Jig Saw, Metal Clamps, Bar Clamps, Drill, Paint Sprayers, Safety Goggles, Dust Mask, and Hearing Protection. You will also need some materials such as Wood Glue, Flat Wood Screws, Paint, and Outdoor Sealer.
Once you have gathered all the necessary tools and materials, follow the step-by-step instructions to create a stunning, custom wood planter with your own creative touch. This DIY plan offers a big, light, movable, and water-resistant planter box that can be used to grow plants in small spaces or even outdoors.
With just a little bit of elbow grease and a few tools, you can have a beautiful planter box that will add charm and character to any space. So, get started on this thrifty DIY plan today and enjoy the benefits of having your own custom-made planter box!
22. Easy 3-Steps Planter Box Plan
Creating a DIY planter box is a great way to add some greenery to your outdoor space. This easy 3-step planter box plan is perfect for beginners and can be customized to suit your style. To get started, you’ll need to cut your lumber to size. You’ll need four pieces for the sides and six for the steps. Once you have your pieces, assemble the sides of the box using screws or nails. Then, attach the steps to the sides of the box, making sure they’re evenly spaced and level.
After assembling the box, fill it with soil and plant your favorite flowers or plants. This planter box is a beautiful and functional addition to any porch, balcony, or backyard. To create this planter box, you’ll need wood, screws (self-drilling), a drill, level, and miter saw. With these tools and materials, you can easily create a planter box that you can be proud of.
DIY Slatted Planter Box

Looking for a way to add a modern touch to your gardening space? Look no further than this DIY slatted planter box. With its deep and tall design, this planter box is perfect for retaining raised vegetable beds. The thin, neatly spaced slats provide a contemporary look and ample space for your plants to flourish.
Not only is this planter box stylish, but it is also functional. The slatted design allows for proper drainage and airflow, which promotes healthy soil and provides greater strength and stability than other planter boxes. Plus, its lightweight design makes it easy to move around your yard.
To create this planter box, you will need cedar fence boards, cedar, decking screws, weed barrier, staples, pocket screws, and a variety of tools including a staple gun, ratcheting clamps, pocket hole jig (mini), speed square, cordless jigsaw, mini F-clamps, palm driver, and Kreg face clamps.
Follow the instructions carefully and you’ll have a beautiful and stylish planter box in no time. Give your outdoor space the modern, minimalistic look it deserves with this DIY slatted planter box.
DIY Planter Box Plans
If you’re looking to add some greenery to your outdoor space, building a DIY planter box is a great option. With a few basic tools and materials, you can create a customized planter box to fit your specific needs and style. Here are some key steps to follow when building your own planter box:
- Choose your materials: Depending on your budget and design preferences, you can use a variety of materials for your planter box, including wood, metal, or plastic. Cedar and redwood are popular choices for their durability and natural resistance to decay.
- Measure and cut your pieces: Use a measuring tape and saw to cut your pieces to the desired length and width. Be sure to make precise cuts to ensure a snug fit when assembling your planter box.
- Assemble your planter box: Use screws or nails to attach the pieces together, making sure to align the corners and edges. You may want to add a bottom piece to your planter box to prevent soil from escaping.
- Add finishing touches: Sand down any rough edges and apply a coat of paint or stain to protect your planter box from the elements. You can also add decorative elements like handles or trim to personalize your design.
With these simple steps, you can create a beautiful and functional planter box to enhance your outdoor space.