Looking to upgrade your outdoor entertaining space? Consider building your own DIY outdoor kitchen with these 26 ideas. From simple grilling stations to fully equipped kitchens, there’s something for every budget and taste. These plans include free designs, detailed instructions, visual guides, and PDF blueprints to help you build your dream outdoor kitchen on a budget.
Before you start building, consider the location and layout of your outdoor kitchen. Choose a spot with enough space for your appliances and furniture, and with a good view of your garden or yard. You’ll also need to plan for key elements like countertops, storage, and cooking appliances, as well as durable and weather-resistant furniture. With a little planning and these DIY outdoor kitchen ideas, you’ll be on your way to creating the perfect outdoor entertaining space.
Two-Tear Deck Kitchen Frame Plan
To build a two-tier deck kitchen, you will need to follow a frame plan that will provide support for the structure. The frame plan consists of several steps that will ensure your outdoor kitchen is sturdy and durable. Here are the steps to follow:
- Measure and mark the area where you want to build the kitchen. Use a tape measure to ensure accuracy.
- Cut the wood to the appropriate size using a miter saw. Use metal connectors to join the pieces of wood together.
- Use a cordless drill to attach the frame to the concrete base using screws and nails. Make sure the frame is level before attaching it to the base.
- Add cement boards to the frame to provide a solid surface for the tiles. Use screws to secure the cement boards to the frame.
- Lay gravel stones and cement stones on the ground to create a stable base for the kitchen.
- Install the tiles on top of the cement boards using a tile adhesive. Allow the adhesive to dry before proceeding.
- Stain the wood and apply a wood finish to protect it from the elements.
By following these steps, you can build a strong and sturdy frame for your two-tier deck kitchen. With the right tools and materials, you can create a beautiful and functional outdoor space that you and your guests will enjoy for years to come.
Portable Outdoor Cooking Station – Outdoor Grill Station

A DIY portable outdoor kitchen is a great solution if you have limited backyard space and a tight budget. It is easy to move and can be stored in a garage or shed. To build a basic outdoor cooking area, you will need materials such as scrap wood pieces, copper tube, concrete mix, barbeque, cutting board, reinforcing metal bars, 2×2 lumber, bolts, wheel casters, copper tube, water, plywood, sink, screws, hooks, hose, and water tap. You will also need tools such as a drill, concrete float, trowel, tub (for mixing concrete), and saw.
To assemble the portable outdoor kitchen, you will need to create a base using scrap wood pieces and 2×2 lumber. Add reinforcing metal bars to provide stability. Mix the concrete and pour it over the base to create a countertop. Once the concrete has cured, add a sink and a cutting board.
Attach the barbeque to the countertop using bolts and copper tubes. Install the wheel casters to make it easy to move around the yard. Finally, add hooks to hang utensils and a hose and water tap for easy clean-up.
A portable outdoor cooking station is a clever and valuable solution for those who want to enjoy cooking outdoors without the hassle of a full-size, luxury outdoor kitchen. With this DIY project, you can have all the fun of cooking outdoors without breaking the bank. So get creative and start grilling up a storm!
DIY Outdoor Grill Station & Sink

Are you tired of struggling to access your outdoor cooking equipment? Look no further than this DIY outdoor kitchen with grill and sink project. With easy access to all the equipment needed for outdoor cooking, this outdoor kitchen is the perfect addition to any outdoor living space.
The base of this project is made of treated wood with a cedar access frame and cement board stones, providing a functional and attractive unit. The stainless steel construction and double-walled doors ensure durability, while soft-close drawers and concrete countertops add a touch of luxury.
This DIY outdoor kitchen is ideal for cooking and provides plenty of space for food preparation, setting platters, and working. Plus, with its drop-in grill and sink, you’ll have everything you need for a successful outdoor cooking experience.
To make this project a reality, you’ll need a variety of materials, including hose bibs, treated wood, cedar wood, construction adhesive, cement boards, screws, type S mortar, access panels, silicone, rapid set mortar mix, steel remesh, and a stainless steel outdoor drop-in sink. You’ll also need a range of tools, including a PVC cutter, crimper, utility knife, wet saw, heavy duty max, tape measure, reciprocating saw, sander, oscillating multi-tool, and caulk gun.
With this DIY outdoor kitchen with grill and sink project, you’ll be able to enjoy grilling outside no matter the weather. So why wait? Get started on this project today and enjoy outdoor cooking like never before.
Outdoor Kitchen Framing With Grill Island

If you want to elevate your outdoor cooking experience while keeping up with the latest trends, consider building a DIY outdoor kitchen with a grill island. This project is a fantastic way to add a touch of luxury to your backyard with a low-maintenance kitchen plan that is easy to care for and will last for years.
The outdoor kitchen features an L-shaped construction made of durable materials that can withstand the elements. The cinder block BBQ grill island is overlaid with field stone finished and ended with a concrete bar and countertop, giving it a sleek and modern look that will be the perfect addition to any backyard.
To build this outdoor kitchen, you will need materials such as cinder blocks, field stones, screws, mortar mix, stakes, concrete mix, 2 x 4’s, conduit, and gravel. You will also require tools such as a shovel, level, grout bag, hammer, pointing tool, hand tamper, wheelbarrow, rake, string line, and paintbrush.
With these materials and tools, you can easily construct an outdoor kitchen that will quickly become the favorite gathering place for all your friends and family. So why not take on this DIY project and add a touch of luxury to your backyard?
DIY Grill Cart & BBQ Prep Table

Looking for a weekend DIY project? Why not build your own grill cart and BBQ prep table? This versatile piece of outdoor furniture can be customized to suit your specific grilling needs, making your cooking experience easier and more enjoyable.
The design of this grill cart and BBQ prep table is simple and flexible, with a top shelf for food preparation and a small grill on top. The bottom shelf provides ample storage space, while a side rack is perfect for hanging towels or utensils. This cart can be used as a BBQ prep table, serving table, bar cart, grill station, or even as a portable cart for collecting vegetables from your yard.
To build this grill cart and BBQ prep table, you will need construction lumber, exterior wood screws, furring strips, a wooden dowel, swivel lock casters, black timer frame screws, and exterior finish. You will also need a few tools, including a miter saw, jig saw, drill, and driver.
With these materials and tools, you can easily construct your own DIY grill cart and BBQ prep table, making your outdoor cooking experience more convenient and enjoyable. So, what are you waiting for? Get started on your weekend project now!
Easy Outdoor Kitchen Construction
Building an outdoor kitchen can be a fun and easy DIY project for beginners. By following these simple steps, you can create a customized outdoor kitchen that will make entertaining a breeze.
Materials
To build your outdoor kitchen, you will need the following materials:
- 2 x 4’s
- Plywood
- Paint
- Stain
- Water-based Polyurethane
- Screws
- Wood Glue
Tools
You will also need the following tools to complete the project:
- Saw
- Drill
- Level
- Tape Measure
Step-by-Step Guide
- Build a shelf or cabinet base with legs to support your mini-fridge.
- Modify the design to include a space for your grill, countertops, and any other features you want.
- Be sure to include a sturdy wall to support the weight of your appliances.
- Use wood glue and screws to secure the frame together.
- Apply paint, stain, and water-based polyurethane to protect the wood from the elements.
By following these simple steps and using the right materials and tools, you can create a beautiful and functional outdoor kitchen that will be the envy of your neighbors.
Homemade Backyard Kitchen – Outdoor Grill Station

A DIY backyard kitchen is a great way to add some personality and functionality to your backyard. With some creativity and effort, you can create a unique space to entertain your guests and enjoy your favorite meals. Plus, building your own outdoor kitchen can save you a lot of money on costs.
To start building your own outdoor grill station, you’ll need to gather the necessary materials and tools. Some of the materials you’ll need include concrete mix, stucco mix, bricks, wood, rebar, tiles, hinges, and more. You’ll also need a variety of tools, such as a tile cutter, cement mixer, shovel, trowel, and drill.
Once you have all the necessary materials and tools, you can begin building your outdoor grill station. Start by creating a concrete base and building a frame using 2×4 molds. Then, add in the necessary plumbing and electrical components, such as sink and switches. Next, add the stucco and tile finishes to create a polished look.
Don’t forget to add in some finishing touches, such as door and drawer handles and stain to protect the wood. With a little effort and creativity, you can create a beautiful and functional outdoor grill station that will impress your guests and provide a fun gathering space for years to come.
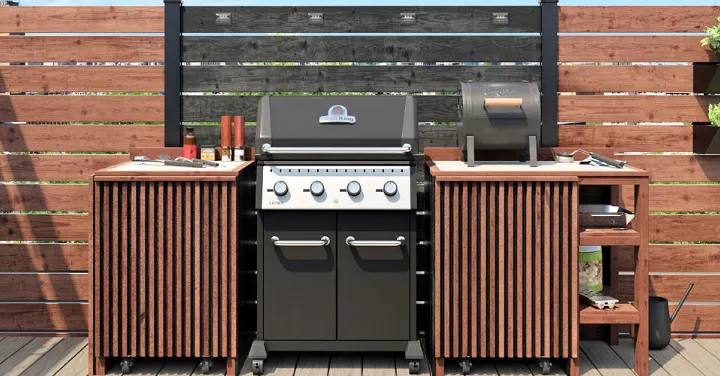
DIY Modular Outdoor Kitchen
Are you looking for an affordable and easy-to-assemble outdoor kitchen solution? Look no further than the DIY Modular Outdoor Kitchen. This sleek and modern kitchen design is perfect for those who want to entertain in style without breaking the bank.
With its lightweight and durable construction, this outdoor kitchen is built to withstand harsh weather conditions. And because it requires minimal maintenance, you can spend less time worrying about upkeep and more time enjoying your outdoor space.
The DIY Modular Outdoor Kitchen is also a great way to bring your family together and create memories that will last a lifetime. Whether you’re hosting a small gathering or a big party, this kitchen is the perfect place to cook, eat, and socialize with friends and loved ones.
So why wait? Start building your own DIY Modular Outdoor Kitchen today and enjoy all the benefits of outdoor cooking and entertaining.
Small Rolling Outdoor Island

Looking for a portable and sturdy cookout solution for your outdoor space? Look no further than this DIY rolling outdoor island plan. This project is a great way to add some style to your backyard barbecues. The island’s structure is easy to build, sturdy, and movable, and can be customized to your preferences.
The island is made of a steel stud frame and connectors, with an attached cement board panel. It has a large open space in the center to place the grill, with two boxes on the side. The larger box provides a shelf and open space on the grill side to easily reach the gas valve.
This island is heavy enough to be sturdy, yet rolls smoothly, allowing you to enjoy grilling anywhere and anytime you want. It is perfect for those who want to move their grilling station around their outdoor space.
To build this island, you will need materials such as steel framing studs, cement backer board, connectors, strap tie, angles, self-tapping sheet metal screws, redwood boards, swivel plate casters with lock, steel washer, lock nut, hex head bolt, and a pre-fabricated countertop or materials for making a concrete countertop.
You will also need tools such as a power drill or impact driver, measuring tape, sanded tile caulk, speed square, diamond grinder wheel, angle grinder, and metal cut-off grinder wheel.
With these materials and tools, you can build a stunning and functional rolling outdoor island that will be the highlight of your outdoor space.
How To Make Wood Fired Pizza Oven

If you love outdoor cooking and entertaining guests, building a DIY wood-fired pizza oven is a great project to consider. This oven is easy to build and budget-friendly, and it will be a great addition to your backyard.
To build this oven, you will need materials such as concrete, concrete blocks, bricks, rebar, wood, and screws. You will also need tools such as a saw, drill, and shovel.
Start by creating a concrete-based foundation to make the oven stable and enduring. Use concrete blocks to create the oven’s structure by dry-piling them in a staggered bond pattern. Leave an open corner to store wood for your oven.
The dome-shaped fired oven is made of bricks surrounded by refractory insulation blankets supported by a wooden frame. This oven is a great alternative to gas ovens and can be used for cooking and baking. It is perfect for arranging large gatherings and entertaining guests with delicious food.
Building a wood-fired pizza oven is a great way to save money and make your home cooking tastier. With these simple instructions and materials, you can have your own wood-fired pizza oven in no time.
DIY Kitchen Island Storage Cart

Looking for a simple and easy DIY project to add storage and style to your outdoor kitchen? Look no further than this DIY kitchen island storage cart. Constructed with a sturdy wood frame and topped with a beautiful butcher block counter, this cart features custom wine racks, drawers, and crates for ample storage space. The large bottom shelf is perfect for storing all of your cooking essentials, while the towel rod ensures that you always have a dish towel within reach.
To build this cart, you will need a few materials, including wood, wood screws, nails, stain, wood finish, drawer slides, drawer pulls, and pocket hole screws. You’ll also need a few tools, such as a miter saw, tape measure, jig saw, drill, and pocket hole jig. With these materials and tools, you can easily build a beautiful and functional kitchen island storage cart that will make your cooking experience more enjoyable and impress your family and friends.
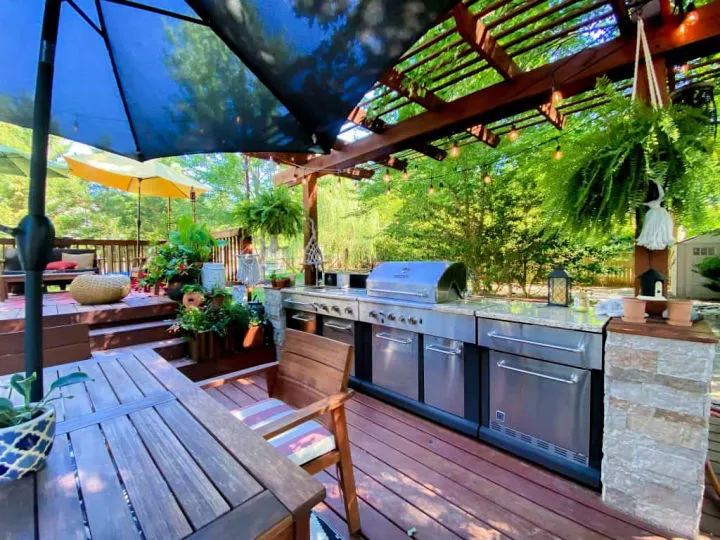
Covered Outside Kitchen With Pavilion

Looking to add a functional and stylish outdoor kitchen to your backyard? Consider building a DIY outdoor kitchen with a pavilion. This project is perfect for those who love to entertain while enjoying the great outdoors.
The foundation of this outdoor kitchen is made of durable steel studs and is protected from rusting by a track underneath Trex decking. It is covered with veneer stones to give it a sleek and modern look. The concrete countertop is supported by iron supports and is covered by a pergola to provide shelter from the sun and rain.
To build this outdoor kitchen, you will need materials such as steel studs, Trex decking, concrete, melamine sheet, iron supports, silicone caulk, concrete colorant, cement screws, self-tapping screws, polymeric sand, and sealer. You will also need tools such as diamond sanding discs, trowel, eggbeater mixer, drill, pointing tool, masonry hand tool, small level, jig saw, circular saw, cement blade saw, aviation snips, and impact driver.
This outdoor kitchen is not only strong and sturdy, but also easy to clean and maintain. It is perfect for any backyard cookout and will impress your guests with its stylish design. Get started with this DIY plan and enjoy a delicious meal in your new outdoor kitchen with a pavilion.
DIY Outdoor Bar With a Pallet & Cinder Blocks

Looking for a way to add some extra pizzazz to your backyard or patio? Why not try building your own outdoor bar with a pallet and cinder blocks? This easy DIY project can be completed in no time, and the end result is both impressive and functional.
To get started, you’ll need to gather your materials and prepare your pallet. Once you’ve chosen the location for your bar, stack the cinder blocks to create a sturdy base. Attach a corrugated metal fence facade along the blocks to provide support, and then add your pallet countertop.
For this project, you’ll need the following materials: cinder blocks, corrugated steel roofing sheet, landscaping fabric, sleeve anchors, large pallet, ½ plywood, exterior screws, stain, water seal, patio base/marble rock, exterior wood glue, and construction adhesive. You’ll also need a saw, drill, and hammer.
With a little bit of effort and some basic tools, you can create a simple yet stylish outdoor bar that’s perfect for entertaining. And best of all, this project won’t break the bank, so you can enjoy your new bar without worrying about the cost. Give it a try today!
Low-Budget Outdoor Pipe Bar Cart
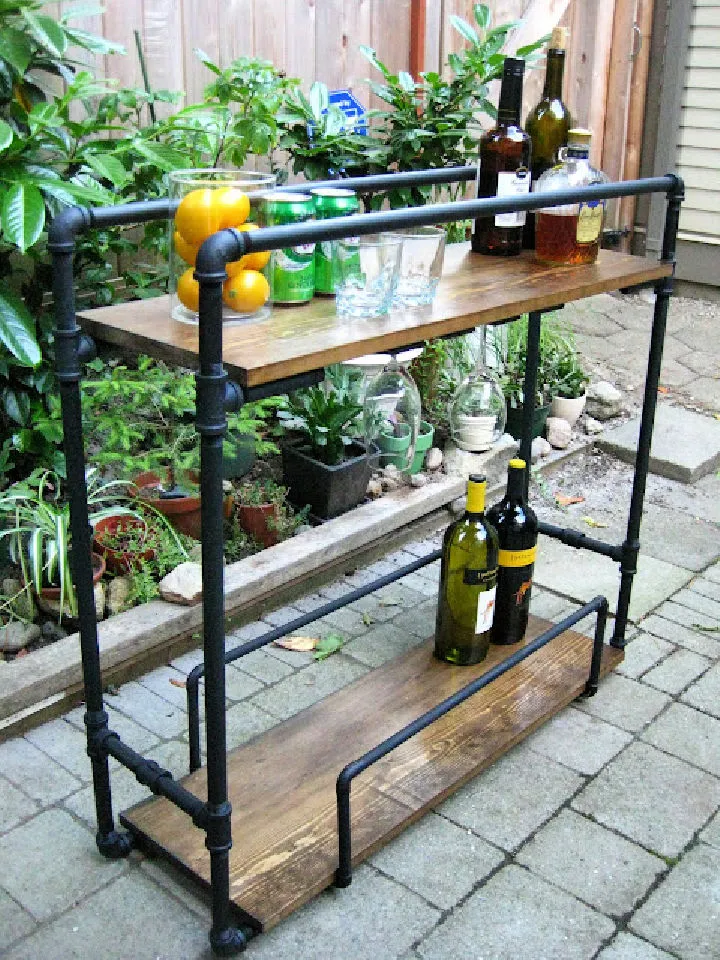
Looking for a way to add a little something special to your outdoor entertainment area? Why not build your own DIY outdoor bar cart? This project is quick and easy, resulting in a stylish and functional bar cart that will make your outdoor space more entertaining.
To build this low-budget outdoor pipe bar cart, you will need galvanized pipes, connectors, pine boards, steel strapings, wood stain, wooden dowel, light weight copper connectors, and wood glue. Once you have the materials, cut the board to the desired length and sand it. Then, assemble the pipe and connectors, and attach the pipe underneath the shelves with strapping. Finally, attach the glass rack to the upside of the bottom shelf. The shelf has enough space to hold six glasses.
This DIY bar cart is affordable, easy to install, and clean. It will make your outdoor space look more rustic and industrial. With this low-budget outdoor pipe bar cart, you can entertain your guests in style without breaking the bank.
Simple Durable Outdoor Kitchen Plan
If you’re looking to create a functional and attractive outdoor kitchen, this DIY plan is perfect for you. With a heavy-duty design, this outdoor kitchen is built to last and is easy to build. All you need are some basic woodworking skills and the right materials and tools.
To build this outdoor kitchen, you’ll need treated wood boards, cedar boards, waterproof wood glue, stainless steel screws, deck screws, finishing nails, oil-based wood waterproofer & protector, construction adhesive, solar LED lights, and water-repellent sealer. You’ll also need a grinder, nailer, tape measure, miter saw, drill and driver, roller frame, roller foam refill, roller tray liner, paint roller tray, and C-clamps.
Once you have all your materials and tools ready, you can begin building your outdoor kitchen. Follow the step-by-step instructions carefully to ensure a professional-looking, versatile, and enduring outdoor kitchen. Don’t forget to add some solar LED lights to create a warm and inviting atmosphere.
With this simple yet sleek outdoor kitchen, you can enjoy eating outside while enjoying the weather and adding some character to your space. So, why not DIY this plan now and make the most of your property this summer?
Outdoor Kitchen Plan With Paper Stone Countertop

Looking for a budget-friendly way to create an outdoor entertainment space? Consider building a DIY outdoor kitchen with a Paper Stone countertop. This project is easy to build and offers a durable and spacious element to cook conveniently.
To build this outdoor kitchen, you will need treated lumber (2×8’, 2×4’ & 4×4’), untreated 1×6’s, PaperStone Countertop, asphalt roofing panels, and wipe-on poly. You will also need a variety of tools, including a miter saw, sander, table saw, band saw, hammer drill, circular saw, jig saw, Forstner bits, drill bits, spade bits, drill, and impact driver.
The outdoor kitchen features a wooden base cabinet frame and a Paper Stone countertop that gives it a shiny stone look. The corrugated asphalt roofing with a lathing ceiling protects it from sun and rain. The simple design makes it easy to build with some handy materials and tools.
With this outdoor kitchen, you can create a durable, easy-to-clean, and spacious spot for your grill. It is an excellent project for those who want to enjoy gatherings and have fun in their outdoors.
Budget Friendly Outdoor Kitchen Plan

If you’re looking for a low-cost way to enjoy cooking outdoors, this DIY budget-friendly outdoor kitchen plan is an excellent option. This project is easy to complete and requires only a few materials, including treated pine, coated wooded screws, fiber-glass reinforcements, leather stain, fast-setting concrete-composite, construction adhesive, airstones, cement boards, and cement screws.
To build this outdoor kitchen, you’ll need to create a stone-based foundation leveled with concrete slabs and a wooden framework with cement boards. The countertop is made of concrete, which gives a natural edge to the outdoor kitchen with its unique clay hue and leather finish. The tiled airstones layer adds to the overall aesthetic appeal of the kitchen.
This project is an easy and fascinating way to create a sturdier cooking unit that is perfect for outdoor cooking. With the use of simple tools such as a drill, saw, level, and tape measure, you can complete this project in no time. So why not give it a try? You’ll have a beautiful and functional outdoor kitchen that won’t break the bank.
DIY Patio Outdoor Kitchen
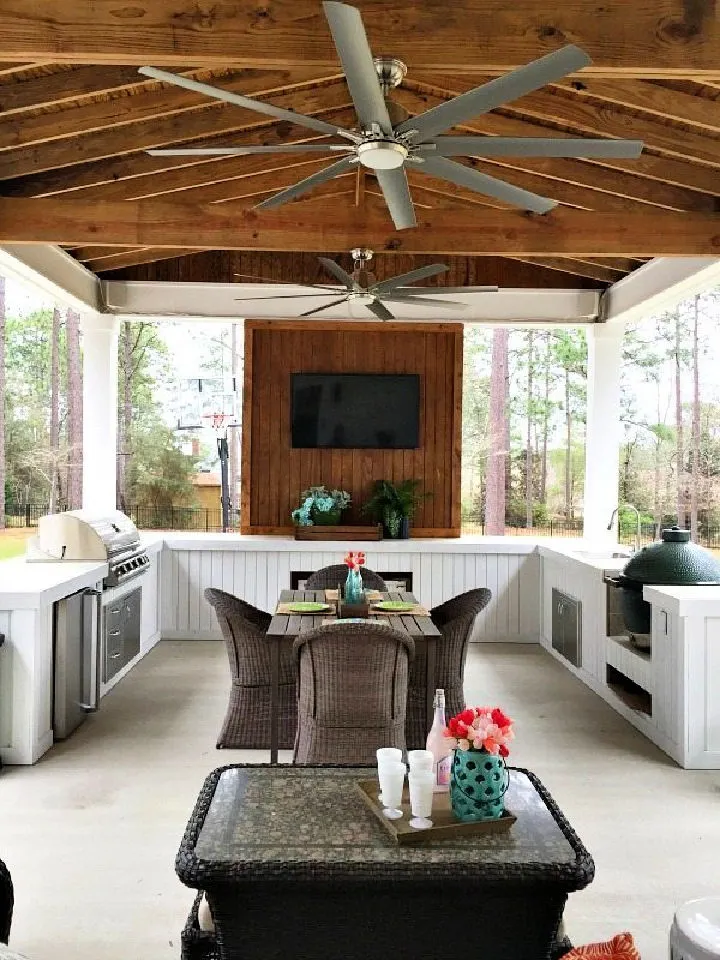
If you’re looking to add a touch of elegance to your patio, then building a DIY patio outdoor kitchen is a great project to undertake. This outdoor kitchen is perfect for preparing meals and snacks for your guests or serving food on the patio. The best part is that it is easy to build with simple tools and supplies.
The design of this outdoor kitchen features a wood ceiling, wood frame cabinet base built on a concrete patio, and tiled countertops protected with red guards. It also includes a wooden wall for the TV and a cabinet for storing TV essentials. The result is a durable, low maintenance, and easy-to-clean luxurious outdoor kitchen that will make your outdoor space stand out while allowing you to have a great place to entertain friends, family, and guests.
To build this outdoor kitchen, you will need materials such as lumber, pocket hole screws, backer board, nails, tile, plywood, stain, red guards, primer, paint, epoxy grout, fan, heaters, and lights. You will also need tools such as a Kreg Jig, drill, tape measure, saw, wood glue, and caulk gun.
With this plan, you can have a stylish and practical outdoor kitchen that will make your patio the envy of the neighborhood. Get started today and enjoy the benefits of having a beautiful and functional outdoor kitchen!
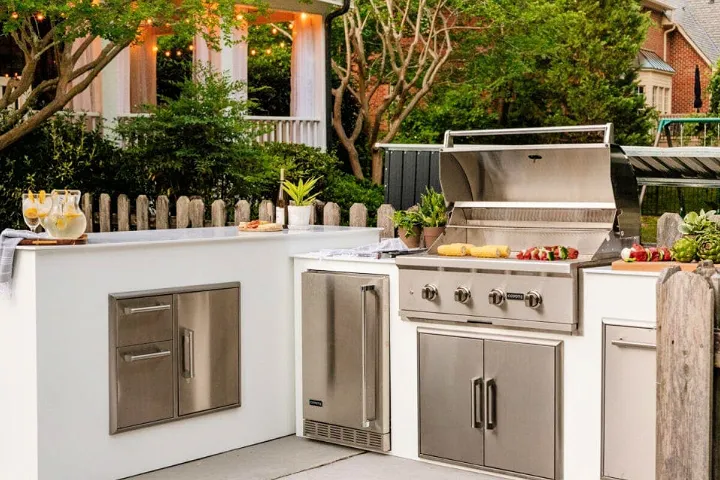
Outdoor BBQ Grilling Station

Looking for a way to enhance your backyard experience and impress your guests? Look no further than this DIY outdoor BBQ grill island. With its durable and low-maintenance grilling plan, you can enjoy cooking and have delicious meals in no time.
This outdoor kitchen features a culture stone veneered wood base frame with plywood box cabinets and spacious concrete countertops on each side of the grill. The comfortable height of the countertops makes food preparation easy and comfortable.
To build this project, you will need pressure-treated plywood, lumber, construction adhesive, metal posts standoff, deck screws, flange, mortar, stainless-steel roofing nails, lath, culture stones, grill, and stainless steel cabinet doors. You will also need a variety of tools, including a circular saw, drill/driver, hammer, mason hand tool, staple gun with staples, tin snip, mortar tub, pointing trowel, finishing trowel, miter saw, power grinder, drywall hawk, bar clamp, masonry hoe, notched trowel, and safety equipment.
This project offers durable and inexpensive construction, allowing you to enjoy cooking and entertaining in your backyard with ease. So why wait? Start building your own outdoor BBQ grilling station today and enjoy delicious meals with your guests in the comfort of your own backyard.
Redwood Outdoor Kitchen Cabinet Plan

Create a functional and beautiful outdoor kitchen space with this DIY redwood outdoor kitchen cabinet plan. The project is perfect for entertaining or relaxing with family and friends. The cabinetry is made of durable and beautiful redwood, which is perfect for outdoor use. The large island is perfect for preparing meals, and the outdoor grill is perfect for cooking. The under-cabinet space provides ample storage for settings, while the hidden drawer protects useful items from the elements.
Building this modern-sleek outdoor kitchen requires little experience, and you can easily follow the simple DIY plan to create a beautiful and functional cabinet. The materials required for this project include redwood 2x4s, hardware, stain applicator, redwood fence planks, and stain. The tools required for the project include a drill, saw, and nail gun.
With proper care, this redwood outdoor kitchen cabinet will last for years and will be a perfect addition to your outdoor kitchen space.
Making an Outdoor BBQ Cart

If you’re looking to add some convenience to your outdoor cooking experience, building an outdoor BBQ cart is a perfect DIY project for you. This sturdy and durable cart is designed to withstand the elements and is easy to build with just a few materials and tools.
To build this BBQ cart, you’ll need framing studs in 1×2, 1×3, and 1×4 sizes, along with boards, nails, stain, wood filler, paint, pocket hole screws, and casters. You’ll also need a sander, nail gun, paint brush, spacer, and Kreg Jig to complete the project.
The BBQ cart features top and bottom shelves for storing spices, sauces, and herbs, as well as a long drawer with pulls for hanging towels and grilling tools. The cart also has a removable working space for easy cleaning and maintenance.
This versatile DIY cart can double as extra cooking space and a full bar cart, making it a great addition to any outdoor space. So why not get started on this DIY project and enjoy grilling at ease with this versatile cookout piece?
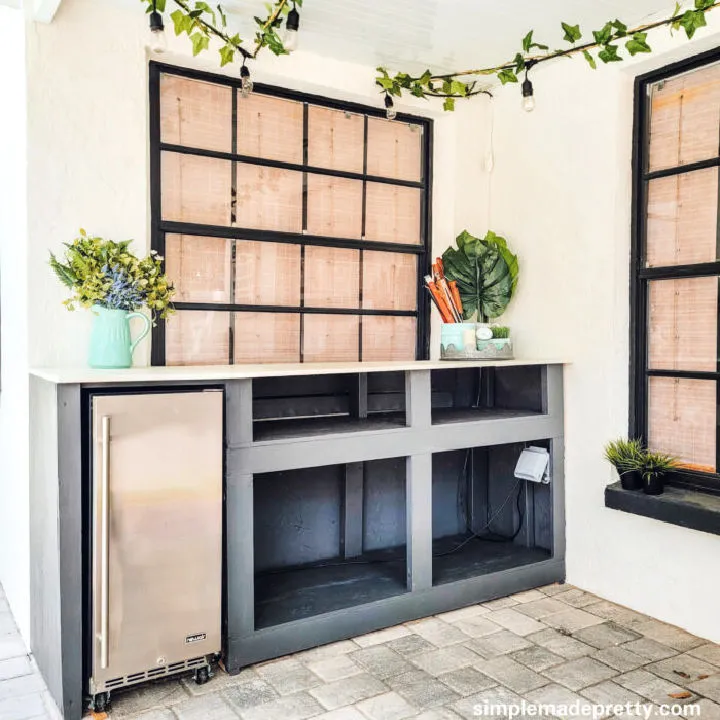
Upcycled Cabinet Mini Bar

Looking for a unique and eco-friendly way to enhance your outdoor entertainment? Why not try building your own upcycled cabinet mini bar? This DIY project is perfect for repurposing an old hutch or cabinet, and can serve as a beverage and food station, outdoor snack bar buffet station, or even a minibar. With a little creativity, it can be the perfect addition to any party or event.
To get started, select an old hutch or cabinet that is in good condition. You can also use any other piece of furniture you have on hand. Once you have chosen your piece, paint it and decorate it to your liking. Next, add a mini fridge and wine glass racks, or customize it to your preference.
Here are the materials and tools you will need:
Materials:
- Old Hutch or Cabinet
- Paint
- Mini Fridge
- Cabinet Hardware
- Under-Cabinet Stem Ware Rack
- Painter’s Tape
Tools:
- Drill
- Drill Bits
- Paint Brush
- Paint Roller
- Canvas
This DIY plan will provide you with a multi-functional outdoor entertaining unit that is perfect for any occasion. Get started on your upcycled cabinet mini bar today!
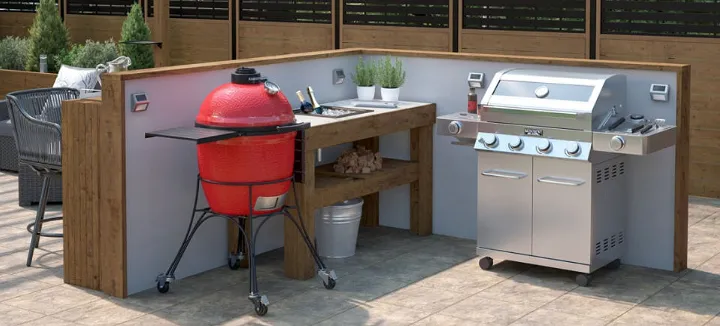
How to Build an Outdoor Kitchen with Rolling Drawers
Upgrade your outdoor space with this DIY outdoor kitchen with rolling drawers plan! This modern and modular outdoor kitchen is a great way to boost your outdoor space. The ceramic tile countertop makes it sturdy and durable, and the two cabinets model on caster wheels allow for easy mobility. The shelving provided also helps keep your outdoor kitchen organized.
This project is straightforward and can be completed over the weekend, costing you less than $500. Even a novice DIYer can easily complete it, yet it offers an overwhelming cooking unit that will look great in any outdoor space.
To build this outdoor kitchen, you will need the following materials:
| Materials | Quantity |
|---|---|
| Treated Wood | – |
| Plywood Panel | – |
| Treated Wood U-Molding | – |
| Stainless Steel Screws | – |
| Swivel Lock and No-Lock Casters | – |
| Exterior Wood Stain | – |
| Exterior Acrylic Latex | – |
| Finishing Nails | – |
| Deck Screws | – |
| Corner Braces | – |
| Strap Hinge (stainless) | – |
| Washers (stainless steel) | – |
| Nailing Strips (pressure treated) | – |
| Weatherproof Wood Glue | – |
| Mono Serra Porcelain Tile | – |
| High-Temperature Enamel Paint | – |
You will also need the following tools:
| Tools | Quantity |
|---|---|
| Miter Saw | – |
| Drill | – |
| Measuring Tape | – |
| Compressor | – |
| Pneumatic Nailer | – |
| Roller Tray Liner | – |
| Paint Roller Tray & Refill | – |
| Roller Frame | – |
| Circular Saw | – |
Follow these steps to build your outdoor kitchen with rolling drawers:
- Begin by measuring and cutting the treated wood and plywood panel to the desired size.
- Assemble the treated wood into a frame and attach the plywood panel to the top of the frame using finishing nails.
- Install the treated wood U-molding around the edges of the plywood panel using exterior wood glue and stainless steel screws.
- Attach the swivel lock and no-lock casters to the bottom of the frame to create the rolling drawers.
- Install the corner braces to provide additional support.
- Attach the strap hinge to the cabinet doors and install the washers and screws.
- Install the nailing strips to the back of the cabinets and attach them to the frame using deck screws.
- Apply exterior wood stain and acrylic latex to protect the wood from weather damage.
- Install the mono Serra porcelain tile to the countertop using high-temperature enamel paint.
- Your outdoor kitchen with rolling drawers is now complete and ready to use!
By following these steps, you can easily build your own outdoor kitchen with rolling drawers and add some convenience and practicality to your outdoor living space.
Summary
Designing and building your own outdoor kitchen can be a fun and rewarding project. With a little creativity, planning, and some basic DIY skills, you can create a functional and stylish outdoor cooking and entertaining space. Consider factors such as layout, materials, appliances, and lighting to create a space that meets your needs and fits your budget. With the right tools and resources, you can turn your backyard into a culinary oasis.