Looking to add some personality to your luggage while making it easier to spot on the baggage carousel? Look no further than these DIY luggage tag ideas. By creating your own tags, you can ensure that your luggage stands out from the crowd and reflects your unique style. With 25 free printable options to choose from, you can easily create sturdy tags using card stock or regular printer paper.
DIY Personalized Luggage Tag
A luggage tag is an important accessory for any traveler. Not only does it help you identify your bag, but it also makes your luggage stand out from the rest. With this easy DIY project, you can create a personalized luggage tag that is both functional and stylish.
To make your own luggage tag, you’ll need the following materials:
- A blank luggage tag
- Paint or markers
- Stickers or stencils (optional)
- Clear contact paper or laminating sheets
- String or a plastic loop for attaching the tag to your luggage
Here are the steps to follow:
- Decorate the front of the tag with your desired design using paint, markers, stickers, or stencils.
- Allow the design to dry completely before adding any text or personal information.
- Write your name, address, and phone number on the back of the tag using a permanent marker.
- Cover the front and back of the tag with clear contact paper or laminating sheets to protect the design and information.
- Attach the tag to your luggage using string or a plastic loop.
With this simple DIY project, you can create a personalized luggage tag that is easy to spot and will help you identify your bag quickly. Plus, it’s a fun and inexpensive way to add some personality to your luggage.
DIY Embossed Leather Luggage Tag

In today’s world of carry-on bags and roller luggage, it can be challenging to identify your suitcase among a sea of similar-looking bags. A stylish leather luggage tag can make your suitcase stand out while also adding a touch of sophistication. Creating an embossed leather luggage tag is a simple DIY project that requires only a few materials: leather scraps, embossing tools, a utility knife, scissors, pencil, and ruler. The skill level required for this project is moderate, meaning that it will not take a lot of time, but patience is necessary.
To make the tag, start by cutting a rectangular piece of leather to the desired size. Then, use a ruler and pencil to mark the tag’s outline and any design or lettering you want to emboss. Use embossing tools to create the design or lettering, and then cut out the tag’s shape with a utility knife. Finally, punch a hole in the top of the tag and attach it to your luggage with a sturdy cord or strap.
Overall, creating an embossed leather luggage tag is an easy and fun way to personalize your luggage while also making it easier to identify.
DIY Leather Luggage Tags
Making your own leather luggage tags is a simple project that can add a touch of personalization to your travel bags. Not only do these tags look stylish, but they also make it easier to identify your luggage at a busy airport or bus station. With just a few simple tools and materials, you can create your own unique luggage tags.
To make your own leather luggage tags, you will need the following materials:
- Leather scraps
- Leather punch
- Metal eyelets
- Hammer
- Stamps (optional)
- Leather dye or paint (optional)
Follow these simple steps to create your own leather luggage tags:
- Cut a piece of leather to your desired size and shape using a sharp pair of scissors or a craft knife.
- Use a leather punch to create a hole in the top center of the tag.
- Insert a metal eyelet into the hole and secure it in place using a hammer.
- If desired, use stamps to add your name or initials to the tag.
- Apply leather dye or paint to the tag for added color and personalization.
With just a little bit of patience and creativity, you can create your own unique leather luggage tags that will make your travel bags stand out from the crowd.
DIY Luggage Tag

Making your own luggage tag is a simple and easy way to distinguish your bag from others. This project requires basic sewing skills and involves using sturdy leather to ensure that it lasts for a long time. Here are the steps to make your own luggage tag:
- Cut a rectangular piece of leather to the desired size for your tag.
- Fold the leather in half, with the rough side facing out.
- Sew the two sides of the leather together, leaving the top open.
- Turn the tag right side out.
- Cut a piece of cord to the desired length for your tag.
- Thread the cord through the top of the tag.
- Tie a knot in the cord to secure it in place.
By following these simple steps, you can create a unique luggage tag that will make your bag stand out from the crowd. This project is perfect for beginners who are looking to improve their sewing skills.
Homemade Luggage Tag

If you’re looking for a quick and easy way to personalize your luggage, a homemade luggage tag is a great option. Not only is it a fun DIY project, but it’s also a practical way to identify your bag on the luggage carousel.
To make a homemade luggage tag, you’ll need a few basic supplies including a soft material of your choice, a luggage strap, and a printed identification card. The best part about making your own tag is that you can use any fabric you want, making it completely customizable to your style.
Here are the steps to make a homemade luggage tag:
- Cut your fabric to the desired size and shape.
- Sew the edges of the fabric together, leaving a small opening to insert the identification card.
- Insert the identification card and sew the opening closed.
- Attach the luggage strap to the tag.
One of the benefits of making a homemade luggage tag is that it’s a soft material, which means it won’t make any noise when you’re wheeling your bag through the airport. Additionally, it’s machine washable, so you can easily clean it if it gets dirty during your travels.
Overall, making a homemade luggage tag is a simple and practical way to personalize your luggage while also making it easier to identify on the luggage carousel.
How to Make Rustic Wooden DIY Luggage Tags

Making your own luggage tags is a great way to add a personal touch to your luggage while also ensuring that it stands out on the baggage carousel. With this tutorial, you can create rustic wooden DIY luggage tags that are not only stylish but also durable enough to withstand the rigors of travel.
To get started, gather the necessary materials, including wooden tags, a wood burning tool, a drill, leather straps, and vintage-style hardware. Then, follow these simple steps:
- Use the wood burning tool to burn the traveler’s name and destination onto the wooden tag.
- Drill a hole in the top center of the tag for the leather strap to go through.
- Thread the leather strap through the hole and tie a knot at the end to secure it in place.
- Attach the vintage-style hardware to the leather strap using pliers.
Once you have completed these steps, you will have a beautiful and unique luggage tag that is sure to stand out on the baggage carousel. Plus, you can customize it to your liking by adding different designs or using different types of wood. With a little bit of creativity and some basic woodworking skills, you can create a luggage tag that is both functional and stylish.
DIY Luggage Tag
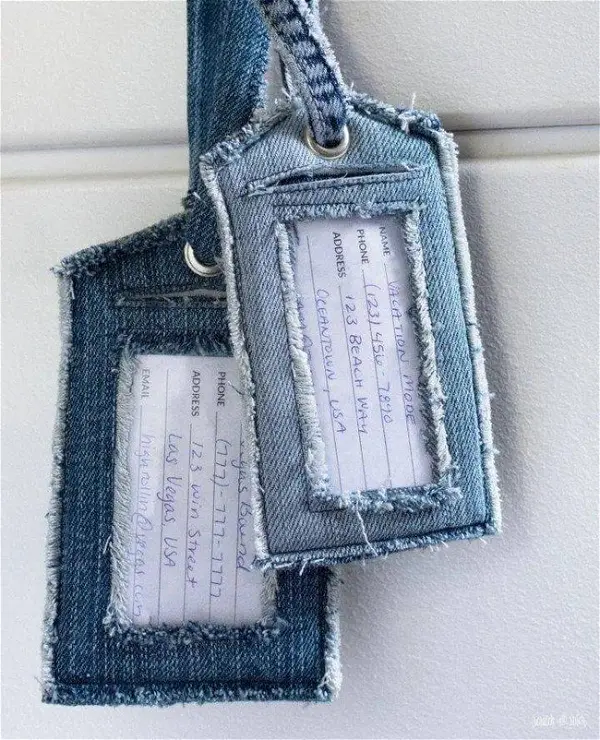
Looking for a way to personalize your luggage or backpack? Why not make your own luggage tag from recycled denim material? This DIY luggage tag is not only stylish, but also sturdy and easy to make. Plus, it comes with a vinyl window for inserting an information card to help identify your suitcase at baggage claim.
To make this luggage tag, you will need advanced sewing skills. Begin by cutting a piece of denim fabric to the desired size, then fold it in half and sew the edges together, leaving a small opening to turn it right side out. Insert a vinyl window and sew the opening shut. Finally, add a strap or loop to attach the tag to your luggage.
This luggage tag is perfect for full-size suitcases, but can be scaled down to fit a carry-on bag or laptop case by reducing the size of the cut fabric. With this easy DIY project, you can go from zero to travel-ready in no time!
DIY Shrinkable Plastic Luggage Tags
If you’re a frequent traveler, having luggage tags is a must. Making your own luggage tags can be a fun and easy DIY project. With this DIY shrinkable plastic luggage tag project, you can make your luggage tags in just under an hour. The materials required for this project are clear shrinkable plastic, colorful tag design, and basic crafting tools.
To make your luggage tags, start by designing your tag on a computer or by hand. Print it out and trace it onto the shrinkable plastic sheet. Cut out the tag and punch a hole in it for the strap. Follow the instructions on the shrinkable plastic sheet to shrink the tag to the desired size.
Once your tag is shrunk, attach it to your luggage with a strap. The most important thing to remember when making your own luggage tags is to ensure that the information on the tag is durable and not easily removed. Include your name, address, and phone number on the tag.
This DIY project is rated as advanced, so be sure to have some experience with crafting before attempting it. With these fun and personalized luggage tags, you’ll never have trouble spotting your luggage at the airport baggage carousel again!
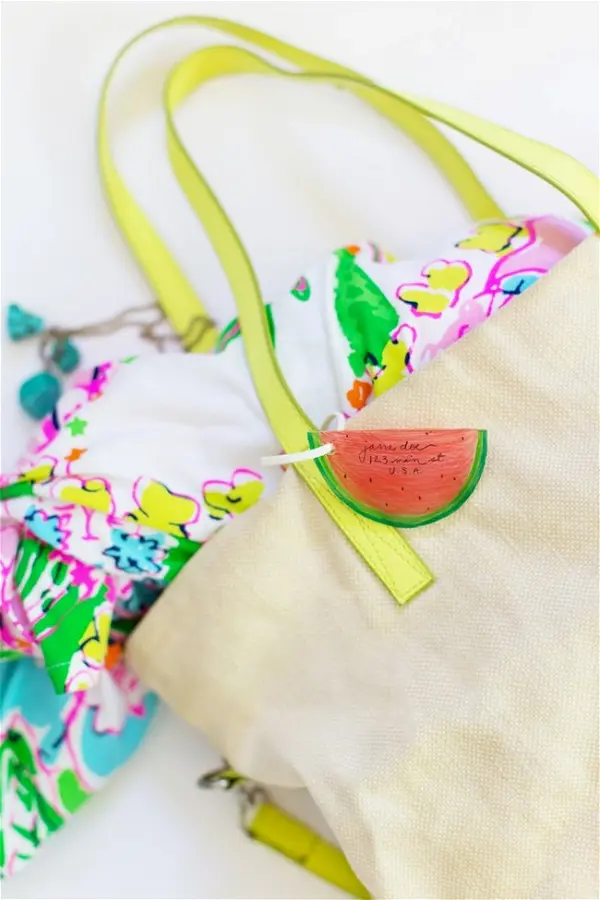
Leather Luggage Tags DIY
Personalize your suitcase with these super easy-to-make leather luggage tags. These tags can also be used as gift tags or name tags for kids. Not only are they beautiful, but they’re also practical and durable, making them easy to spot on a crowded bag carousel. With your contact information on the tag, finding you if your bag is lost will be easier.
To make these tags, you’ll need leather, a letter stamp set, a hammer, a hole punch, and a small clasp. Follow these simple steps to create your own:
- Cut the leather into a rectangle shape.
- Use the letter stamp set to stamp your name or initials onto the leather.
- Use the hammer to firmly attach the letters to the leather.
- Punch a hole on each side of the tag for the rope.
- Attach a small clasp to make it easier to open and close.
These luggage tags are perfect for those with simple crafting skills. They not only add a touch of class to your luggage but also make it easier to identify.
Easy DIY Luggage Tags
Are you looking for a way to make your luggage stand out from the crowd? Try making your own luggage tags! Not only is it a fun and easy DIY project, but it’s also a great way to ensure that your luggage is easily identifiable.
To make your own luggage tags, all you need is some card stock, a laminator, and some colorful or patterned paper. Simply cut the card stock into the desired shape and size, add your name and contact information, and then laminate the tag. You can even add some decorative paper to make your luggage tags more unique and personalized.
This DIY project is simple and requires no special skills, making it perfect for anyone to try. Plus, by making your own luggage tags, you can save money and have fun at the same time. So why not give it a try and make your next trip a little more colorful and personalized?
DIY Luggage Tag Sewing Tutorial
If you are a traveler, you understand the importance of having a reliable luggage tag. Not only does it help to identify your luggage when it is lost, but it can also make a statement about your style. This tutorial will guide you through the process of creating your own personalized luggage tag using fabric and ribbon. The best part is that this project is beginner-friendly and doesn’t require any complex sewing techniques. Additionally, you can use up any fabric scraps you have lying around the house.
To make your own luggage tag, you will need the following materials:
- Fabric (preferably cotton)
- Ribbon
- Sewing machine
- Scissors
- Ruler
- Pencil or fabric marker
Follow these simple steps to create your own luggage tag:
- Cut out two pieces of fabric in the desired shape and size of your tag.
- Cut a piece of ribbon to the desired length for the tag loop.
- Pin the ribbon loop in between the two fabric pieces, with the loop facing inwards.
- Sew around the edges of the fabric, leaving a small opening for turning the tag right side out.
- Turn the tag right side out and use a pencil or fabric marker to push out the corners.
- Sew the opening closed and you’re done!
This DIY luggage tag sewing tutorial is a great way to create unique and personalized tags for each member of your family. Plus, you can have fun with different fabrics and designs to make your luggage stand out on the baggage carousel.
DIY Typographic Luggage Tags

You can easily make your luggage stand out from the crowd with these DIY typographic luggage tags. The best part about this project is that you can customize the text to say anything you like, using any font you have available. These tags are a fun and easy way to add a personal touch to your luggage. You can choose your own phrases, colors, and fonts to make them totally unique!
To make these tags, you will need advanced skills. Here are the steps:
- Choose a font and phrase you would like to use for your tag.
- Print out the phrase in the desired font and size.
- Cut out the phrase and laminate it for durability.
- Punch a hole in the tag and attach it to your luggage with a string or metal loop.
With these DIY typographic luggage tags, you’ll never have to worry about losing your luggage again!
Make Your Own Watercolor Luggage Tags

If you’re looking for a fun and easy way to add some personality to your luggage while also making it easier to identify, try making your own watercolor luggage tags. This DIY project uses washi tape and watercolor paper to create colorful and unique tags that will help your bags stand out from the crowd.
To make your own watercolor luggage tags, you’ll need the following supplies:
- Watercolor paper
- Washi tape
- Scissors
- Hole punch
- Ribbon or twine
- Watercolor paints and brushes
Once you have your supplies, follow these simple steps:
- Cut the watercolor paper into tag shapes.
- Use washi tape to create fun designs and patterns on the tags.
- Paint over the washi tape with watercolor paints.
- Allow the tags to dry completely.
- Punch a hole in the top of each tag.
- Thread ribbon or twine through the hole and tie it onto your luggage.
These watercolor luggage tags are not only easy to make, but they’re also a great way to add some personality to your bags while making them easier to identify. Plus, they’re a fun DIY project that you can do with friends or family before your next trip. So why not give it a try and see how creative you can get with your own watercolor luggage tags?
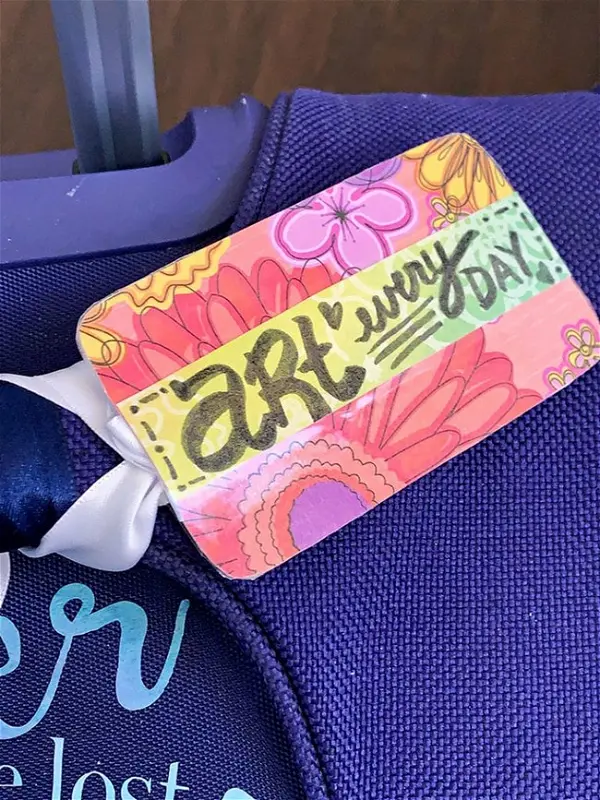
Homemade Luggage Tag

Make your luggage stand out from the crowd with an easy-to-make Homemade Luggage Tag. It’s a great way to add a personal touch to your suitcase, backpack, or beach bag. This project can be super creative, and you can make a statement with your luggage tag. You can even make these for family members as gifts for any occasion.
This tutorial shows you how to use an old gift card to make a durable and attractive luggage tag. It’s a fun and inexpensive way to add some personality to your bags. The skill level required for this project is advanced, but it’s still easy to make.
With this tutorial, you’ll learn how to create a luggage tag that is unique and eye-catching. You’ll have so much fun making these tags that you’ll want to create one for each of your bags.
DIY Fabric Luggage Tag
Making your own fabric luggage tag is a fun and easy DIY project that adds a personal touch to your luggage. With just a few materials and some basic sewing skills, you can create a stylish and unique luggage tag that will make your suitcase stand out from the rest.
To make your own fabric luggage tag, you will need:
- Fabric or ribbon of your choice
- Fusible interfacing
- Clear vinyl
- Sewing machine
- Thread
- Scissors
- Iron
Here’s how to make it:
- Cut a piece of fabric and fusible interfacing to the desired size of your luggage tag.
- Iron the fusible interfacing onto the wrong side of the fabric.
- Cut a piece of clear vinyl slightly smaller than your fabric and place it on top of the right side of the fabric.
- Sew around the edges of the vinyl, leaving a small opening for the luggage tag strap.
- Cut a piece of ribbon or fabric for the luggage tag strap and sew it onto the vinyl.
- Fold the fabric in half, right sides together, and sew around the edges, leaving a small opening for turning.
- Turn the luggage tag right side out and press with an iron.
- Topstitch around the edges of the luggage tag, closing the opening.
This easy DIY fabric luggage tag is a great way to add a personal touch to your luggage while also making it easier to identify your suitcase at baggage claim. Give it a try and see how easy it is to make your own unique luggage tag!
DIY Luggage Tags

Personalize your luggage with these creative and easy-to-make DIY luggage tags. Whether you’re a pizza lover or a surf enthusiast, there’s a tag for everyone. Follow the step-by-step instructions in each tutorial to create a unique and eye-catching tag that will make your bag stand out at baggage claim. Not only do these tags add personality to your bags, but they also make it easier for your friends to spot you in a crowd.
These DIY luggage tags are not only perfect for travel bags, but also for athletic equipment and more. Check out the 28 DIY Camera Strap Projects for even more inspiration on how to personalize your belongings. Don’t settle for boring luggage tags, let your creativity shine with these fun and iconic ideas.
DIY Luggage Tags

Are you tired of waiting at the baggage carousel, trying to spot your luggage among the sea of similar-looking bags? Try making your own DIY luggage tags! They’re simple to create and can save you time and frustration on your next trip.
To make your own luggage tags, you’ll need some basic supplies like cardstock, laminating sheets, and a hole punch. Here’s how to do it:
- Cut out a tag shape from the cardstock, about 2.5 inches by 4.5 inches.
- Decorate the tag with your favorite colors, patterns, or stickers.
- Write your name, address, and phone number on the back of the tag.
- Laminate the tag using the laminating sheets.
- Punch a hole in the top of the tag and attach it to your luggage with a sturdy loop of ribbon or string.
With these DIY luggage tags, you’ll be able to spot your luggage from a distance and avoid any mix-ups at baggage claim. Plus, they’re a fun and easy way to personalize your travel gear.
DIY Laminated Luggage Tags
Luggage tags are a must-have accessory for any traveler, but they can be flimsy and easily damaged. Additionally, traditional luggage tags do not offer any security for your personal information. This is where DIY laminated luggage tags come in handy. By adding a laminate to the tag, you can protect it from water damage and make it last longer.
Making your own laminated luggage tags is easy and can be done in just a few minutes. All you need are some basic materials that you probably already have at home. Here’s how to do it:
- Gather your materials. You will need cardstock or heavy paper, clear contact paper, a hole punch, and a ribbon or string.
- Cut your cardstock or heavy paper into a tag shape and punch a hole at the top.
- Write your contact information on the tag.
- Cut a piece of clear contact paper slightly larger than your tag.
- Peel off the backing of the contact paper and carefully place it over the tag, smoothing out any bubbles.
- Trim the excess contact paper around the edges of the tag.
- Thread a ribbon or string through the hole and attach it to your luggage.
By following these simple steps, you can create durable and secure luggage tags that will last for many trips to come. Just remember to use a moderate skill level when attempting this project.
How to Make a Luggage Tag
If you want to make your luggage stand out from the rest, consider making your own luggage tag. Making a leather luggage tag is a simple and fun DIY project that can add a personal touch to your luggage. Here are the steps to make your own luggage tag:
- Gather your materials. You will need leather, a cutting tool, a ruler, a hole punch, and a metal eyelet.
- Cut the leather to your desired size and shape using a cutting tool. You can make it any shape you want, such as a circle, rectangle, or even a unique shape that reflects your personality.
- Use a ruler to mark where you want to punch the hole for the tag.
- Use a hole punch to make a hole in the leather where you marked it.
- Insert a metal eyelet into the hole to reinforce it.
- Add your personal touch by stamping your name or a design onto the leather.
- Attach the tag to your luggage and enjoy your personalized luggage tag.
This simple DIY project is perfect for travelers of all skill levels. With a little creativity, you can make a luggage tag that is unique and reflects your personality.
DIY Quilted Luggage Tag
Making your own quilted luggage tag is a fun and easy project that anyone can do, even if you’re a beginner. This tutorial will show you step-by-step how to make a luggage tag using fusible webbing, so there’s no need to pin all your layers together. You can use any type of fabric you like, but make sure it’s thick enough so that your information on the back won’t show through. Quilting cotton, canvas, and leather are all great options.
Here’s what you’ll need:
- Fabric scraps
- Fusible webbing
- Clear vinyl
- Grommet and grommet tool
- Sewing machine and thread
- Iron and ironing board
Instructions:
- Cut your fabric and fusible webbing to the desired size.
- Iron the fusible webbing onto the wrong side of your fabric.
- Cut a piece of clear vinyl to the same size as your fabric.
- Sew your fabric and vinyl together, leaving a small opening to turn it right side out.
- Turn your luggage tag right side out and sew the opening closed.
- Use a grommet tool to add a grommet to the top of your luggage tag.
- Attach a strap to your luggage tag and you’re done!
With this easy tutorial, you can make your own personalized luggage tags for yourself or as gifts for your loved ones.
DIY Luggage Tag Using Duct Tape

If you want to make sure that your luggage is easily identifiable and distinguishable, making your own luggage tag using duct tape is an easy and inexpensive way to do so. This tutorial is perfect for those with an easy skill level. Here’s how you can make a luggage tag using duct tape:
- Cut two pieces of duct tape, each measuring 8 inches in length.
- Place one piece of duct tape on top of the other, sticky sides facing each other.
- Fold the two pieces of duct tape in half, lengthwise.
- Cut the folded duct tape to your desired tag size.
- Peel off the backing of one side of the duct tape and fold it in half.
- Cut a small piece of duct tape and fold it in half, lengthwise.
- Place the folded piece of duct tape on the top of the luggage tag, leaving a small loop at the top for the luggage tag to hang from.
- Use a permanent marker to write your contact information on the luggage tag.
With these simple steps, you can create a unique and personalized luggage tag that is both functional and stylish. Plus, by using duct tape, you can rest assured that your luggage tag will be durable and long-lasting.
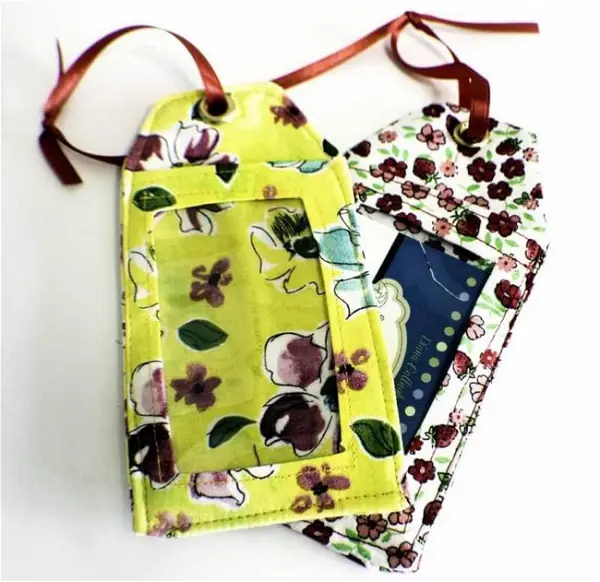
DIY Fabric Luggage Tag
Looking for a fun and unique way to identify your luggage on your next trip? Why not try making your own luggage tag? This DIY fabric luggage tag is not only stylish, but it’s also durable enough to withstand any journey. Made from 100% cotton fabric, this tag is perfect for those who want to add a personal touch to their luggage.
To make this DIY luggage tag, you’ll need some advanced sewing skills. The tag is made up of two pieces of fabric, sewn together and laminated on the backside to protect the information on the card inside. You can create a fun design using your favorite fabrics and colors to make your luggage stand out in a sea of black bags.
This DIY luggage tag is perfect for making handmade luggage tags for each of your family members’ suitcases. It’s a great way to add a personal touch to your luggage and make it easy to identify at the airport. So, why not give it a try on your next trip?
How To Sew DIY Luggage Tags
If you’re looking for a fun and easy way to keep track of your luggage, then DIY luggage tags are the perfect solution! Not only are they practical, but they’re also a great way to add a personal touch to your bags. Here’s how you can make your own:
Materials
- Scrap fabric remnants
- Sewing machine
- Thread
- Scissors
- Ruler
- Iron
- Pins
- Grommet kit
Instructions
- Cut out two rectangles of fabric, each measuring 4 inches by 2.5 inches.
- Place the two pieces of fabric with their right sides facing each other and sew around the edges, leaving a small gap for turning.
- Turn the fabric right side out and iron flat.
- Fold the fabric in half, with the right sides facing each other, and sew along the long edge.
- Turn the fabric right side out and iron flat.
- Fold the fabric in half again, this time with the wrong sides facing each other, and iron flat.
- Use a grommet kit to add a grommet to the top of the tag.
- Thread a piece of ribbon or elastic through the grommet and tie a knot.
And that’s it! You now have a personalized luggage tag that is both practical and stylish. With this simple tutorial, you can easily create a set of luggage tags for yourself or as a gift for your friends and family. Happy sewing!
DIY MDF Luggage Tags

If you’re looking for a unique way to personalize your luggage, consider making your own luggage tags out of MDF (medium-density fiberboard). MDF is a wood composite material that’s easy to cut and sand, and some companies even carry pre-cut and laser-etched shapes for DIY projects that can be finished however you like.
Not only are these luggage tags great for identifying your luggage at the baggage carousel, but they can also be used as gift tags for friends who love to travel. Making these tags is an easy and fun project that requires just a few items you probably already have on hand.
To get started, you’ll need MDF tags, paint, a brush, and a design. Simply paint your MDF tag with your chosen design, let it dry, and attach it to your luggage. With its smooth surface, MDF takes designs to the next level and is easy to work with.
Keep in mind that this project is considered advanced, so be sure to take your time and follow all safety precautions when working with MDF.
How to Make a Luggage Tag in Leather
Making a luggage tag in leather is a simple and practical project that can serve as a key ring, bag tag, or luggage tag. The durability of leather makes it the perfect material for a luggage tag that can withstand the wear and tear of frequent travel. To create a high-quality luggage tag, you will need a sturdy leather strap and a brass plate. The leather strap is a crucial component of the tag as it is the first thing people will notice. Therefore, it is essential to make it look attractive.
Here are the steps to make a luggage tag in leather:
- Cut the leather strap to your desired size and shape using a leather cutter or scissors.
- Punch a hole in the center of one end of the strap using a leather hole puncher.
- Insert a brass plate into the hole and fold the leather strap in half to secure the plate.
- Use a leather stitching awl to make a hole on both sides of the folded strap.
- Stitch the two sides of the strap together using a leather needle and waxed thread.
- Attach a metal ring to the hole on the other end of the strap to complete the luggage tag.
With these simple steps, you can create a durable and attractive luggage tag that will last for years.
Summary
Creating your own luggage tags can be a fun and creative way to personalize your luggage while making it easier to identify on the baggage carousel. There are many DIY luggage tag ideas that you can try, including using scrapbook paper, leather, or even repurposing old credit cards. Consider adding your name, contact information, or a unique design to make your luggage stand out. With a little creativity, you can make a luggage tag that is both functional and stylish.