Creating your own kiln can be a cost-effective way for ceramic artists to harden their clay pieces. With 23 DIY kiln ideas to choose from, you can easily find inspiration to build your own kiln. You may not have thought of your kiln as a DIY project, but it certainly can be.
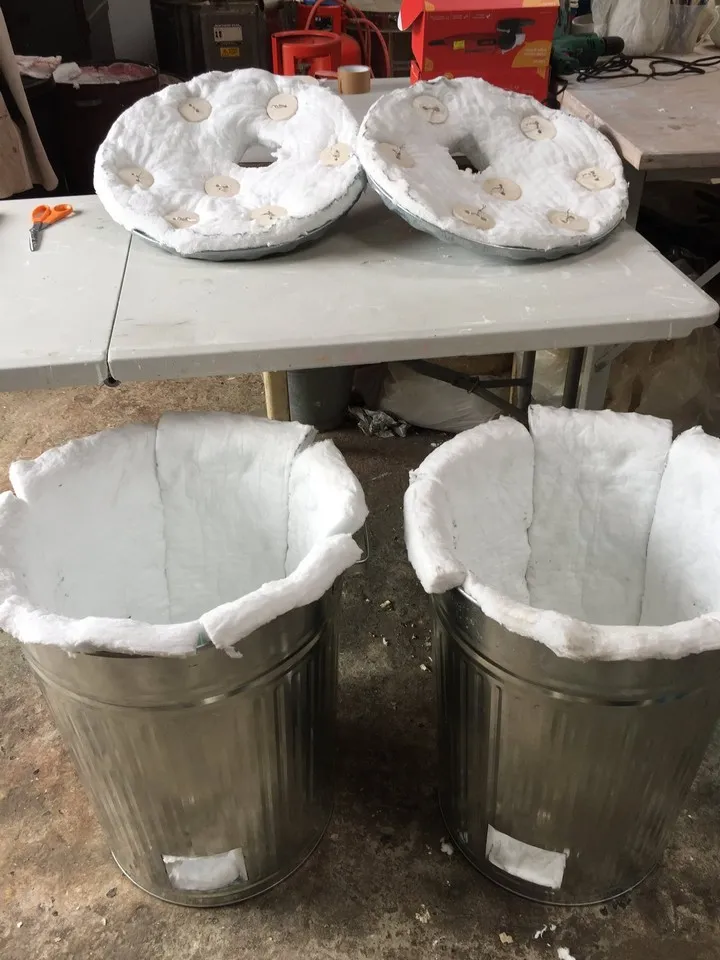
Dustbin Raku Kiln Tutorial
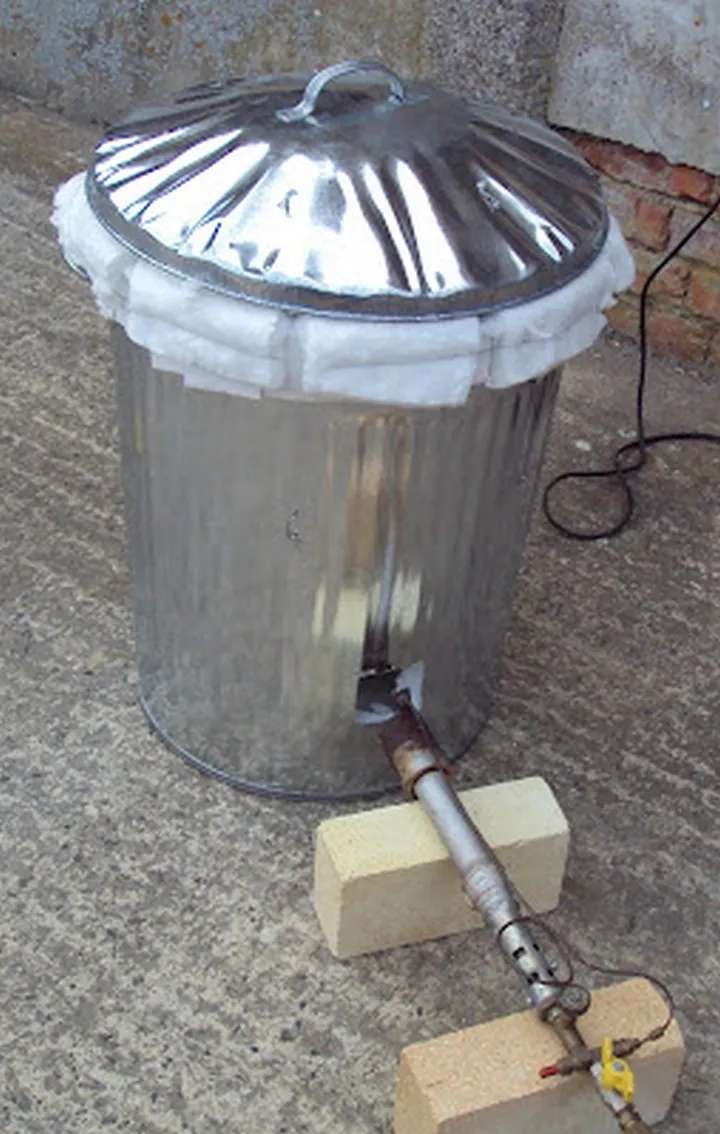
Transform your old dustbin into a stunning kiln using the raku pottery technique. This upcycling idea is a perfect way to add a unique touch to your home decor. Follow these simple steps to make your own kiln using a dustbin and ceramic buttons:
- Cut a hole in the bottom of the dustbin for ventilation.
- Drill holes around the top of the dustbin for the ceramic buttons to hold the lid in place.
- Line the inside of the dustbin with ceramic fiber blanket and place a propane burner at the bottom.
- Cover the top with a lid and heat the kiln to 1800°F.
- Once heated, place your pottery inside the kiln and let it cool for a few minutes before removing it.
With this technique, you can create glass ornaments, figurines, and other unique pieces of art. Give your old dustbin a new life with this easy and fun project.
How To Build A Gas Kiln
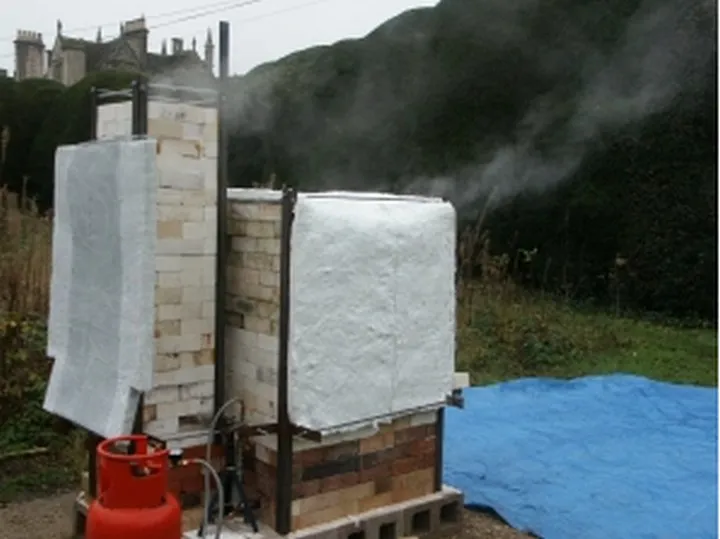
Building a gas kiln is a great DIY project that can add value to your pottery studio. Here are the steps to follow:
- Design your kiln: Sketch out your design on paper, considering the size, shape, and materials needed.
- Gather materials: Purchase the necessary materials, including firebricks, burners, and a gas regulator.
- Build the frame: Construct the frame of the kiln using metal studs and cement board.
- Install the burners: Install the burners into the kiln, ensuring they are properly spaced and secured.
- Install the gas line: Connect the gas line to the burners and install a gas regulator.
- Build the chimney: Construct a chimney to vent the kiln and prevent the buildup of harmful gases.
- Install the insulation: Line the inside of the kiln with insulation to retain heat and improve efficiency.
- Test the kiln: Before firing up the kiln, perform a test run to ensure everything is working properly.
By following these steps, you can create a gas kiln that heats up quickly and evenly, providing the perfect environment for firing your pottery.
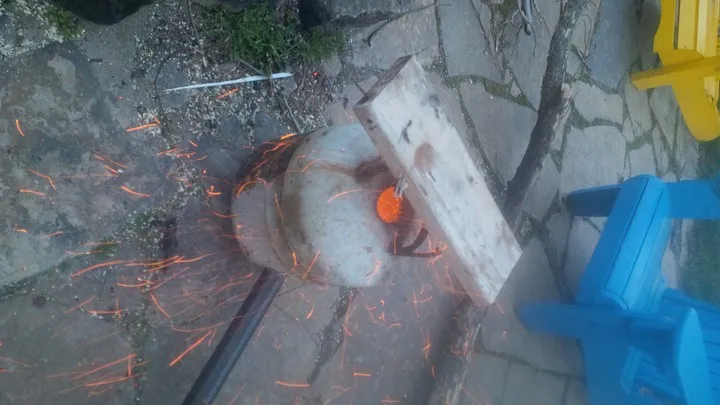
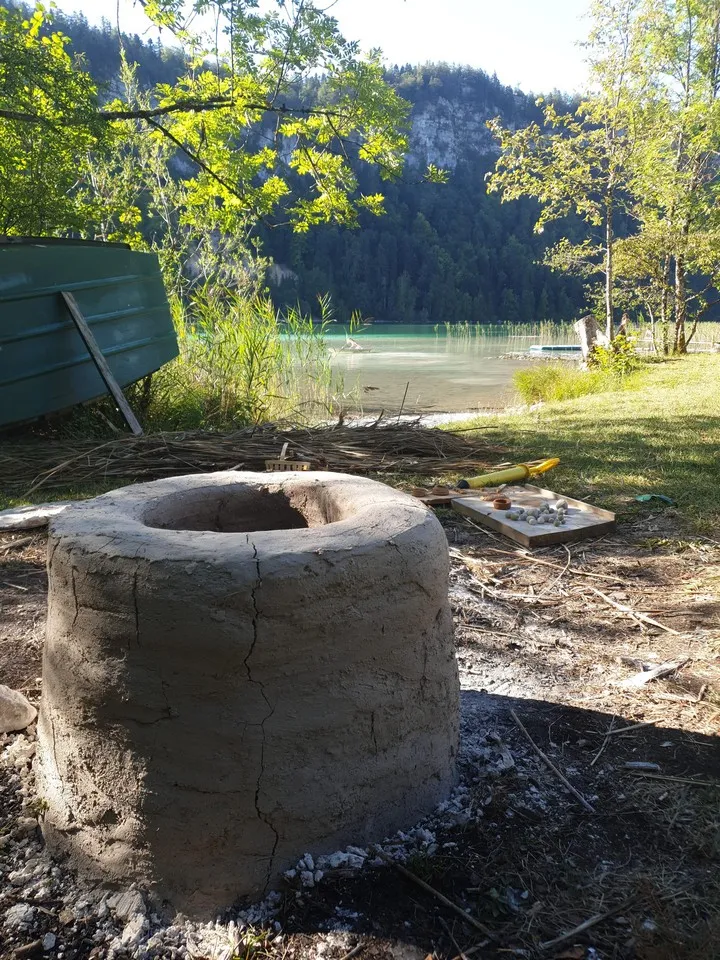
How to Construct a Basic Wood-Powered Raku Kiln
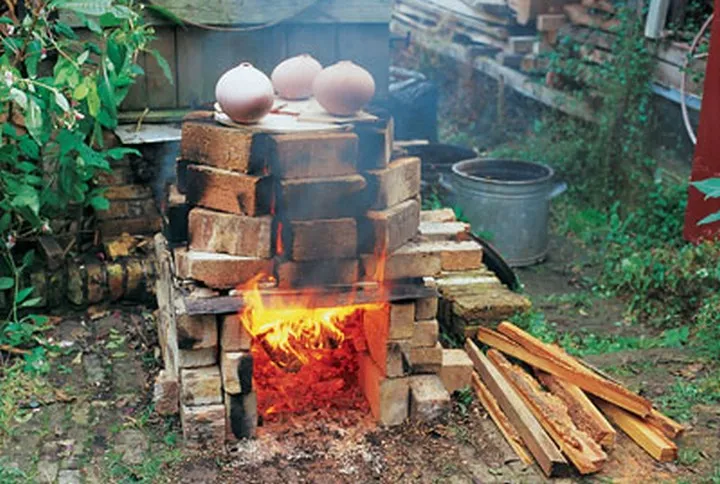
To create a raku pottery kiln that produces beautiful swirls and colors, you only need bricks, sand, and a sturdy box that can hold combustible materials like sawdust or wood chips. This kiln combines two firing methods: raku, which uses heat, and wood burning, which uses high heat.
Here are the steps to build your own kiln:
- Create a base using bricks or cinder blocks and fill it with sand.
- Build a strong box with bricks, leaving a hole for ventilation.
- Fill the box with combustible materials like sawdust or wood chips.
- Light the materials on fire and let them burn until the box reaches the desired temperature.
- Place your pottery pieces inside the kiln and let them fire until they’re ready.
This simple wood-powered raku kiln is an excellent way to create beautiful artwork using two popular firing methods. With a little bit of effort and the right materials, you can construct a kiln that will produce stunning results.
Homemade Pottery Kiln
If you’re interested in pottery but don’t want to buy a kiln, you can make one using an old washing machine and scrap materials. This DIY tutorial will guide you through the process of creating a custom kiln that can be used for pottery, glass, or any other material that needs to be baked. The best part is that you get complete customization regarding fireproofing and insulation. With this homemade pottery kiln, you can explore your creativity without spending a lot of money on expensive equipment.
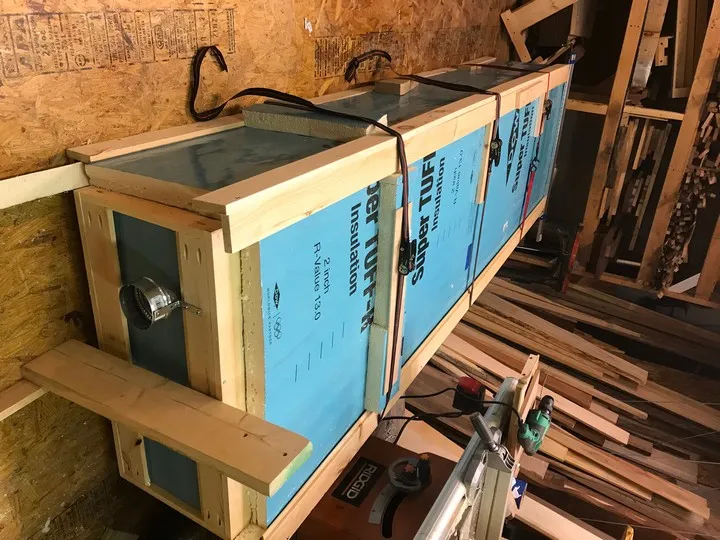
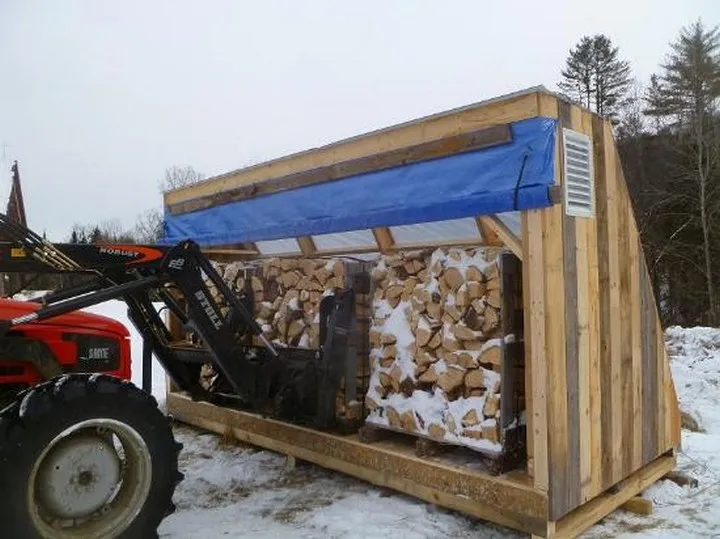
Build A Dehumidifier Wood Kiln
If you’re a woodworker, you know how important it is to dry wood before using it. A dehumidifier wood kiln is an efficient and cost-effective way to dry wood. Here’s how you can build one:
- Gather materials: metal sheets, roofing panels, an empty barrel, and plywood.
- Build a frame out of plywood and metal sheets to create the structure of the kiln.
- Cut holes in the sides of the barrel and install the roofing panels to create vents.
- Install a dehumidifier in the kiln and connect it to the vents.
- Place the wood to be dried in the kiln and turn on the dehumidifier.
With this DIY dehumidifier wood kiln, you can dry wood in a controlled environment, ensuring that it is ready for use in your woodworking projects. Plus, building your own kiln can save you time and money compared to purchasing one from a store.
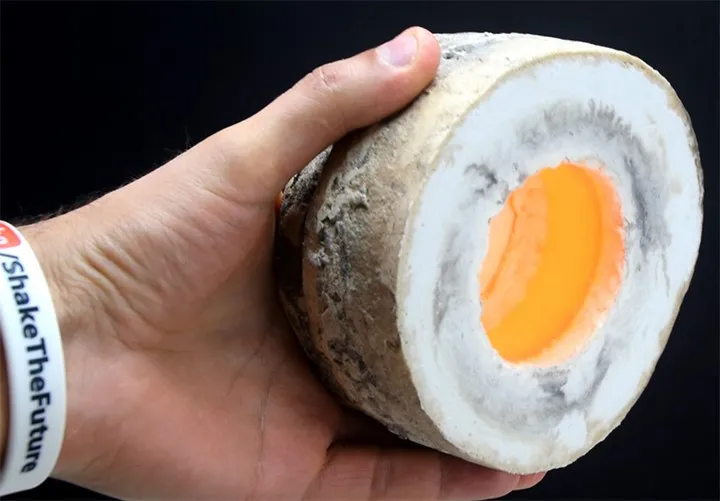
DIY Melting Kiln
If you’re looking to melt various materials like glass, metal, and stones for your artistic projects, a DIY Melting Kiln can be an inexpensive and fun option. You can easily build one using materials found around your house, and it won’t take more than half an hour. You don’t need any special woodworking skills or knowledge of power tools to build this kiln. Once you have it, you can create unique projects using your imagination. This kiln is perfect for making stained glass windows, iron sculptures, and jewelry. With this DIY Melting Kiln, your creativity will know no bounds.
DIY Kiln For Woodturners

If you’re a wood turner looking for a way to keep your equipment at the perfect temperature, this DIY kiln project is a great option. With some basic materials and a shelf unit, you can create a customised shade that fits your needs. The design is easy to build and cost-efficient, making it perfect for beginners. Detailed illustrations and simple installation instructions are included, so you can complete this unique project step-by-step. Keep your wood-turning tools and parts safe with this DIY kiln.
Small Scale Biochar Kiln

If you’re looking to create biochar and other wood-burning materials like charcoal and wood chunks for barbecuing or smoking, then a small-scale biochar kiln could be a great starting point. This homemade kiln is easy to make and suitable for small batch production of biochar. You don’t need any fancy or expensive equipment, just some basic materials and skills. With a small-scale biochar kiln, you can produce biochar in your backyard. It’s a great way to get your hands dirty and create something beautiful and useful.
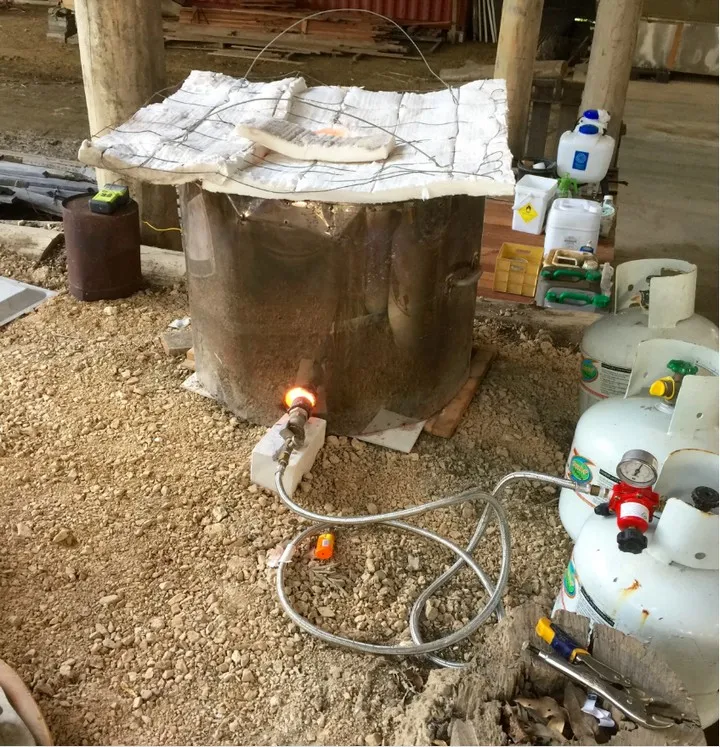
DIY Mini Gas Test Kiln
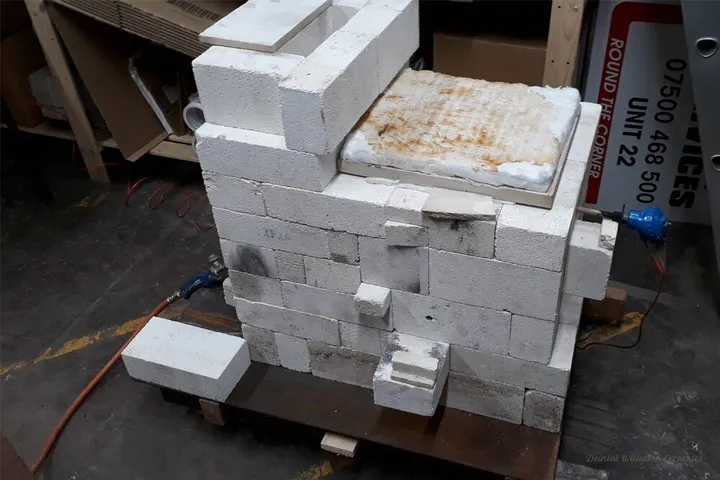
If you’re an aspiring potter or a hobbyist looking to experiment with pottery, creating a mini gas test kiln can be a fun and rewarding project. With simple materials, you can build a kiln that will allow you to test firing schedules and gauges, as well as make glass beads from colored cullet. Here are the basic steps to create your own mini gas test kiln:
- Gather materials such as firebricks, kaowool insulation, propane burner, and a temperature gauge.
- Build a box-shaped structure using the firebricks, leaving a small opening for the propane burner.
- Line the inside of the structure with kaowool insulation.
- Install the propane burner and attach it to a propane tank.
- Add a temperature gauge to the kiln to monitor the temperature as you start firing your pottery.
With your DIY mini gas test kiln, you can start experimenting with firing schedules and gauges to achieve the desired results for your pottery. Remember to always keep track of the temperature and adjust accordingly to avoid any mishaps.
Reclaimed Lumber Scalable-Size Wood Kiln
Looking for a simple yet impressive DIY project to do at home? Why not make yourself a Roman Shade from reclaimed wood and a kiln? By repurposing old lumber for the shade and a kiln for the frame, you can create a unique and eco-friendly addition to any room. Plus, you can easily adjust the size and shape of the project by varying the thickness of the boards you use. Finished with a neutral beige paint, this project is sure to impress. Customize it with any color to match your decor and enjoy the satisfaction of creating something beautiful from reclaimed materials.
Build Your Own Raku Kiln
To build your own Raku kiln, you’ll need a few materials, including reclaimed lumber, scalable-size wood kiln, ceramic buttons, nichrome wire, a power drill, a Raku burner, and strips of ceramic fiber. This kiln is built taller than most kilns, so it can also be used as a work table. Follow the diagram carefully and make each piece accordingly. Once completed, place it on cinder blocks or bricks for a more stable base. With this DIY project, you can have your own Raku kiln in no time.
DIY Solar Kiln

If you are looking for an eco-friendly heat source, the DIY Solar Kiln is the perfect solution for you. Not only can it be used for making new art pieces, but it can also be used for baking food items and more. This kiln is easy to build and can be made in just two hours using recycled materials and inexpensive items from Amazon and eBay. The step-by-step process for building the DIY Solar Kiln is described below. Once built, it can be used in your greenhouse, garden, and other plants. It is a basic design idea that can help reduce your curiosity or problems while making an eco-friendly heat source.
Solar Wood Drying Kiln
Looking for an eco-friendly way to dry out wood, lumber, or blocks? Consider building a DIY solar kiln. This type of kiln utilizes solar panels to absorb heat and maintain a high temperature inside the kiln, which allows for efficient and effective drying. The solar kiln does not require fuel or electricity, making it a cost-effective and environmentally friendly option. Additionally, the kiln features a convenient door for easy loading and unloading of materials. With a solar kiln, you can easily dry out your wood during the winter and foggy months without producing any waste.
Microwave Kiln Tutorial
If you’re looking to create a DIY kiln, building a classic-shaped kiln is recommended for optimal thermal efficiency and uniform heating. Fortunately, you can easily repurpose an old microwave to create a kiln that can be used for hardening, drying, or temperature needs. This tutorial will guide you through the process, which should take approximately two to three hours. With a few simple steps, you can have a functional kiln that will serve your needs.
How To Make A Brick Kiln
Making a brick kiln is a simple and cost-effective way to fire pottery. Here are the steps to follow:
- Choose a suitable location for your kiln, preferably a flat and open area.
- Prepare the foundation by digging a shallow pit and filling it with gravel.
- Build a base using ordinary bricks and a concrete mixture.
- Place fire bricks on top of the base, leaving a small gap between them for ventilation.
- Build the walls of the kiln using ordinary bricks and a concrete mixture.
- Leave a small opening at the base of the kiln for ventilation.
- Add a chimney at the top of the kiln to allow smoke to escape.
- Allow the kiln to dry and cure for a few days before firing it up.
With these simple steps, you can easily make a brick kiln and start firing pottery in no time.
Raku Kiln Out Of An Old Electric Kiln
Looking to make a DIY kiln out of an old electric kiln? It’s a great way to repurpose old equipment and save money. Here’s how you can create your own raku kiln with just basic carpentry knowledge:
- Build a wooden base for the kiln to sit on. Make sure it’s sturdy and level.
- Install caster wheels on the bottom of the base to make it easy to move around.
- Stack concrete bricks on top of the base to create the walls of the kiln.
- Cover the entire kiln with wire mesh to keep everything in place.
- Add a fiber sheet on top of the wire mesh to insulate the kiln.
With these simple steps, you can create your very own raku kiln and start firing your pottery at home. Get creative and experiment with different firing techniques to achieve unique results.
Homemade Electric Glass Fusing Kiln
If you are interested in making your own fused glass, owning a DIY kiln can be a great idea. However, purchasing a kiln can be expensive and may not fit your specific needs. Building a homemade electric glass fusing kiln can be a cost-effective and safe alternative. With just a few materials, which can be easily found at your nearby store, you can create a kiln that is the perfect size for your fused items and available space. Just make sure to choose the right size for your needs.
Primitive Pottery Wood Firing Updraft Kiln
Looking to take your pottery crafting to the next level? The Primitive Pottery Wood Firing Updraft Kiln is a great option for those who love primitive and upcycling crafts. This DIY kiln is versatile, with an updraft design that allows for speedy firing. It comes equipped with a fan unit, grate, and interchangeable shrink-wrap shelves to accommodate your needs.
Here are some key features of the Primitive Pottery Wood Firing Updraft Kiln:
- Easy DIY design
- Versatile and updraft design for speedy firing
- Fan unit and grate included
- Interchangeable shrink-wrap shelves to accommodate your needs
With the Primitive Pottery Wood Firing Updraft Kiln, you can fire your ceramics and pottery with ease and see impressive results. So why not take your pottery crafting to the next level and try out this fantastic kiln?
Make A Primitive Kiln At Home

If you are a craft enthusiast and want to make a primitive kiln at home, you can use mud bricks with mud or clay as the main construction material. You will also need a metal sheet and a thermocouple for this project. Follow these easy steps to make a furnace for a modern home kiln, regardless of your experience level:
- Build a rectangular base using mud bricks. Make sure to leave a space in the center for the fire pit.
- Stack the mud bricks to create the walls of the kiln. Leave a small opening at the bottom for ventilation and a larger opening at the top for the smoke to escape.
- Line the inside of the kiln with a layer of mud or clay to protect the bricks from the heat.
- Place the metal sheet on top of the kiln walls to create a roof.
- Insert the thermocouple into the kiln to monitor the temperature.
With these simple steps, you can create a primitive kiln at home, perfect for pottery and other crafts.
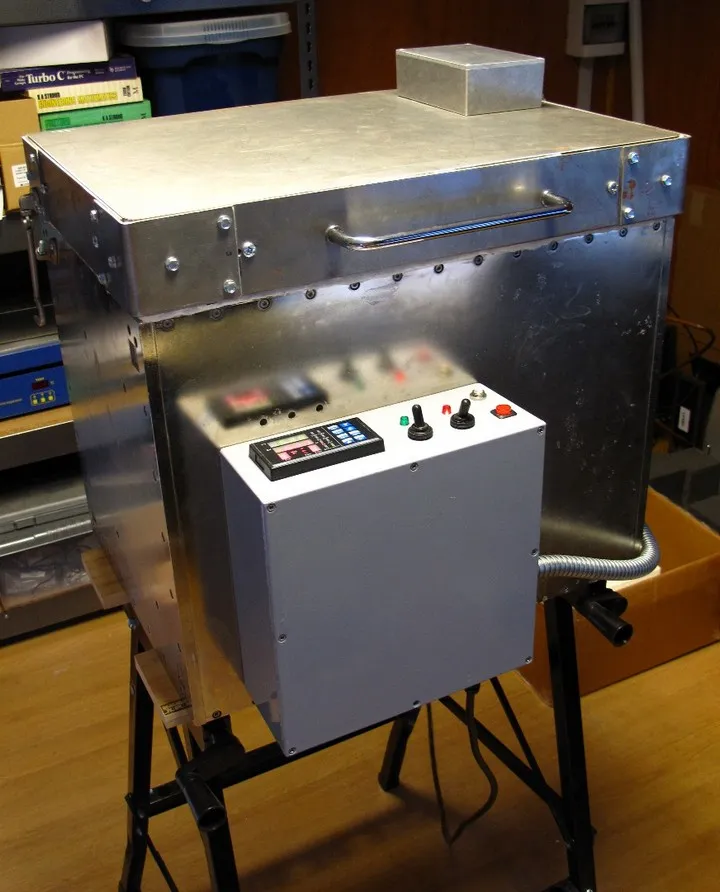
How to Build an Electric Kiln

If you’re interested in learning the basics of ceramics and pottery, but don’t want to invest in a kiln, then building your own electric kiln is a great option. With clear and easy-to-follow instructions, you can create pots, bowls, figurines, and more. However, it’s important to note that these instructions are meant only as a guide. If you don’t have experience in electrical wiring equipment, it’s not recommended that you attempt to build your own kiln.
To build an electric kiln, you’ll need to gather the necessary materials, including heating elements, a temperature controller, and insulating materials. You’ll also need to construct the kiln’s frame and wiring system. Once you have all the materials, you can follow the step-by-step instructions to assemble your kiln.
Building your own electric kiln can be a rewarding experience, but it’s important to prioritize safety and caution throughout the process. With the right equipment and a careful approach, you can create beautiful pottery and ceramics in the comfort of your own home.
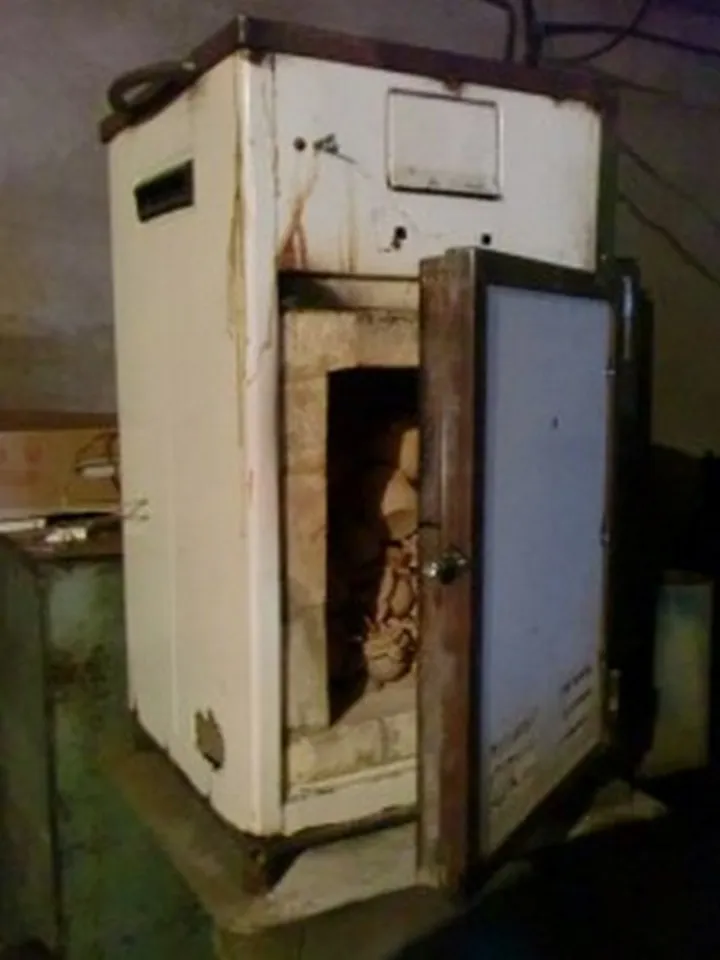
Turn An Old Fridge Into A Kiln
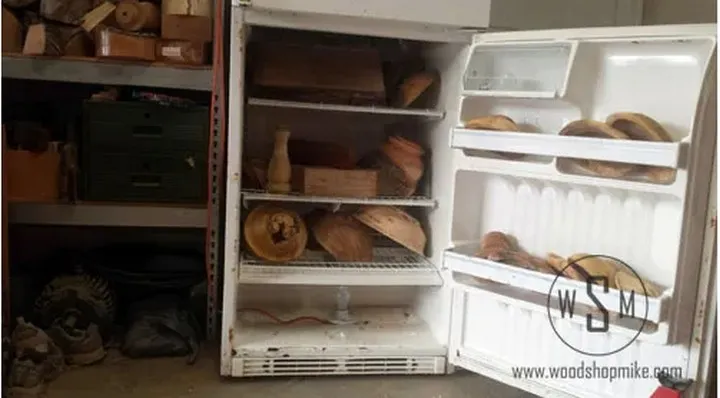
If you have an old fridge or freezer lying around, you can transform it into a kiln with a few simple steps. This sturdy, glass-on-wood kiln can be used to create various crafts, including ceramics and jewelry. Here’s what you need to know to turn your old appliance into a work of art:
- Remove the compressor and all other electrical components from the fridge.
- Cut a hole in the top of the fridge for ventilation.
- Install heating elements and a thermostat to regulate the temperature.
- Line the interior with firebrick or ceramic fiber insulation to protect the walls from the heat.
- Use kiln shelves to hold your projects.
With these steps, you can turn an old fridge into a fully functional kiln that can be used to create beautiful decorations or artful gifts. Give new life to your old appliance and unleash your creativity with this easy DIY project.
Build a Tobacco Kiln

If you’re interested in drying your tobacco at home, building a DIY tobacco kiln can be a convenient and quick solution. The main concept behind constructing a kiln is to use heat to burn organic matter and produce organic fuel. This method has been used for thousands of years to burn organic materials. By building a tobacco kiln, you can easily dry your tobacco stock and create your smoking blends and tobaccos.
Summary
To build a DIY kiln, you will need to gather materials such as firebricks, a heating element, and a temperature controller. Construct the outer shell of the kiln using the firebricks and insulate the inside with ceramic fiber blanket. Install the heating element and temperature controller, and connect them to a power source. Finally, test the kiln to ensure it reaches and maintains the desired temperature. With these steps, you can create your own kiln for pottery, metalworking, or other applications.