Looking to add some excitement to your Halloween celebrations this year? Why not try making some of your own props? In this article, we’ve got the 39 best DIY Halloween prop ideas for you, ranging from simple projects that can be completed in just a few hours to more complex builds that will take a little longer. So get crafting and have some fun this Halloween!
DIY Chicken Wire Cheesecloth Halloween Ghost

Add some spooky charm to your Halloween decor with this DIY Chicken Wire Cheesecloth Halloween Ghost. This project requires cheesecloth, chicken wire, and wire cutters. The skull is attached to a strip of chicken wire, and the arms are made of extra chicken wire. Easily hang the ghost using fishing line and an s-hook. For more details, check out diyshowoff.com.
DIY Light Up Skull

Add a spooky touch to your Halloween decorations with these DIY light up skulls. This project is not only easy to complete, but it will also save you money on expensive store-bought decorations. You can complete this project in about 15 minutes with just a few supplies.
To create the pedestal plate stand, use a glue gun to attach the melamine plates to the glass candlestick holders. Once the glue has dried, you can paint the skull and pedestal plates with black enamel spray paint.
After the paint has dried, remove the blue tape from the tea lights and place them in the center of the top of the new pedestal plate stand. Finally, place the skull on top of the pedestal plate stand and your spooky light up skull is ready to go!
Supplies needed for this project include two battery-operated tea lights, two small melamine plates, two glass candlestick holders, and two Halloween craft skulls. For more details on this project, visit frugelegance.com.
Realistic Dead Alien Halloween Prop

Create a spooky atmosphere with this realistic dead alien Halloween prop made from a skeleton, foam, paper mache, and paint. This project is perfect for scaring people as they come up to your front door. Place it anywhere to add a creepy touch to your Halloween decorations. Check out instructables.com for detailed instructions on how to make this eerie prop.
DIY A Life-Size Spider Victim

Looking for a creative way to decorate your porch for Halloween? Try making a life-size spider victim! This DIY project is easy to make and has a high impact on your Halloween decor.
To get started, you will need some plastic grocery bags, white tall kitchen trash bags, clear packing tape, 2-3 packages of store-bought cobwebs, sheer white fabric (optional), and hardware to hang your victim.
First, create a human-like form out of the plastic bags. Stuff the form with more bags and use packing tape to hold it together. You can use sheer white fabric to cover the form for a more realistic look.
Next, suspend the form from your porch ceiling or wall. Cover the form with cobwebs and add spiders until your victim looks sufficiently cocooned. For extra effect, you can also add skulls wrapped in spiderwebs around the porch.
This project is a great way to add a spooky touch to your home for Halloween. Get creative and have fun with it!
Creepy Head In A Jar

Looking for a spine-chilling addition to your Halloween decoration? A “Head in a Jar” prop is a perfect fit. This prop creates an illusion of a human head trapped inside a jar with the clever use of a printed face. The glass distortion of the jar and low lighting add to the effect, making it look like a real three-dimensional head. The prop is so convincing and disturbing that many people can’t bring themselves to look at it.
This prop is cost-effective and takes less time to create. It is sure to be the showstopper in any spooky setting. You can even use it as a year-round curio in your office. Check out madhauscreative.com for more project details.
DIY Zombie Dolls

Transform regular dolls into spooky monsters with this Halloween project from instructables.com. Follow these steps to create your own DIY zombie dolls:
- Gather materials, including dolls, acrylic paint, and fake blood.
- Remove any clothing or accessories from the dolls.
- Paint the dolls with a base coat of gray or green acrylic paint.
- Add details such as rotting flesh, exposed bones, and torn clothing with darker shades of paint.
- Apply fake blood to create a gruesome effect.
- Display your finished zombie dolls for a frightful Halloween decoration.
This project is a fun and creative way to repurpose old dolls into something new and spooky.
DIY Giant Scarecrow

Create a life-sized scarecrow to spook your neighbors and passersby. Add accessories like crows, straw, or a plastic pumpkin head with an LED light inside. For project details, visit hallmarkchannel.com.
DIY Masking Tape Hand Prop

Create a spooky Halloween decoration with this DIY masking tape hand prop. It’s quick and easy to make, taking only 15-20 minutes. The hand can be adjusted to fit any size wrist, and the fingers can be wrapped separately for a more realistic look. This technique can also be used on other parts of your body for a truly creepy effect. Check out wholesalehalloweencostumes.com for more project details.
Zombie Planted Hands

Looking for a cheap and easy way to add some Halloween spirit to your home? Look no further than the “zombie planted hands” project! All you need are some severed hands and potting soil, both of which can be found at your local dollar store. If you don’t have skewers, you can simply bury the hands in the soil.
To get started, fill your pots with soil and decide where you want to plant your hands. If necessary, add skewers to help position the hands in the pot. Plant one hand in each pot, making sure to position them at different angles for a more eerie effect.
This project is a great way to get creative and add some spooky decor to your home without breaking the bank. For more details on this project, check out sewwoodsy.com.
Spooky Halloween Candle
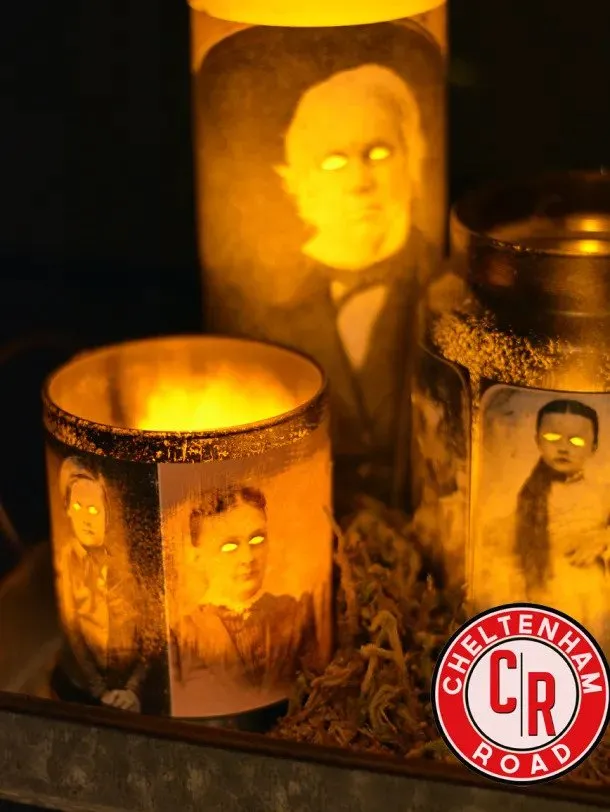
Looking for a fun and easy way to add some spooky decor to your Halloween party? Try making these eerie glowing eye candle holders! Simply choose any photos you want and use textured paint to create a creepy effect. The glowing effect is achieved by allowing some of the light to shine through both behind and under the pictures. These candle holders make great centerpieces for your Halloween party. For more details on how to make them, check out cheltenhamroad.wpcomstaging.com.
DIY Halloween Lawn Coffin Prop

If you want to add a spooky touch to your front yard this Halloween, creating a lawn coffin prop is a great way to do it. The project involves roughing up foam pieces, painting them, and attaching them together to form the coffin. The coffin lid is made separately and placed on top of the coffin at an angle. To make it extra creepy, you can add a skull mask with tealights for eyes. Follow the detailed instructions provided by wholesalehalloweencostumes.com to create your own DIY Halloween lawn coffin prop.
Spooky Crystal Ball Halloween Candlesticks

If you want to add a unique and spooky touch to your Halloween decorations, making your own crystal ball candle holders is a great idea. With the following steps, you can easily create your own crystal ball candlesticks:
- Choose the images you want to use for your crystal balls and print them out on transparency film.
- Cut out the shapes of the images and use a candle to add smoke to the ball until it is as dark as you like.
- Once the ball is cool, roll up the transparency image and glue it into place inside the ball opening.
- Add your crystal ball to your Halloween candlesticks.
These candlesticks are a great way to add a creepy and mystical vibe to your home during the Halloween season. For more details and inspiration, check out the project details at flamingotoes.com.
Make A Life-Size Halloween Ghost
Creating a life-size Halloween ghost is a fun and simple project that can be completed in a few easy steps. To make your spooky ghost, you will need cheesecloth and other inexpensive materials. Follow these steps to create a scary addition to your front yard or porch:
- Gather your materials, including a foam mannequin head, cheesecloth, fabric stiffener, a spray bottle, and a plastic drop cloth.
- Cover your work surface with the plastic drop cloth to protect it from the fabric stiffener.
- Mix the fabric stiffener with water in a spray bottle according to the manufacturer’s instructions.
- Drape the cheesecloth over the foam mannequin head, shaping it to create the ghost’s head and body.
- Spray the cheesecloth with the fabric stiffener mixture until it is completely saturated.
- Allow the fabric to dry completely, which may take several hours or overnight.
- Once the fabric is dry, carefully remove the cheesecloth from the mannequin head.
- Hang the ghost from a tree or other outdoor fixture using fishing line or string.
Your life-size Halloween ghost is now complete and ready to spook your neighbors and trick-or-treaters!
Creating Zombies Using Buckets
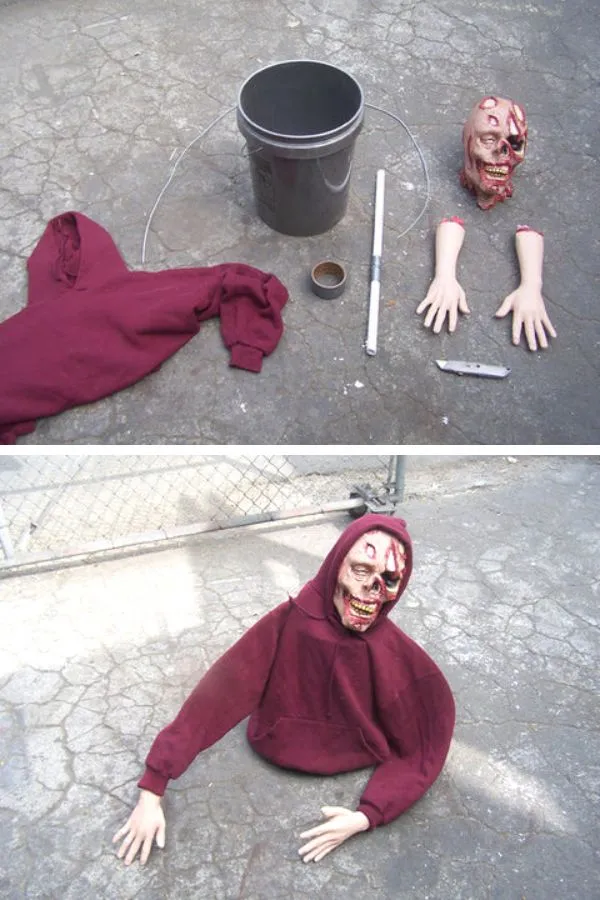
Creating zombies using buckets is an easy and cost-effective way to add some spookiness to your Halloween decorations. Here’s what you’ll need:
- A 5-gallon bucket
- A roll of duct tape
- A roll of wire
- A PVC pipe
- 1 fake head
- 2 fake hands
- A hooded sweatshirt
- A drill
- A knife
To create the zombie, start by drilling a hole in the bottom of the bucket and inserting the PVC pipe. Then, use the duct tape to attach the fake head and hands to the bucket. Wrap the hooded sweatshirt around the bucket and secure it with wire.
To make the zombie look more realistic, add makeup and blood. This will give your zombie a more gory and terrifying look.
For more project details and inspiration, visit dappercadaver.com.
Barbie Zombies: The Walking Dead
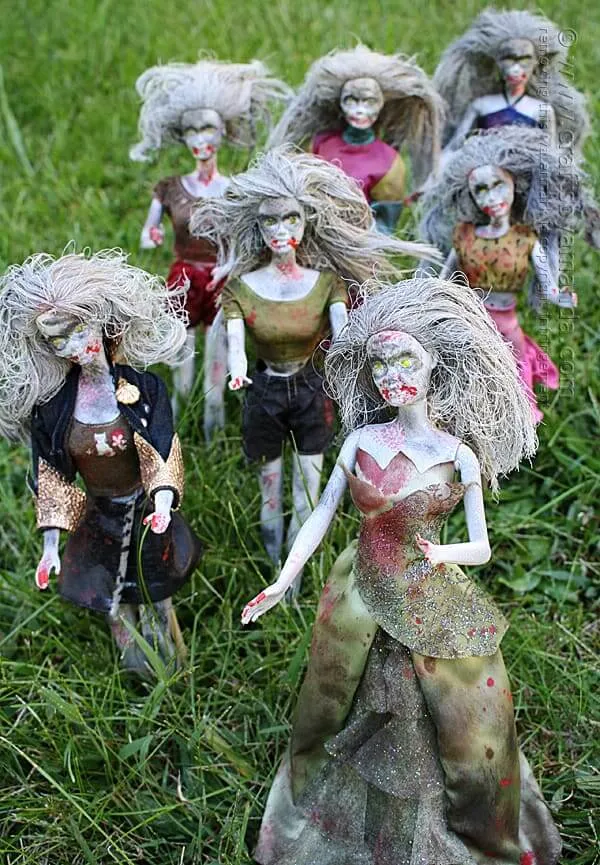
If you’re looking for a fun and spooky Halloween project, consider creating your own Barbie Zombies. These dolls have been given a zombie makeover, making them perfect for any Halloween display.
To create your own Barbie Zombies, you’ll need a few supplies, including yucky Barbies, gray and white spray paint, dye, paint pens, craft paint, and dowels (for standing them up). Follow these steps:
- Dye the Barbies’ clothes using a mixture of colors until they are a desired shade of brown.
- Remove the clothes from the Barbies and drain the dye.
- Paint the Barbies’ skin gray, white, and black, and their hair gray.
- Dress the Barbies in their newly dyed clothes.
- Give them zombie-inspired makeovers with paint pens.
With a little bit of time and effort, you can create your own unique Barbie Zombies. For more detailed instructions, visit craftsbyamanda.com.
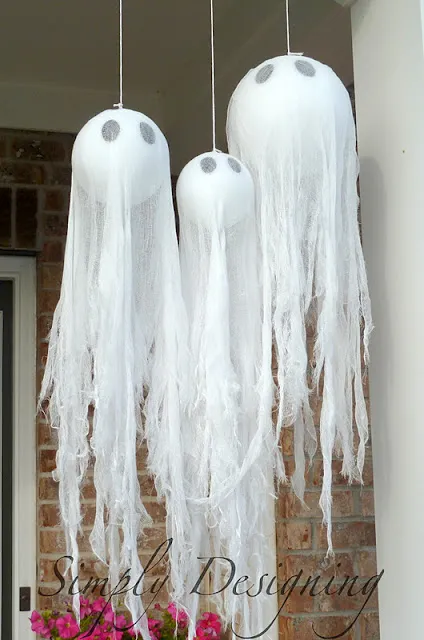
How To Make Hanging Ghosts

To create your own hanging ghosts for Halloween, you don’t need to spend a lot of money. You can make them easily using some styrofoam balls, black paint, cheesecloth, and eye screws. Follow these simple steps to create your own spooky decorations:
- Insert an eye screw into the top of each styrofoam ball.
- Use black craft paint to paint ghost eyes on each ball. Allow the paint to dry completely.
- Take two 1-yard squares of cheesecloth and place them over the top of each ball.
- Rip the cheesecloth to create a tattered look, and you’re done!
Hang your ghosts from your front porch or in your house for a spooky effect. These decorations are simple to make and won’t break the bank. For more inspiration and ideas, check out simplydesigning.net.
DIY Tomato Cage Ghost

Creating your own DIY Tomato Cage Ghost is a fun and easy way to add some spooky charm to your Halloween decor. To make one, you will need a tomato cage, string lights, a pillowcase, and a sharpie.
Here are the steps to follow:
- Wrap the string lights around the tomato cage, making sure to cover the entire cage.
- Slip the pillowcase over the top of the tomato cage, allowing the excess fabric to drape down over the sides.
- Use the sharpie to draw eyes and a mouth on the pillowcase, creating a ghostly face.
- Turn on the lights at dusk and enjoy the adorable glow of your new Tomato Cage Ghost.
This project is both inexpensive and easy to assemble, making it a great activity for the whole family. For more detailed instructions and inspiration, visit princesspinkygirl.com.
Carnivorous Plant

A unique and intriguing plant species that has been known to consume small animals and insects is the carnivorous plant. This plant has adapted to survive in environments with poor soil quality by deriving nutrients from its prey. Here are some interesting facts about the carnivorous plant:
- The carnivorous plant is also known as a “man-eating” plant, but it is not capable of consuming humans.
- There are over 600 species of carnivorous plants, with the Venus flytrap being the most well-known.
- These plants have specialized leaves that are designed to trap and digest prey.
- The traps are triggered by the movement of the prey, causing the leaves to snap shut and trap the prey inside.
- The plant then secretes digestive enzymes to break down the prey and absorb the nutrients.
- Carnivorous plants are found in wetlands and bogs around the world, with the majority being native to North and South America.
- Some species of carnivorous plants are endangered due to habitat destruction and poaching.
Overall, the carnivorous plant is a fascinating and unique species that has adapted to survive in harsh environments. While they may not be capable of consuming humans, their ability to consume small animals and insects is an impressive feat of evolution.
DIY Concrete Tombstones

Creating a spooky Halloween display has never been easier with these DIY concrete tombstones. To make your own, simply mix cement according to instructions and spray a baking pan with oil. Pour the cement into the pan and wait for it to start setting. Once it’s partially set, use a screwdriver to carve out an inscription of your choice. Be sure to spray the pan with oil before each use to ensure easy removal of the cement.
For an extra creepy effect, add some zombie hands to your tombstones. Check out diyfunideas.com for more project details.
DIY Chicken Wire Ghosts

If you’re looking for a spooky addition to your yard decor, consider making your own chicken wire ghosts. To create this decoration, you’ll need chicken wire, black spray paint, glow-in-the-dark spray paint, trellis netting, cheese cloth, and a few other supplies.
Begin by shaping a piece of chicken wire into a head and neck, and adding an arm if desired. Then, spray the wire with black paint and let it dry.
Next, slide a tomato cage over the ghost’s body and use more chicken wire to create a dress. Cut the dress into strips and bend them outward at the bottom.
Finally, cover the head, body, and arms with cheese cloth, and use masking or packing tape to create a hand. Once everything is covered in cheese cloth, spray it with glow-in-the-dark paint for a spooky effect.
This DIY project is a fun and creative way to add some Halloween spirit to your yard. For more detailed instructions and pictures, visit instructables.com.
Easy Halloween Cemetery Fence

Transform your yard into a spooky cemetery this Halloween with a simple and easy-to-make fence. All you need are a few materials and a bit of creativity.
To start, gather some old wood to use as fence slats. Stain them with a brownish color and add a red stain to create an aged look. Arrange the slats on a cardboard and glue and nail them together. Hammer them into the ground to keep them upright.
To add some Halloween-themed details, decorate the fence with spider webs and twine. You can also add fake tombstones or skulls to create a more eerie atmosphere.
This project is a great way to get into the Halloween spirit and create a spooky atmosphere in your yard. For more detailed instructions, check out instructables.com.
Easy DIY Skeleton Corpse Prop
Looking for a spooky addition to your outdoor Halloween decorations? Why not create a DIY skeleton corpse prop? This easy project involves spraying a plastic skeleton with clear acrylic paint to give it a wet look. To add some extra fright, you can use washable red paint or fake blood to create a bloody effect around the eyes, neck, and muscles. Once complete, this prop can be placed outside to spook your trick-or-treaters. Get creative and customize your skeleton corpse prop to fit your desired level of spookiness.
Halloween Bloodbath Fountain

If you want to create a spooky atmosphere for your Halloween party, the Halloween Bloodbath Fountain is a great choice. This fountain pump creates a bubbling effect that looks like blood, and it is really effective at creating a scary atmosphere.
To make the fountain even scarier, dribble red food coloring down the skull, bones, and rocks. You can also add candles and cobwebs to complete the eerie look. For detailed instructions on how to create this Halloween decoration, visit instructables.com.
Halloween Prop With A PVC Pipe and Costume

If you want to create a spooky zombie Halloween prop, a PVC pipe human frame is an easy and effective option. By using chicken wire to shape the zombie and a styrofoam head to make it look realistic, you can create a haunting figure that will spook your guests. This prop can be placed on your front porch or in a dark corner of a room to add a creepy touch to your Halloween party. Check out hungryhappenings.com for more project details.
Realistic Halloween Dead Man Prop

If you’re looking for a spooky Halloween decoration, a dead man prop can be a great addition to your collection. You can make this prop using materials that you can find around your house. The prop is made with newspaper, an old shirt or jacket, a Halloween mask, gloves, or fake hands. The stuffing in the clothes gives the prop a solid lightweight body, and the frame created by the coat hanger will support the upper body of the prop.
You can attach the hands and feet with strings, and the head with stuffing and a cardboard tube. To make the prop look more realistic, you can slice the shirt and add blood for a finishing touch. This prop is especially scary when used with strobe lights and fog effects.
For more detailed instructions on how to make this prop, you can check out instructables.com. With a little creativity and some household items, you can have a spooky and realistic dead man prop that will scare your guests at your Halloween party.
How to Corpse a Skeleton for Halloween

Corpse a skeleton prop to create a spine-chilling scene that will shock your neighbors and passersby. The process of corpsing is easy and simple. Follow these steps to get started:
- Get a skeleton prop from a Halloween store or online.
- Apply gel stain to the skeleton to give it a realistic, aged look.
- Use dark stains to add depth and creepiness to the skeleton.
- Let the skeleton dry completely before displaying it.
For more inspiration and ideas, check out homecrux.com.
DIY Motion Sensor for Halloween Props

Looking to add a little extra spookiness to your haunted house this Halloween? Try creating a DIY motion sensor for your Halloween props! By using two lights and a motion sensor, you can create a simple power circuit that will turn on your lights when motion is detected.
This project is easy to install and provides a clean, safe way to connect your lights. Plus, you can use it to create different effects and scare your guests in new ways each year.
To get started, check out the project details at teediddlydee.com. Happy haunting!
Building A Giant Spider
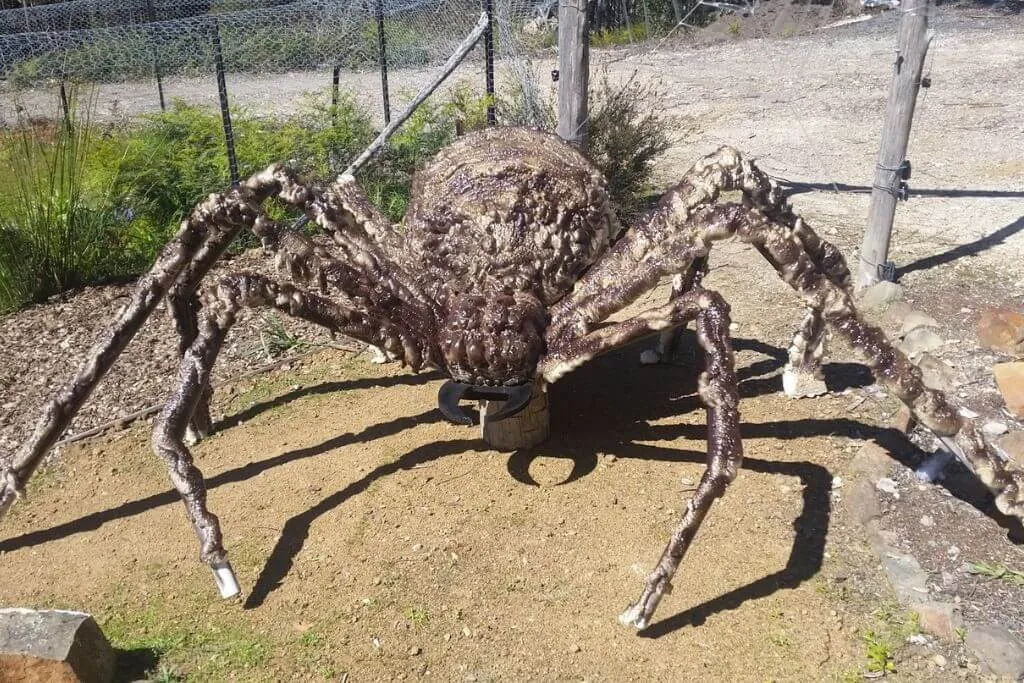
To create a realistic and spooky giant spider for Halloween, you will need a fitness ball for the abdomen, PVC pipe for the legs, and spray insulation foam. Follow these steps to make your own giant spider prop:
- Cut the PVC pipes into eight equal lengths for the legs.
- Bend the PVC pipes to create a natural-looking curve for the legs.
- Attach the legs to the fitness ball using duct tape or hot glue.
- Cover the entire spider with spray insulation foam, making sure to create texture and definition for the spider’s body and legs.
- Let the foam dry completely.
- Use spray paint to colour the spider appropriately, making sure to add details such as eyes and fangs for a more realistic look.
By taking your time and paying attention to detail, you can create a giant spider prop that is sure to scare people this Halloween. For more detailed instructions and tips, visit thehousethatworkedout.com.
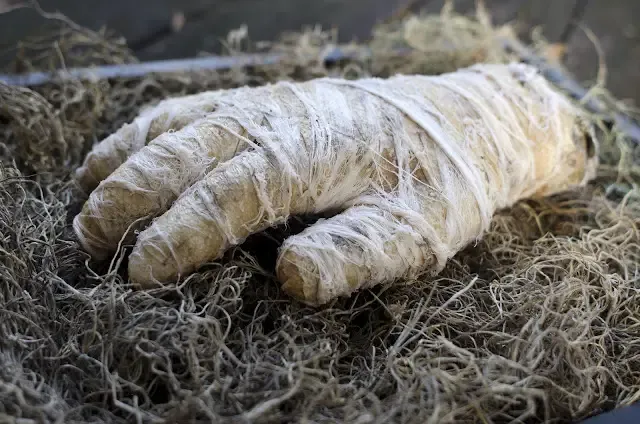
Easy DIY Mummy Props

Creating your own mummy props is a fun and easy DIY project that you can complete in just a few steps. Start by covering the skull with paper maché to create the face. Next, wrap the body in plastic tablecloths and bubble wrap to give it shape and bulk. Finally, wrap the body in cheese cloth strips and tape them in place. You can display your mummy props in various locations around your home for a spooky Halloween decoration. For more inspiration, check out manningkrull.com.
How to Make Cardboard Tombstones

Making cardboard tombstones is an easy and affordable way to add a spooky touch to your Halloween decorations. Here are the steps to follow:
- Gather materials: cardboard, scissors, ruler, pencil, black paint, and paintbrush.
- Draw the shape of the tombstone on the cardboard using the ruler and pencil.
- Cut out the tombstone shape using the scissors.
- Paint the tombstone black and let it dry completely.
- Use white paint or a white paint pen to write the desired words or designs on the tombstone.
- Optional: add spiderwebs or other spooky items to enhance the effect.
With these simple steps, you can create a life-sized, realistic tombstone that is easy to make and transport. Get creative with your designs and have fun decorating for Halloween!
Monster Mud Reaper
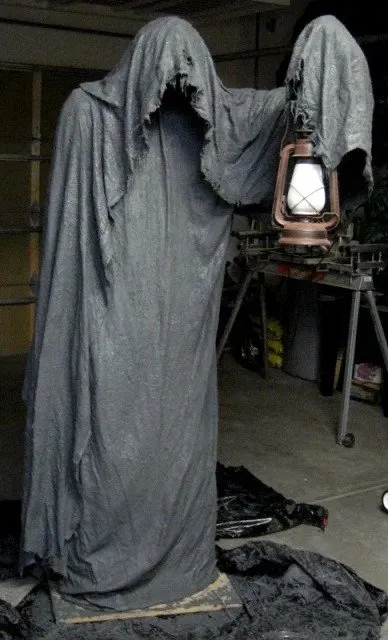
To create a terrifying life-sized reaper prop, you will need to start with a chicken wire frame. Cover the frame with fabric and then apply a layer of monster mud. This mixture will give the prop a realistic and eerie appearance. Once the mud has dried, apply a waterproof sealant to protect it from the elements if you plan to use it outdoors. You can add your own personal touches to make it even more impressive, such as moss or a lantern. For more detailed instructions, check out instructables.com.
Discount Store Mummy Hand
You can find a spooky and affordable Halloween decoration at the dollar store. The Discount Store Mummy Hand is a popular item that can add a creepy touch to your Halloween decor. This item is made of plastic and is designed to look like a mummified human hand.
Some key features of the Discount Store Mummy Hand include:
- Affordable price
- Creepy appearance
- Made of plastic
- Lightweight and easy to display
- Can be used as a standalone decoration or incorporated into a larger display
Overall, the Discount Store Mummy Hand is a great option for those looking to add a spooky touch to their Halloween decor without breaking the bank.
DIY Bloody Votive Jars

Create a spooky atmosphere for your Halloween party with these DIY bloody votive jars. You can use them to light up your table or as part of your decor. The project is simple and easy to follow, with the red paint providing a realistic and spooky effect. Check out brit.co for project details and get ready to impress your guests with your creepy decorations.
Bloody Skull Candle Lamp

Looking for a way to add some eerie lighting to your party? Look no further than the Bloody Skull Candle Lamp project from skeletonfoundry.com. These lamps feature creepy blood splatters on a skull-shaped base, perfect for creating a spooky atmosphere. Plus, the lamp lights up, adding an extra level of creepiness to your haunted house. Don’t miss out on this unique accent lighting option for your next party.
DIY Creepy Doll Mobile

Looking for a spooky Halloween decoration? Create a creepy doll mobile using grungy dolls, fake knives, and rope. Hang it up for a unique and eerie touch to your Halloween decor. Check out project details at epbot.com for inspiration.
Construct a Massive Tentacle Creature

If you’re looking for a unique and eye-catching project, building a giant tentacle monster is sure to impress. This project can be a great addition to a haunted house, a Halloween party, or just a fun decoration for your backyard.
To build your own tentacle monster, you’ll need the following materials:
- PVC pipes
- Foam insulation
- Duct tape
- Spray paint
- Pool noodles
- Zip ties
- Hot glue gun
- Fishing line
Once you have all your materials, follow these steps to construct your tentacle monster:
- Cut the PVC pipes to the desired length for your tentacles.
- Cover the pipes with foam insulation and secure with duct tape.
- Shape the foam into a tentacle shape and spray paint it the color of your choice.
- Attach pool noodles to the base of the tentacles using zip ties and hot glue.
- Use fishing line to attach the tentacles to a central point, such as a tree or pole.
With these simple steps, you can create a unique and impressive tentacle monster that is sure to be a hit at your next event.
Pallet Halloween Coffin Decoration

Looking for a spooky Halloween decoration that is easy to make? Why not try making a coffin out of wood pallets? This project is simple and perfect for adding a creepy touch to your Halloween decor.
To make this coffin, you will need wood pallets, a saw, screws, and some basic woodworking tools. The offset slats of the pallets give the coffin a unique look, and the addition of a chain and lock make it even more eerie.
To light up the coffin, consider adding a green rope light inside. This will create an eerie glow and add to the overall effect of the decoration.
For detailed instructions and step-by-step photos, check out instructables.com. With a little effort, you can create a spooky Halloween decoration that is sure to impress your guests.
Summary
You can create unique and spooky DIY Halloween props with just a few materials and some creativity. From eerie tombstones to creepy spider webs, the possibilities are endless. By using everyday items like cardboard, paint, and fabric, you can transform your home into a haunted house. Don’t forget to add some lighting effects and sound to enhance the spooky atmosphere. With these tips, you can create a Halloween experience that is both fun and frightening for all ages.