Are you a teenager who loves unique jewelry but can’t always afford to buy it? Look no further! DIYProjectForTeens.com has compiled a list of the most adorable, fun, and unique DIY earrings from our favorite bloggers. These earrings are customizable to your liking and can be made at a fraction of the cost of store-bought options. You’ll be surprised at how easy they are to make, even without advanced jewelry-making skills. So why not start crafting your own unique earrings today?
This list includes earrings in a variety of colors and materials, so you’re sure to find something that suits your style. And the best part? You’ll have the satisfaction of knowing you made them yourself. Don’t wait any longer to start creating your own fabulous and affordable earrings.
DIY Dagger Earring Studs

Looking for a new addition to your collection of rustic and classy items? These dagger earring studs are perfect for those who can’t resist all things with a touch of brown. Here’s what you’ll need:
- Dagger earring studs
- Jewelry pliers
- Epoxy glue
- Small paintbrush
- Gold leaf sheets
Instructions:
- Carefully remove the earring backs from the studs using jewelry pliers.
- Apply a small amount of epoxy glue to the back of the dagger stud using a small paintbrush.
- Carefully apply a gold leaf sheet to the glued area and press down gently.
- Allow the glue to dry completely before reattaching the earring backs.
These DIY dagger earring studs are perfect for adding a touch of edginess to any outfit. Plus, they’re easy to make and won’t break the bank!
Create Your Own Rhinestone Chain Earrings

Add some sparkle to your wardrobe with these DIY rhinestone chain earrings. Follow these simple steps to create your own unique pair:
- Gather materials: rhinestone chain, earring hooks, jump rings, pliers.
- Cut rhinestone chain to desired length.
- Attach jump ring to one end of chain and earring hook to the other end.
- Repeat for second earring.
- Wear to your next party or dinner date and enjoy the compliments!
This easy and affordable project is perfect for any fashion-forward individual looking to add some glam to their accessories.
DIY Beachy Boho-Chic Pearl Earrings

Create your own beachy boho-chic pearl earrings with these easy DIY steps:
- Gather materials: pearls, earring hooks, jump rings, pliers, and fishing line.
- String pearls onto fishing line, leaving enough length for desired earring size.
- Tie a knot at the end of the line and trim excess.
- Attach jump ring to knot and earring hook to jump ring using pliers.
- Repeat steps 2-4 for second earring.
- Enjoy your unique and stylish beachy boho-chic pearl earrings!
DIY Front/Back Stud Earrings

Looking for a unique way to show off your love for dinosaurs? Try making your own front/back stud earrings! Here’s how:
- Gather materials: earring posts, earring backs, small plastic dinosaur toys, super glue, pliers.
- Use pliers to remove the tail and legs of the dinosaur toy.
- Apply a small amount of super glue to the flat side of the dinosaur toy and attach it to the earring post.
- Once the glue has dried, attach the earring back to the post.
- Repeat steps 2-4 for the second earring.
- Enjoy your new one-of-a-kind dinosaur earrings!
These DIY front/back stud earrings are a fun and easy way to add a unique touch to your jewelry collection. Plus, they make a great conversation starter!
DIY Trapeze Earrings

Create your own stylish and unique Trapeze Earrings with this easy-to-follow guide. Perfect for everyday wear and a great way to showcase your creativity.
Materials:
- Earring hooks
- Jump rings
- Chain
- Pliers
Instructions:
- Cut two equal lengths of chain using your pliers.
- Attach a jump ring to the end of each chain.
- Attach the jump rings to the earring hooks.
- Adjust the length of the chain to your desired length.
- Enjoy your beautiful Trapeze Earrings!
Tips:
- Experiment with different chain lengths and styles for a personalized look.
- Use different colored chains for a pop of color.
- Be careful when using pliers to avoid injury.
DIY Dreamcatcher-Inspired Earrings
Looking for a fun and easy DIY project? These dreamcatcher-inspired earrings are the perfect addition to any outfit. With inexpensive beads and a few simple steps, you can create a unique piece of jewelry that will catch everyone’s eye.
Here’s what you’ll need:
- Earring hooks
- Jump rings
- Beads in various sizes and colors
- Feathers
- Nylon thread
Instructions:
- Cut a length of nylon thread and tie it to the earring hook.
- String beads onto the thread, alternating colors and sizes to create a unique pattern.
- Once you’ve strung enough beads to create the desired length, tie a knot at the end to secure them in place.
- Attach a jump ring to the end of the thread.
- Cut a length of nylon thread and tie it to the jump ring.
- String beads and feathers onto the thread, alternating them to create a dreamcatcher-inspired design.
- Once you’ve strung enough beads and feathers, tie a knot at the end to secure them in place.
- Attach the jump ring to the earring hook.
And there you have it – a beautiful pair of dreamcatcher-inspired earrings that you can wear with any outfit. Plus, since they’re so easy to make, you can create a whole collection in different colors and styles. Happy crafting!
DIY Wood Earrings

Looking for a fun and easy DIY project? Why not try making your own pop color wood earrings? With simple instructions and easy-to-find materials, you can create stylish and unique accessories for any occasion. Get ready to show off your creativity and party girl spirit with these handmade earrings.
DIY Chevron Earrings From Bobby Pins
![]()
Transform your bobby pins into trendy chevron earrings with this easy DIY project. Perfect for last-minute accessorizing before a fun event.
Here’s what you’ll need:
- Bobby pins
- Pliers
- Earring hooks
- Jump rings
- Spray paint (optional)
Instructions:
- Use pliers to bend the bobby pins into a chevron shape.
- Attach jump rings to the top of each chevron.
- Attach earring hooks to the jump rings.
- Spray paint the earrings for a pop of color (optional).
Now you have a stylish and unique accessory to complete your outfit.
DIY Glitter Earrings

Looking for a fun and affordable way to add some sparkle to your jewelry collection? Try making your own glitter earrings with these easy steps:
- Gather your materials: earring hooks, jump rings, pliers, glue, and glitter.
- Apply glue to the front of your earring hooks and sprinkle glitter on top.
- Use your pliers to attach jump rings to the top of your earrings.
- Let your earrings dry and enjoy your new sparkly accessory!
These DIY glitter earrings are perfect for adding some glam to your party outfit or giving as a thoughtful gift to your friends. Get creative and experiment with different colors and shapes of glitter to make your earrings truly unique.
DIY Ear Cuff

Looking for a quick and easy way to add some elegance to your outfit? Try making your own rhinestone ear cuff! Here’s how:
- Gather your materials: rhinestone chain, pliers, and ear cuff findings.
- Cut a length of rhinestone chain to fit the ear cuff finding.
- Use the pliers to attach the rhinestone chain to the ear cuff finding.
- Repeat for the other ear cuff.
- Put on your new ear cuffs and enjoy feeling like royalty!
This DIY project is a great way to add some sparkle to your look without breaking the bank. Plus, you can customize the ear cuffs to match your personal style. Give it a try and see how easy it is to make your own elegant accessories!
DIY Denim Feather Earrings
 Looking for a fun and eco-friendly way to spice up your accessory game? Look no further than these trendy denim feather earrings! With just a few simple steps, you can transform your old denim scraps into a chic and stylish accessory.
To make your own denim feather earrings, you’ll need the following materials:
- Denim scraps
- Scissors
- Earring hooks
- Jump rings
- Pliers
Here’s how to make them:
- Cut out feather shapes from your denim scraps using scissors.
- Use pliers to attach jump rings to the top of each feather.
- Attach the earring hooks to the jump rings.
- Repeat for the second earring.
With just a few simple steps, you’ll have a unique and eco-friendly accessory that’s sure to turn heads. So why wait? Grab your denim scraps and get crafting today!
Create Stunning Ear Drop Earrings

Looking for a fun and easy DIY project? Create your own beautiful ear drop earrings with these simple steps:
- Gather your supplies: pliers, earring hooks, jump rings, beads, and charms.
- Choose your beads and charms to create a unique and personalized look.
- Use the pliers to open the jump rings and attach your beads and charms.
- Attach the jump rings to the earring hooks.
- Shake it! Your stunning ear drop earrings are ready to wear.
Now you can confidently show off your one-of-a-kind earrings with your friends.
DIY Zipper Earring

If you’re looking for a funky and unique accessory, try making your own zipper earrings! Follow these simple steps:
- Gather materials: pliers, earring hooks, jump rings, and zippers.
- Cut off the metal stopper from the bottom of the zipper.
- Use pliers to remove the teeth from the zipper.
- Cut the zipper tape into desired lengths.
- Attach a jump ring to the end of each zipper tape.
- Attach the jump ring to the earring hook.
- Repeat steps 2-6 for the second earring.
These DIY zipper earrings are a fun and easy way to add some edge to your everyday style.
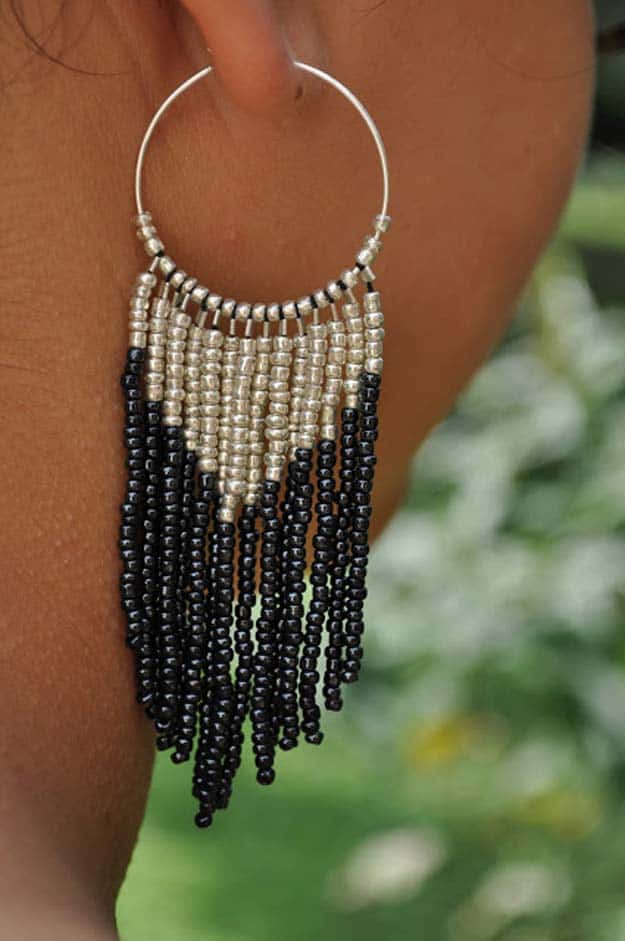
DIY Fringe Earrings

Looking for a trendy and affordable accessory? Try making your own diamonds and arrows design fringe earrings. With simple materials and easy steps, you can create multiple pairs in no time. Follow these steps to get started:
- Gather your materials: pliers, earring hooks, jump rings, seed beads, and fringe trim.
- Cut the fringe trim to your desired length.
- Use pliers to attach jump rings to the top of the fringe trim.
- Attach earring hooks to the jump rings.
- Add seed beads to the jump rings for extra detail.
- Repeat steps 2-5 for the second earring.
With these steps, you can create a stylish and unique accessory that won’t break the bank.
DIY Fringe Earrings

Looking for a stylish way to top off your school outfit? Try making your own fringe earrings! Choose the length and color that suits you best, and make a lasting impression with this trendy accessory.
Create Your Own Faux Labradorite Geo Drop Earrings

Make a statement with these stylish and easy-to-make DIY earrings. The classic design will have everyone thinking you bought them from a limited edition line. Follow these simple steps to create your own:
- Gather your materials: faux labradorite beads, gold wire, earring hooks, and pliers.
- Cut a length of wire and create a loop at one end with your pliers.
- Thread your beads onto the wire, alternating between small and large sizes.
- Once you have added all of your beads, create another loop at the end of the wire.
- Attach your earring hook to the top loop and you’re done!
These earrings are the perfect accessory for any outfit and are sure to impress. Plus, with their easy DIY design, you can make multiple pairs in different colors to match your entire wardrobe.
Create Your Own Arizona Iced Tea Earrings

Transform your used tea cans into stylish earrings with this DIY tutorial. Follow these steps to make your own:
- Clean and dry your used tea cans.
- Using scissors, cut the top and bottom off of the can and then cut down the side to create a flat piece of aluminum.
- Draw the shape of your earrings onto the aluminum and cut them out.
- Use a hole punch to create a hole at the top of each earring.
- Sand the edges of the earrings to smooth them out.
- Paint the earrings with acrylic paint or cover them with decorative paper.
- Once the paint or paper is dry, attach an earring hook to each earring using pliers.
- Wear your new Arizona Iced Tea earrings with pride!
This simple DIY project is a fun way to upcycle your used tea cans and create unique accessories.
Create Your Own Brass Fringe Earrings

Looking for a fun and easy DIY project? Why not try making your own brass fringe earrings? With just a few inexpensive materials, you can create a stylish and unique accessory that’s perfect for any occasion.
Here’s what you’ll need:
- Brass chain
- Earring hooks
- Jump rings
- Pliers
- Scissors
Instructions:
- Cut the brass chain into 2-inch sections using scissors.
- Using pliers, open a jump ring and attach it to the top of one of the chain sections.
- Attach the earring hook to the jump ring.
- Repeat steps 2-3 for the other chain section.
- Use pliers to carefully separate the individual links of the chain to create a fringe effect.
And voila! You now have a pair of chic and trendy brass fringe earrings that you can wear with any outfit. So why not give it a try and show off your DIY skills?
DIY Faux Gold Cuff Earrings

If you’re tired of spending a fortune on simple designed earrings, try making these DIY faux gold cuff earrings. This project is easy to follow and won’t break the bank. Here’s what you’ll need:
- Gold-colored wire
- Needle-nose pliers
- Round-nose pliers
- Wire cutters
Instructions:
- Cut a piece of wire to your desired length.
- Use the needle-nose pliers to create a loop at one end of the wire.
- Use the round-nose pliers to create a small loop at the other end of the wire.
- Bend the wire into a cuff shape.
- Use the needle-nose pliers to adjust the loops and shape of the cuff.
- Wear your new faux gold cuff earrings with pride!
This DIY project is perfect for those who want to create simple and elegant earrings without spending a fortune. With just a few materials and some basic tools, you can make a pair of earrings that will look great with any outfit.
DIY Faux Druzy Earring Studs

Looking for a simple and sparkly earring option? Try making your own Faux Druzy Earring Studs! This project is both inexpensive and easy to create. Here’s what you’ll need:
- Earring stud blanks
- Epoxy resin
- Fine glitter
- Small mixing cups
- Toothpicks
- Disposable gloves
To make the earrings, mix the epoxy resin according to the instructions on the package. Add a small amount of fine glitter to the mixture and stir well. Use a toothpick to apply the mixture to the earring stud blanks, making sure to fill the entire surface area. Let the mixture dry completely, then remove any excess from the edges of the studs. Finally, attach the earring backs to the studs.
With just a few simple steps, you can create your own beautiful Faux Druzy Earring Studs that are sure to add some sparkle to your wardrobe.
DIY Memory Wire Beaded Earrings

Create stunning beaded earrings effortlessly with memory wire. Follow these simple steps:
- Gather materials: memory wire, beads, wire cutters, and round-nose pliers.
- Cut a length of memory wire and make a loop at one end with the pliers.
- Thread beads onto the wire until it is full.
- Make a loop at the other end of the wire and trim any excess.
- Use the pliers to adjust the loops and shape the earrings.
Enjoy your beautiful and unique DIY earrings!
DIY Spike and Pearl Earrings

For a unique combination of edgy and classy, try making your own spike and pearl earrings. Here’s how:
- Gather materials: spikes, pearls, earring hooks, pliers, and jump rings.
- Using pliers, attach a jump ring to each spike and pearl.
- Connect the jump rings to create a chain of alternating spikes and pearls.
- Attach the chain to the earring hook using a jump ring.
- Repeat for the second earring.
With a little DIY spirit, you can create a one-of-a-kind accessory that combines two different styles.
DIY Tough Love Leather Earrings

Looking for a unique and durable accessory? Look no further than these DIY leather earrings. They’re hip, chic, and sure to make a statement. Here’s what you’ll need:
- Leather scraps
- Earring hooks
- Jump rings
- Pliers
- Scissors
Instructions:
- Cut out your desired earring shape from the leather scraps.
- Use pliers to attach a jump ring to the top of each earring.
- Attach the earring hook to the jump ring.
- Repeat for the second earring.
These earrings are simple to make and will add a touch of toughness to any outfit. Give them a try!
DIY Sea Glass Wire Wrapped Earrings

Create your own unique sea glass wire wrapped earrings with this DIY tutorial. Perfect for any occasion, these earrings are inspired by the beauty of the ocean.
Materials Needed:
- Sea glass beads
- Jewelry wire
- Earring hooks
- Pliers
- Wire cutters
Instructions:
- Cut a piece of wire to your desired length.
- Thread the sea glass bead onto the wire.
- Use the pliers to bend the wire into a loop above the bead.
- Wrap the wire around the bead and loop several times.
- Use the pliers to bend the wire into another loop below the bead.
- Attach the earring hook to the top loop.
- Repeat steps 1-6 to create a matching earring.
Tips:
- Experiment with different wire colors and bead sizes for a unique look.
- Use a jewelry polishing cloth to keep your earrings looking shiny and new.
Enjoy your beautiful DIY sea glass wire wrapped earrings!
Create Orange Angel Earrings with Ribbon and Pearl
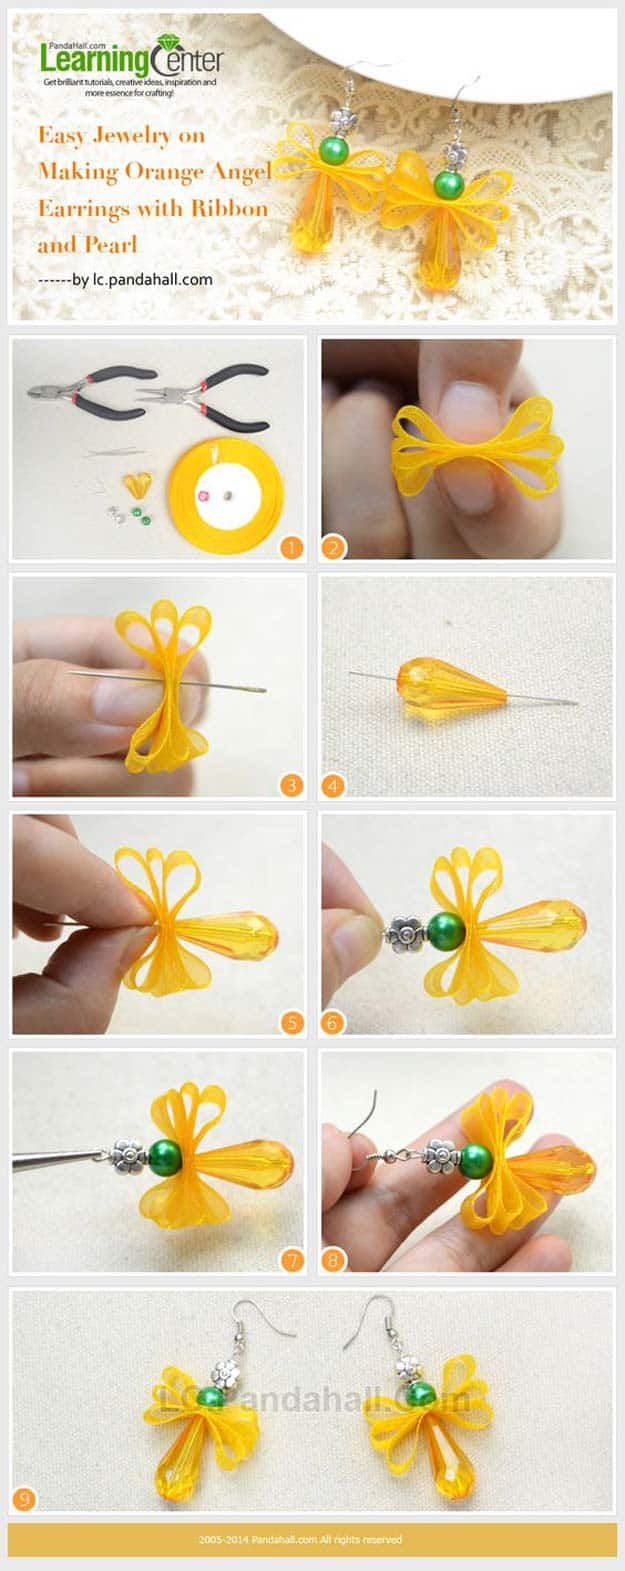
Make your own unique angel earrings with orange ribbon and pearl beads. Follow these simple steps to create your own personalized earrings:
- Gather your supplies: orange ribbon, pearl beads, earring hooks, jump rings, pliers, and scissors.
- Cut two pieces of ribbon to your desired length.
- Fold each ribbon in half and tie a knot at the top to create the angel’s head.
- Thread a pearl bead onto each ribbon and tie a knot underneath to create the angel’s body.
- Attach a jump ring to each angel’s head using pliers.
- Attach the jump rings to the earring hooks using pliers.
- Trim any excess ribbon or thread.
- Enjoy your new DIY orange angel earrings!
These earrings are perfect for adding a pop of color and a touch of whimsy to any outfit. Plus, they make a great personalized gift for friends and family. Get creative and experiment with different colors and bead sizes to make your own unique designs.
DIY Feather Earrings

Create your own bohemian-inspired feather earrings with ease. Avoid harming any chickens during the process.
DIY Bobby Pins Earrings

Looking for a quick and easy way to make artistic earrings? Look no further than your trusty bobby pins! With just a few simple steps, you can transform these everyday hair accessories into stylish and unique earrings. Here’s how:
- Gather your materials: bobby pins, pliers, and any additional decorative elements you want to add (such as beads or wire).
- Use the pliers to bend the bobby pins into the desired shape for your earrings. You can create loops, twists, or any other shape you like.
- If you want to add decorations, thread them onto the bobby pins before shaping them.
- Once you have your desired shape, use the pliers to bend the ends of the bobby pins to secure the decorations in place.
- Attach the bobby pins to earring hooks or simply wear them as-is.
With just a few simple steps, you can create beautiful and unique earrings using nothing but bobby pins and a little creativity. So next time you’re in a pinch and need a last-minute accessory, turn to your trusty bobby pins and get creative!
DIY Angel Bead Earrings

Create your own heavenly Angel Bead Earrings with this simple DIY tutorial:
- Gather materials: angel wing beads, round beads, earring hooks, pliers.
- String round beads onto a headpin, then add an angel wing bead.
- Use pliers to create a loop at the top of the headpin.
- Attach the earring hook to the loop.
- Repeat for the second earring.
- Perfect for church related activities or any occasion.
DIY Lace Earrings

Create elegant and regal lace earrings that will make you feel like royalty. Follow these simple steps:
- Gather materials: lace fabric, earring hooks, jump rings, pliers.
- Cut lace into desired earring shape and size.
- Attach jump ring to lace and earring hook using pliers.
- Repeat for second earring.
- Enjoy your new stunning lace earrings!
These DIY lace earrings are perfect for weddings, special events, or everyday wear. Personalize them by choosing different lace patterns and colors.
DIY Leather Triangle Earrings

Looking for a fun and trendy accessory to add to your wardrobe? Try making these retro-inspired leather triangle earrings! Perfect for any occasion, these earrings are sure to add a pop of color to your outfit. Here’s how to make them:
Materials:
- Leather scraps in various colors
- Earring hooks
- Jump rings
- Pliers
- Scissors
- Glue
Instructions:
- Cut out two triangles from your leather scraps using the scissors. Make sure they are the same size.
- Use the pliers to attach a jump ring to each triangle at the top point.
- Attach the earring hooks to the jump rings using the pliers.
- Apply glue to the back of each triangle to secure the jump rings and earring hooks in place.
- Allow the glue to dry completely before wearing your new earrings!
These DIY leather triangle earrings are a simple and stylish way to add some retro flair to your look. Plus, you can customize them with any colors you like!
DIY Silver Earrings

Create your own unique silver earrings with ease using simple materials. These earrings are perfect for any occasion and can be made quickly. Follow these steps:
- Gather silver wire, pliers, and earring hooks
- Cut the wire to the desired length
- Use the pliers to create the desired shape
- Attach the earring hooks to the wire
- Enjoy your new stylish earrings!
DIY Button Earrings

For a quick and easy accessory to complement your on-the-go style, try making your own button earrings. Here’s how:
- Gather small buttons and earring posts with backs.
- Use pliers to remove the shank from the back of the button.
- Apply a small amount of glue to the flat side of the button and attach the earring post.
- Allow the glue to dry completely before wearing.
These simple and stylish earrings are perfect for adding a pop of color to any outfit.
Create Your Own Fabric Button Earrings

Looking for a fun and easy way to add some personality to your outfits? Look no further than DIY fabric button earrings! With just a few simple materials and some creativity, you can create a unique and stylish accessory that perfectly complements your style.
To make your own fabric button earrings, you will need:
- Fabric scraps
- Button-making kit
- Earring hooks
- Pliers
Follow these steps to create your earrings:
- Cut your fabric into circles that are slightly larger than the button-making kit.
- Place the fabric circle into the button-making kit and press the button cover into the mold.
- Use the pliers to attach the earring hook to the back of the button.
- Repeat these steps for the second earring.
With just a few simple steps, you can create a fun and personalized accessory that is perfect for any occasion. So why not give DIY fabric button earrings a try today?
DIY All In One Button Earrings

Make your own stylish button earrings with this simple DIY tutorial. These earrings are perfect for daily wear or as a thoughtful gift. Plus, the materials are inexpensive and easy to find.
Materials:
- Buttons (in various sizes and colors)
- Earring posts and backs
- Glue
Instructions:
- Choose your buttons and lay them out in pairs.
- Apply a small amount of glue to the back of one button and attach the earring post.
- Repeat with the second button, making sure the two buttons match up.
- Allow the glue to dry completely.
- Attach the earring backs to the posts.
- Enjoy your new all-in-one button earrings!
These earrings are a fun and creative way to add some personality to your outfit. Experiment with different button sizes and colors to create a unique look.
DIY Dolce & Gabbana Inspired Coin Earrings

Make a statement with these stunning Dolce & Gabbana inspired coin earrings. Dress them up or down for any occasion. Perfect addition to any outfit.
DIY Rhinestones Chain Earrings

Create stunning rhinestone chain earrings that look like they cost a fortune! These dangling earrings are sure to turn heads and make you feel like a million bucks. Follow these simple steps to make your own:
- Gather rhinestone chain and earring hooks
- Cut the chain to desired length
- Attach the chain to the earring hook using pliers
- Repeat for the second earring
Enjoy your beautiful new earrings without breaking the bank!
DIY Upcycled Denim Earrings

Looking for a creative and unique way to accessorize your everyday look? These upcycled denim earrings are perfect for showcasing your foxy charisma! Here’s how to make them:
Materials:
- Old denim jeans
- Scissors
- Earring hooks
- Jump rings
- Pliers
Instructions:
- Cut thin strips of denim from your old jeans.
- Tie each strip into a knot, leaving a small tail.
- Trim the tail and shape the knot into a round ball.
- Attach a jump ring to each denim ball using pliers.
- Attach an earring hook to each jump ring using pliers.
- Repeat steps 1-5 to create a matching pair of earrings.
These DIY upcycled denim earrings are a fun and easy way to show off your creative personality while also reducing waste by repurposing old clothing. Try making them in different colors or sizes to match your personal style!
DIY Raw Stone Earrings

Looking for a unique and easy-to-make earring idea? Try making your own raw stone earrings! Simply gather some special stones and follow the DIY tutorial provided by Aliceandlois. These earrings are perfect for showing off to your friends.
DIY Rose Earrings
Looking for an affordable and thoughtful gift for your best friends this fall? These DIY rose earrings are the perfect solution! With just a little effort, you can create a beautiful and unique present that anyone would be happy to receive. Plus, they won’t break the bank!
DIY Upcycled Leather Fringe Earrings

Looking for a unique accessory for the upcoming Fall event? Look no further than these DIY leather earrings. Follow the steps in this article to create your own one-of-a-kind fringe earrings. Materials needed include leather scraps, earring hooks, jump rings, and pliers.
Summary
To create DIY earrings, you can use various materials such as beads, wire, and hooks. Be creative and experiment with different colors and designs to make unique pieces. Use pliers to bend and shape the wire, and add beads or other embellishments as desired. With some patience and practice, you can create beautiful and personalized earrings that are perfect for any occasion.