Looking to start your garden early? Cold frames are a great way to do just that! These mini-greenhouses allow you to grow plants on the earlier side, sometimes even starting in March or April. Not only do they extend your growing season, but they can also prevent frost from damaging your flower and vegetable beds. Check out these unique DIY cold frame ideas to get started!
How To Make A Cold Frame From Upcycled Materials
If you’re looking to extend your growing season without breaking the bank, building a cold frame from upcycled materials is a great option. Here’s how you can build your own cold frame using pallet wood and scrap:
- Start by gathering your materials: pallet wood, scrap wood, screws, hinges, and a clear plastic sheet.
- Cut the pallet wood and scrap wood to size to create the frame of the cold frame.
- Use screws to attach the pieces of wood together to create the frame.
- Attach hinges to the back of the frame to create a lid that can be opened and closed.
- Cover the frame with a clear plastic sheet to allow sunlight to enter.
- Place the cold frame in a sunny spot in your garden and start planting!
By following these simple steps, you can create a cold frame that will help you extend your growing season and save money on new materials. Plus, building your own cold frame is a fun and rewarding DIY project that you can complete in just a weekend.
DIY Cold Frame Hoop House

A DIY Cold Frame Hoop House is an inexpensive way to extend your growing season and start seedlings. This structure is made from PVC pipes and greenhouse plastic sheets, which are easy to find at any home improvement store. Here are the steps to build your own:
- Cut PVC pipes to the desired length for the frame of the hoop house.
- Create a frame by connecting the PVC pipes using connectors.
- Cover the frame with greenhouse plastic sheets and secure them in place using clamps or duct tape.
- Place the cold frame in a sunny location.
- Plant your seedlings inside the cold frame and watch them grow.
A DIY Cold Frame Hoop House is a great way to save money on expensive plants from nurseries and other suppliers. It also allows you to start your garden early and extend your growing season through the fall months.
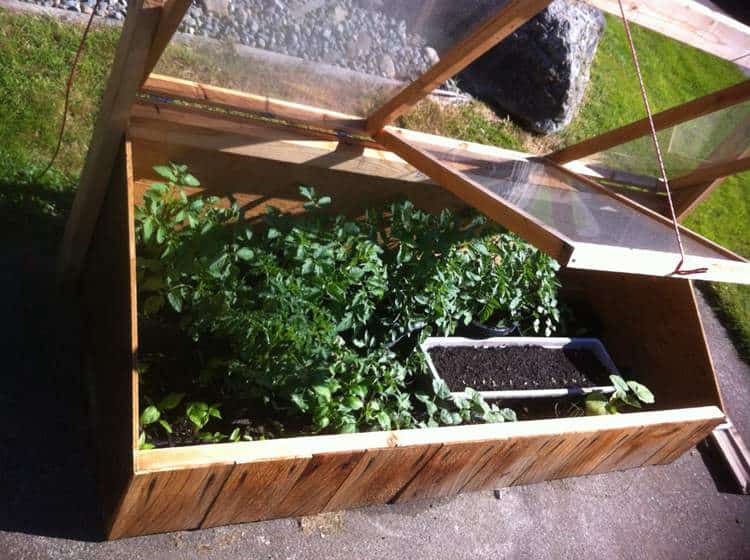
Building A Cold Frame
A cold frame is a great way to extend the growing season for your vegetable garden during the colder months. With salvaged windows, wood, and bricks, you can build a small enclosure that will keep your plants warm and frost-free. Here are the steps to build a cold frame:
- Select a site for your cold frame that receives plenty of sunlight and is sheltered from strong winds.
- Build a rectangular frame using wood and attach salvaged windows to the top.
- Use bricks to create a base for the frame.
- Attach a hinged roof to the frame to allow for easy access to your plants.
- Place your cold frame over your vegetable garden and enjoy fresh produce all winter long!
This project is perfect for beginners and those with limited workshop tools. By following these simple steps, you can build a functional cold frame that will help you grow plants during the cold months of winter.
How to Construct a Cold Frame for $50
Looking to extend your gardening season or start a garden? Building a cold frame is a simple and affordable solution. However, many cold frame plans require expensive materials and carpentry skills. Luckily, you can build a cold frame for under $50 with just a few basic materials.
To construct your cold frame, you’ll need two hinges, two pieces of lumber, and clear plastic sheeting to cover it with. Follow these steps to build your cold frame:
- Cut your lumber to the desired size for your cold frame.
- Attach the hinges to one of the pieces of lumber.
- Attach the other piece of lumber to the hinges to create a frame that can be opened and closed.
- Cover the frame with clear plastic sheeting and secure it in place.
With your cold frame built, you can now grow vegetables all winter long. This is an excellent project for anyone who wants to try their hand at building something, even if you have little experience. By following these simple steps, you can construct a cold frame that will help you grow fresh produce all year round.
Cold Frame DIY
If you’re looking for a way to keep your plants growing during the cold months of winter, a cold frame is an excellent solution. With this easy-to-follow Cold Frame DIY, you can create a sturdy window frame that will keep your plants warm and happy all year round. Here’s how to get started:
- Select the perfect spot for your cold frame. Choose an area that gets plenty of sunlight and is protected from the wind.
- Make a strong, sturdy window frame. Use materials such as wood or PVC piping to create a frame that will withstand the elements.
- Cover the frame with clear plastic or glass to create a greenhouse effect. This will trap heat and keep your plants warm.
- Add insulation to the sides and bottom of the frame to keep the cold out and the warmth in.
By following these simple steps, you’ll be able to create a cold frame that will allow you to grow your plants at any time of the year. With fresh produce straight from your garden, you’ll love having a source of healthy, home-grown food all year round!
How To Make A Cheap And Quick Cold Frame
If you want to start your plants early and protect them from cold snaps, building a cold frame can be a practical solution. Here are the steps to build a cheap and quick cold frame:
- Gather the required tools and supplies, which include a miter saw, power drill, hammer, speed square lumber, and wood screws.
- Cut the lumber to the appropriate lengths using the miter saw.
- Assemble the frame by screwing the pieces of lumber together with wood screws.
- Attach a clear plastic sheet to the top of the frame using a staple gun.
- Place the cold frame in a sunny spot in your backyard.
- Open the cold frame during the day to allow for ventilation and close it at night to keep the plants warm.
By following these steps, you can build a cold frame that will keep your plants warm and protected throughout the colder months. Plus, this method is cost-effective and easy to assemble, making it a great option for gardeners of all skill levels.
DIY Quick and Easy Cold Frame
If you want to extend your growing season, a cold frame is a great option. Fortunately, you can easily make one from scratch with simple materials. Here’s how:
Materials Needed:
- Spongy cords
- Stainless steel screws
- Cut hooks
- Wood
Instructions:
- Cut the wood into four equal pieces.
- Screw the pieces together to form a square frame.
- Attach the cut hooks to the top of the frame.
- Stretch the spongy cords across the top of the frame and hook them onto the cut hooks.
- Place the cold frame in a sunny spot in your garden.
- Plant your seeds inside the frame.
- Close the frame to keep the rain out and the warmth in.
With this cold frame, your young seeds will be warm and protected from the elements. Plus, it’s an affordable and easy solution to extend your growing season.
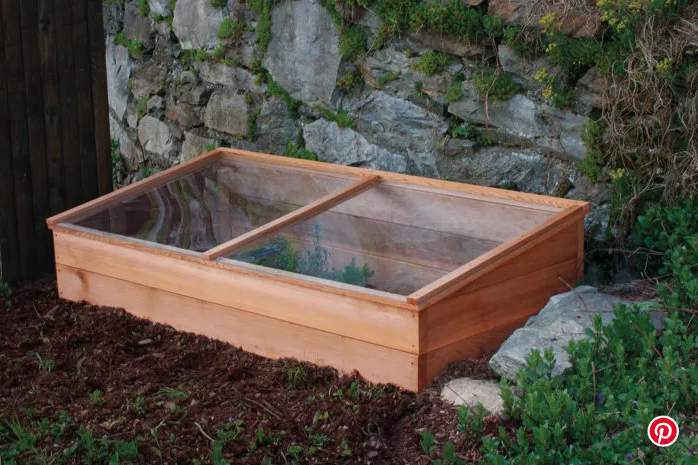
How to Build a Cold Frame
Building a cold frame is a simple and affordable way to extend your growing season. With the right materials and instructions, you can create a cold frame that will help you grow crops with minimal effort. To build a cold frame, you will need 2×6 cedar and 1×2 strips. Follow the instructions in this video closely, and you should be able to construct a cold frame that can extend your growing season by up to two months. Here are the basic steps to building a cold frame:
- Cut the cedar boards to the desired length and width.
- Assemble the frame using the 1×2 strips to reinforce the corners.
- Attach the polycarbonate or glass panels to the frame using screws or clips.
- Add hinges and a latch to the top panel for easy access.
- Place the cold frame in a sunny location and fill it with soil.
With a little bit of effort, you can create a cold frame that will help you grow crops earlier in the spring and later in the fall.
Easy To Build Cold Frame
Looking for a simple and affordable way to expand your garden? Building a cold frame can be a great solution. This DIY project involves creating a rectangular box using acrylic sheets, metal hinges, and wood and deck screws. The acrylic sheet allows light to enter while keeping out most of the sun’s heat, providing the perfect growing environment for your plants. With a little creativity, you can customize your cold frame to fit your garden’s needs. Plus, the materials are easy to find and the construction process is straightforward, making this a great project for beginners.
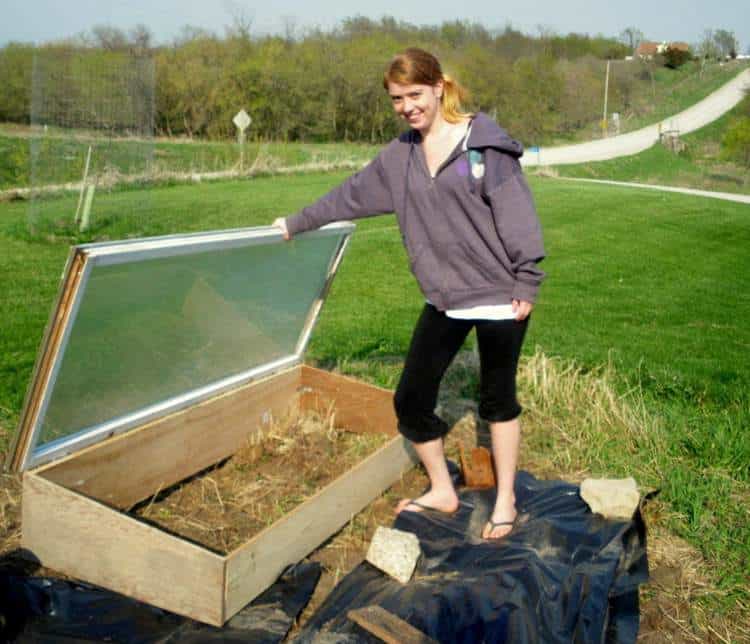
DIY Cold Frame Using Old Window

Protect your plants during colder months with a DIY Cold Frame made from an old window. This project requires power tools such as a drill and saw, but the result is worth it as it allows you to grow a variety of plants all year-round. Here are the steps to build your own Cold Frame:
- Find an old window that is at least 24 inches wide and 36 inches tall.
- Cut four pieces of wood to the length of your window and attach them to the sides of the window to create a frame.
- Cut two additional pieces of wood to the width of your window and attach them to the top and bottom of the frame.
- Cut two 2×4 pieces of wood and attach them to the bottom of the frame to create legs.
- Attach hinges to the back of the frame and a latch to the front for easy access.
- Place the Cold Frame in a sunny spot in your garden and add soil to the bottom.
- Plant your desired seeds or plants in the soil and cover the Cold Frame with a clear plastic sheet or glass pane.
By following these steps, you can easily build a DIY Cold Frame using an old window and protect your plants during colder months.
Cold Frame From Recycled Materials
A cold frame made from recycled materials is an excellent way to extend the growing season of your home garden. You can use old windows and doors to construct a simple and effective structure that will protect your plants during cold spells. By building your own cold frame, you can save money on buying new materials and repurpose items that would otherwise end up in a landfill. With this guide, you can learn how to construct a cold frame from recycled materials and enjoy a longer growing season for your plants.
DIY Cold Frame

With the DIY Cold Frame (Insulated) guide, you can easily create your own insulated cold frame. All you need are some common materials such as a window frame, hay bales, and horse manure. This insulated cold frame provides excellent protection for your plants against sudden changes in temperature and weather conditions. It also has the added benefit of being easy to maintain and adjust to your specific needs. The insulating layer prevents hot air from escaping through gaps, making temperature control a breeze. Consider building your own insulated cold frame to protect your plants and extend your growing season.
Cold Frame DIY Plans
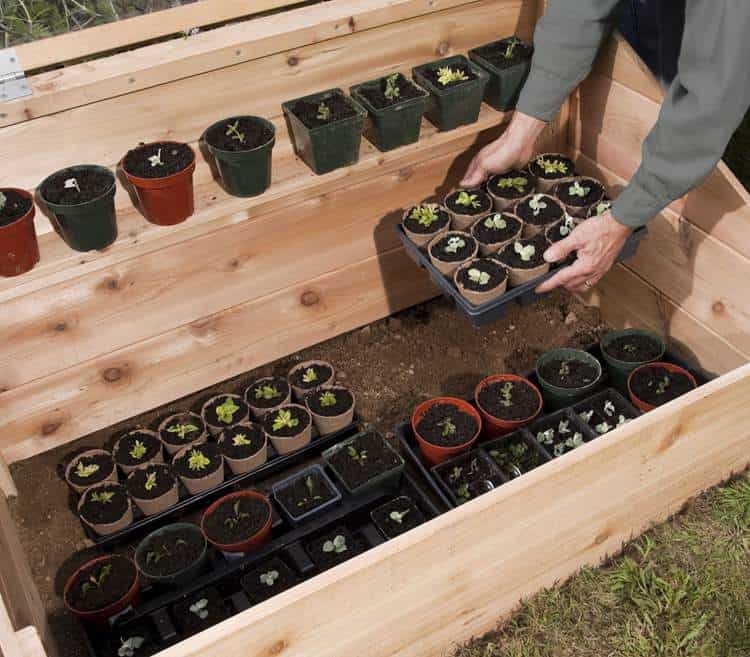
If you’re looking to start your plant’s journey earlier in the season, a cold frame is a great option. With this cheap and simple DIY plan, you can build a cold frame with minimal tools and materials. The step-by-step instructions and picture illustrations make it easy for even beginners to understand the process. With a cold frame, you can control the weather and harvest early, saving you time and money. Plus, you’ll be able to enjoy the fruits of your labor sooner than you thought possible. Start your gardening journey today with these easy-to-follow DIY plans.
DIY Cold Frame Build

Looking for a low-cost greenhouse to start your plants early in the season? Consider building a DIY cold frame with a wooden base constructed from rot-resistant wood. This design is raised with bricks for insulation, making it perfect for your garden. The cost of this project is around $75-$100, depending on where you get some supplies. The cold frame can easily accommodate any size of plants and veggies, keeping them warm inside while protecting them from frost overnight. Get started on your DIY cold frame build today!
DIY Cold Frame From Household Materials
A cold frame is a great way to extend your outdoor garden and grow plants that need warmer temperatures, even in cold weather. You can easily make your own DIY cold frame using household materials. All you need is wood, two T-posts, and two wires. Follow this easy video tutorial to build your own sturdy and stylish cold frame. This is a cheap and effective way to start seeds outdoors and grow your own fresh produce. With this DIY cold frame, you can enjoy fresh lettuce and herbs all year round.
How to Build a PVC Cold Frame
If you want to grow vegetables and fruits but don’t have the means to build a greenhouse, a cheap and effective solution is building a PVC cold frame. In just 30 minutes, you can build a simple and inexpensive cold frame using PVC piping. This can be used with your regular garden or for years of gardening. Here’s how you can build your own PVC cold frame:
- Gather the materials: PVC pipes, connectors, clear plastic sheeting, and a few basic tools.
- Cut the PVC pipes to the desired length and connect them using the connectors to form a rectangular frame.
- Cover the frame with clear plastic sheeting and secure it in place with clips or weights.
- Place the cold frame in a sunny spot in your garden and start planting your seeds.
A PVC cold frame is an easy and affordable way to extend your growing season and protect your plants from harsh weather conditions. With a little bit of effort, you can build your own PVC cold frame and enjoy fresh produce all year round.
DIY Cold Frame
A DIY cold frame is a great way to extend your growing season and try new crops without the use of pesticides. This insect-free greenhouse requires only light maintenance and provides the perfect environment for starting seedlings or planting seeds. With step-by-step instructions, building your cold frame is easy and affordable. A cold frame is an excellent way to get your plants off to a good start before moving them outdoors. By using a cold frame, you can extend the harvest of hardy vegetables and enjoy fresh produce for longer periods.
How to Build a Simple Cold Frame
If you want to extend your growing season, a cold frame is a great solution. It is a simple and inexpensive way to keep your plants warm during the winter months. Here are the steps to build a cold frame:
- Choose a location: Find a spot that gets plenty of sunlight and is sheltered from strong winds.
- Build the frame: Use wooden sheets to create a rectangular box that is at least 18 inches high. The size will depend on the size of your garden.
- Add hardware cloth: Attach hardware cloth to the bottom of the frame to keep pests out.
- Add insulation: Fill the bottom of the frame with soil to create insulation.
- Add plastic cover: Place clear plastic over the top of the frame and secure it with clips or weights.
- Ventilation: To prevent overheating, prop open the lid on sunny days or add a vent.
By following these steps, you can easily build a cold frame that will keep your plants warm and protected during the colder months.
How to Build a Cold Frame

Building a cold frame is an easy and cost-effective way to extend your gardening season. Follow these simple steps to create your own cold frame:
- Find two old window frames with glass, or build a frame using wood and plexiglass.
- Cut four pieces of wood to the desired size to create the frame.
- Screw the pieces of wood together to create a rectangular frame.
- Attach the glass to the top of the frame using hinges.
- Place the cold frame in a sunny location in your garden.
- Fill the bottom of the cold frame with soil and plant your seedlings.
- Close the lid of the cold frame to protect your plants from frost and cold temperatures.
With these easy steps, you can create a simple and effective cold frame to help you start your garden early in the season and protect your plants from the elements.
How To Build A Cold Frame From Old Windows

Building a cold frame from old windows is a great way to repurpose unwanted windows and create a useful addition to your garden. This DIY project is perfect for those interested in growing vegetables and herbs. With basic carpentry skills and common hand tools, you can customize the cold frame to fit your space and plants.
To build a cold frame from old windows, follow these simple steps:
- Gather materials, including old windows, lumber, screws, and a hinge.
- Cut the lumber to the desired size and shape, depending on the size of your windows.
- Screw the lumber together to create a frame.
- Attach the windows to the frame using screws and a hinge for the top window.
- Place the cold frame in a sunny spot in your garden and fill it with soil.
- Plant your desired vegetables and herbs in the soil.
- Close the top window to protect your plants from cold weather.
By following these steps, you can easily build a cold frame from old windows and enjoy fresh vegetables and herbs all year round.
How to Build a Cold Frame Using Pallets
Building a cold frame out of pallets is an inexpensive and easy way to protect your plants from the harsh elements. Follow these steps to create your own cold frame for under $10:
- Gather materials: You will need an old pallet, plastic sheeting, screws, and hinges.
- Disassemble the pallet: Use a saw to cut the pallet into four equal pieces.
- Build the frame: Screw the four pieces together to form a square or rectangular frame.
- Attach the plastic sheeting: Cut the plastic sheeting to size and attach it to the top of the frame using hinges.
- Place in your garden: Place the cold frame in your garden and fill with soil.
Your cold frame is now ready to use! It’s a great way to extend your growing season and protect your plants from the elements.
Summary
To build your own DIY cold frame, you will need to gather materials such as wood, screws, hinges, and clear plastic sheeting. Cut the wood to the appropriate size and assemble the frame using screws and hinges. Attach the clear plastic sheeting to the top of the frame to create a greenhouse-like environment. Place the cold frame in a sunny location and use it to start seedlings or extend your growing season for vegetables. With a little effort, you can create a functional and cost-effective cold frame for your garden.