If you’re tired of dealing with tangled wires, misplaced chargers, and low battery alerts, then a DIY charging station might be just what you need. With 30 practical DIY charging station ideas, you can make your own charging station at home with minimal cost and effort. These DIY projects use simple materials like wood, cardboard, PVC pipes, or even recycled items to make functional and attractive charging stations.
Not only will a DIY charging station help keep your devices organized and charged, it will also add some flair and personality to your home decor. You can customize these charging stations to suit your space, style, and needs. Try our creative and easy DIY charging station ideas, including instructions, step-by-step guides, pictures, and tips to help you make your own homemade charging station.
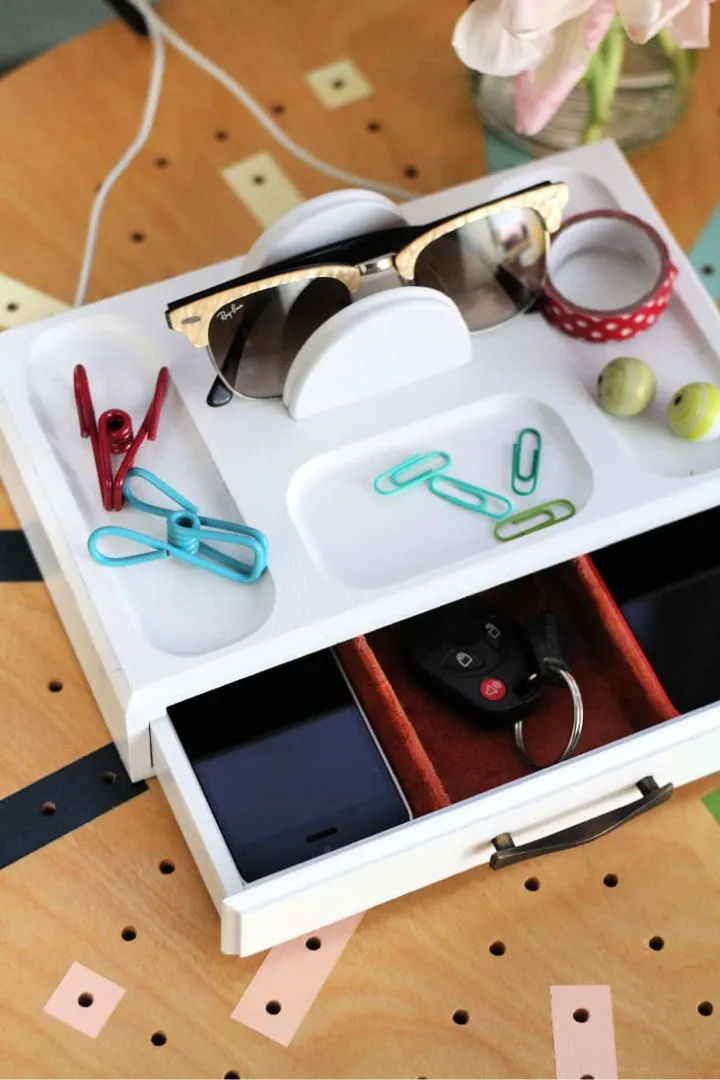
21. Hanging Phone Charging Station

If you’re tired of constantly searching for a safe place to charge your smartphone, a DIY fabric phone charging station may be the perfect solution. Not only does it protect your charging phone, but it also allows you to store its cord neatly. Creating your own hanging phone charging station is easy and requires only a few materials, including any fabric material, an outlet, an adapter plug, and a sewing machine or needle and thread. By following these simple steps, you can create a safe and secure charging station for your phone, ensuring that it stays protected while it charges.
5. DIY Charging Station With LED Notifications
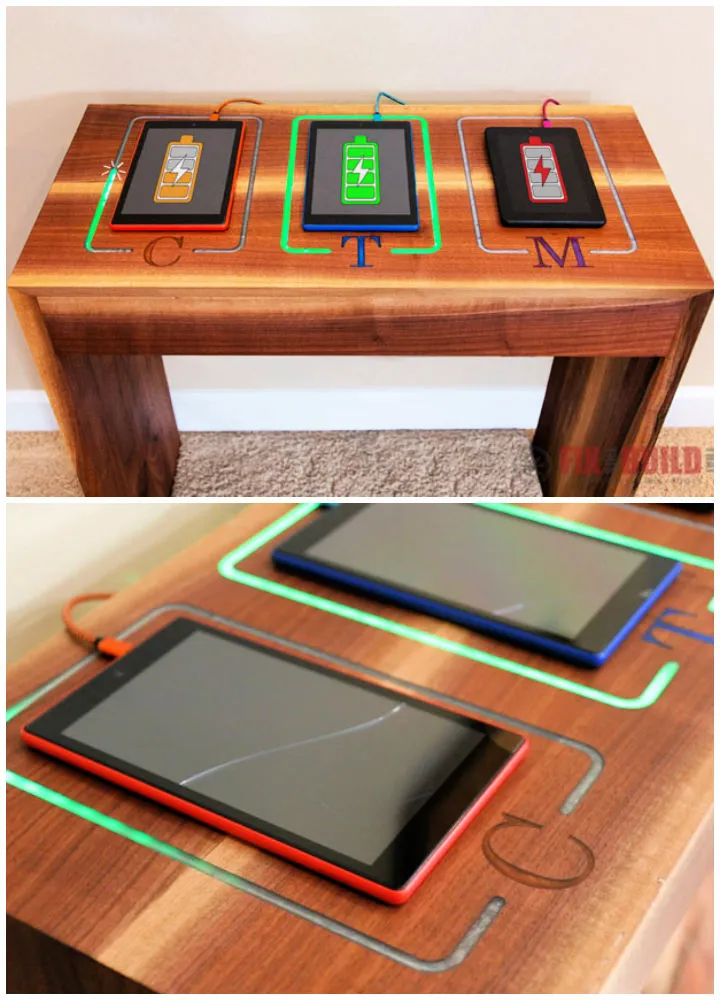
Tired of messy cords and forgotten tablets? A DIY charging station with LED notifications can solve your problems. With some leftover walnut boards and a few new skills, you can create an efficient and attractive charging table for your family’s devices. Here’s what you’ll need:
- Walnut boards
- LED strip lights
- Drill
- Screws
- Wood glue
Start by cutting the walnut boards to size and assembling the table. Then, drill holes for the LED strip lights and wire them up. Finally, attach the LED lights to the underside of the table and glue everything together.
Now, when your devices are fully charged, the LED lights will turn off. No more guessing or checking every device individually. Keep your family’s devices organized and charged with this DIY project.
29. How to Turn Breadbox into Charging Station
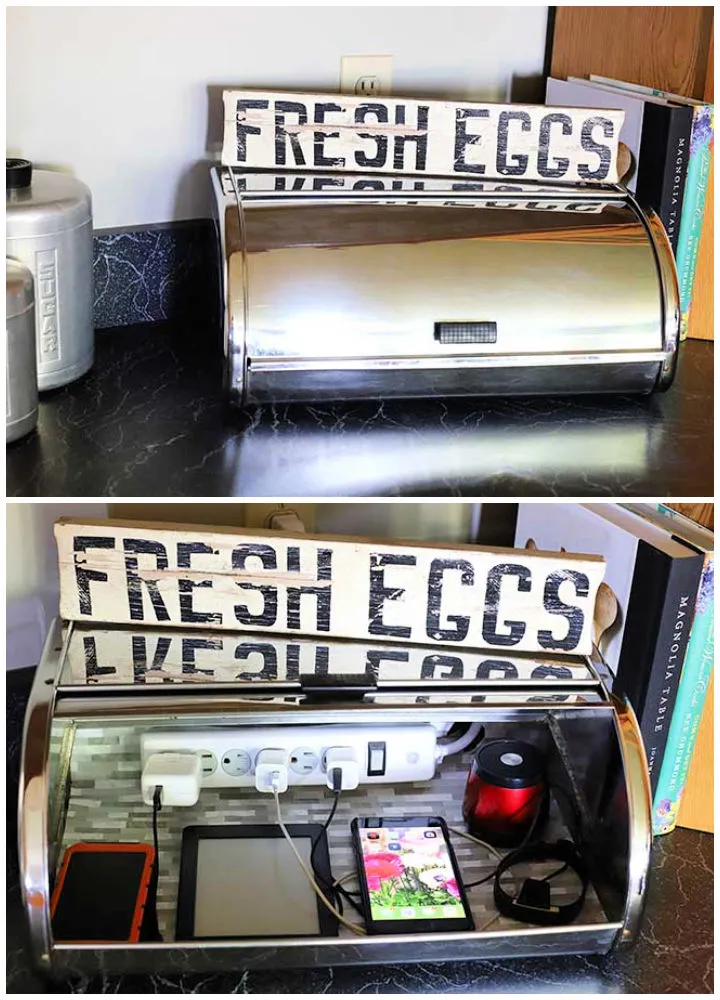
If you’re tired of cords and electronics cluttering up your countertops, why not turn a thrift store breadbox into a convenient charging station? With a few simple steps, you can easily organize and charge all your devices in one place. Here’s how:
- Find a breadbox that fits your needs and style.
- Remove any shelves or dividers inside the breadbox.
- Drill a hole in the back of the breadbox for the power cord.
- Thread the power cord through the hole and attach a power strip inside the breadbox.
- Add a few adhesive cord clips to the back of the breadbox to keep your cords organized.
- Plug in your devices and enjoy your clutter-free countertop!
Check out your local thrift store for a selection of breadboxes to get started on your DIY charging station today.
6. How to Create a Charging Station

Creating a charging station for all your devices is easy and accessible with this do-it-yourself (DIY) guide. To start, you need a power strip with surge protection that can accommodate multiple sizes of power bricks. You can plug in anything from small iPhone chargers to big laptop bricks and charge multiple devices at the same time. Place the power strip on a tabletop instead of hiding it behind the couch to avoid cable clutter that could ruin your home decor efforts. Follow this simple DIY guide and keep all your devices up-to-date with a reliable charging station.
7. DIY Charging Station for Wedding

Keep your guests connected and their phones charged throughout the night with this easy-to-assemble DIY charging station for your wedding. Simply plug in the station and let your guests top off their batteries while enjoying the event. No more worrying about low battery notifications during important moments.
To create this charging station, consider upcycling an old wooden tool crate. This creative idea provides a neat, organized, and stylish place to charge all your electronics fully. You can customize the crate to fit your wedding theme and decor.
Here are some tips to help you create your own DIY charging station:
- Choose a wooden tool crate that fits your needs and decor
- Sand the crate to smooth out any rough edges
- Drill holes in the back of the crate for cords to pass through
- Add a power strip to the back of the crate
- Label each cord with the corresponding device to avoid confusion
- Decorate the crate to match your wedding theme
By creating your own DIY charging station, you can ensure that your guests stay connected and charged throughout the night. Plus, it adds a unique and personalized touch to your wedding.
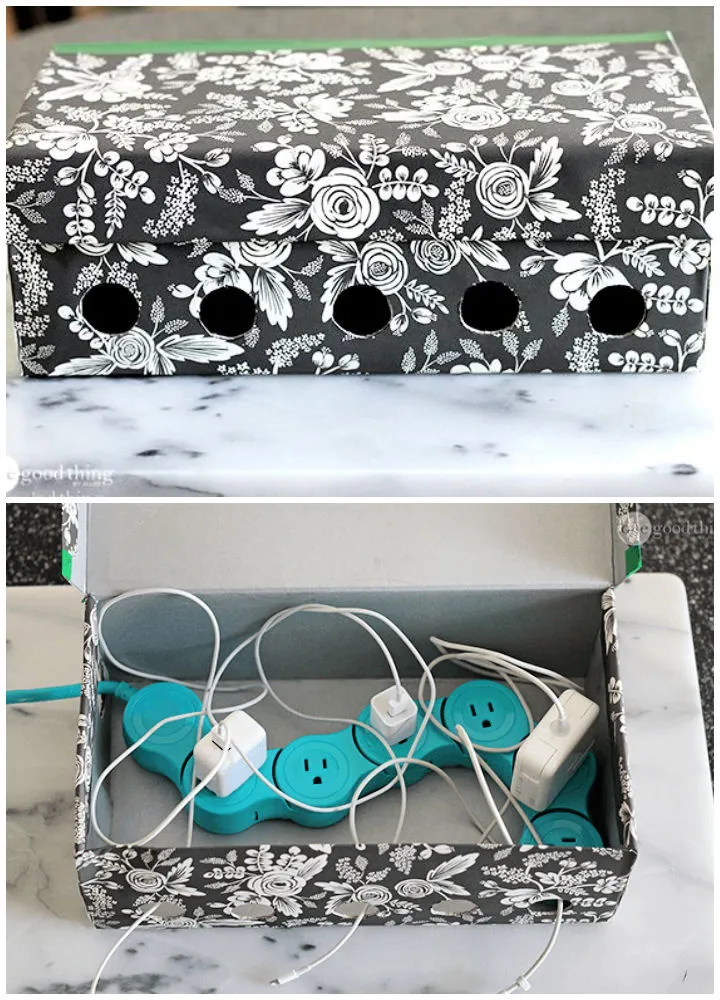
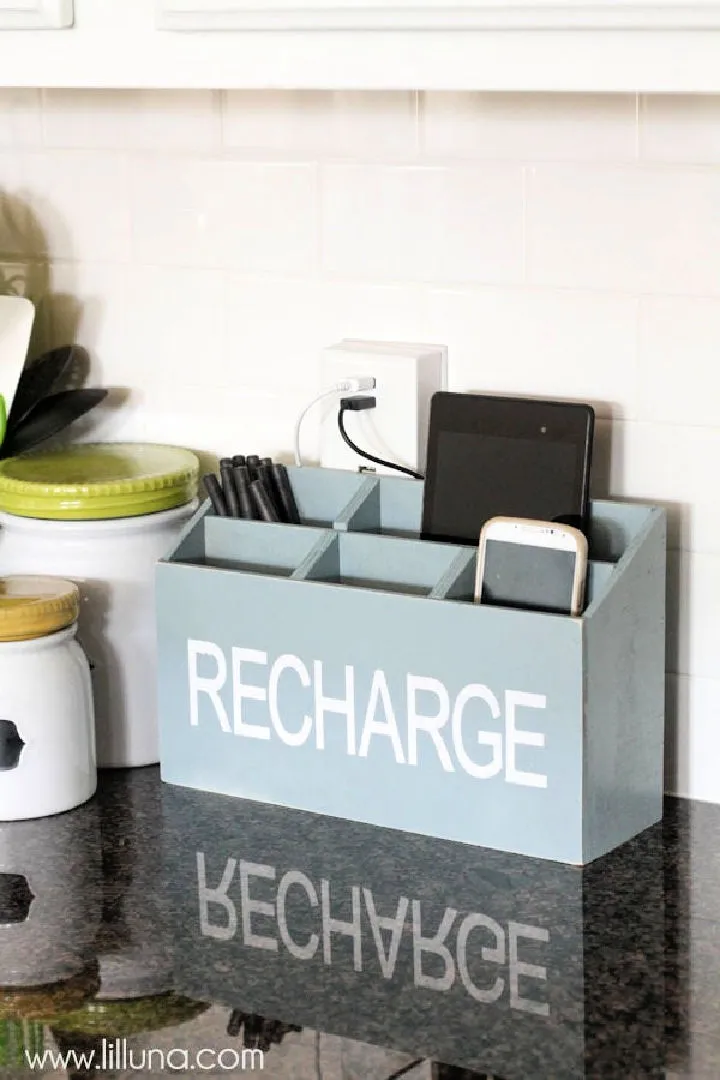
24. Decorative Box Charging Station
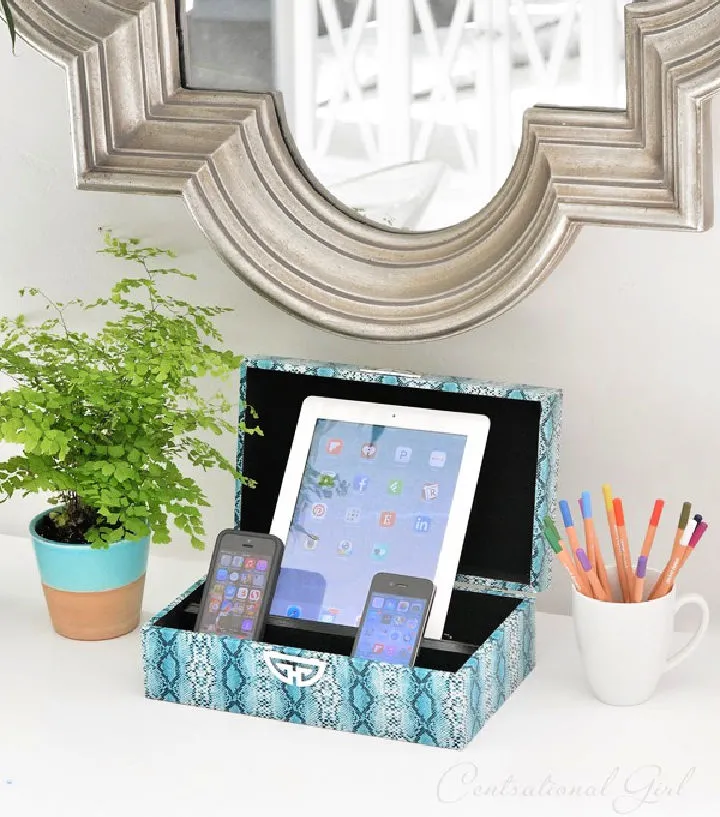
If you’re tired of tangled cords and messy wires, a decorative box charging station is the perfect solution to keep your electronics organized. This charging station provides a practical and stylish way to charge multiple devices simultaneously with multiple USB ports. Its decorative design adds a touch of elegance to any room, making it a great addition to your home decor. With this affordable charging station, you can easily control cord clutter and keep all your phones, tablets, and other electronic devices organized whether you’re at home or on the go. Say goodbye to the hassle of managing your tech life and hello to a more organized and efficient way of living!
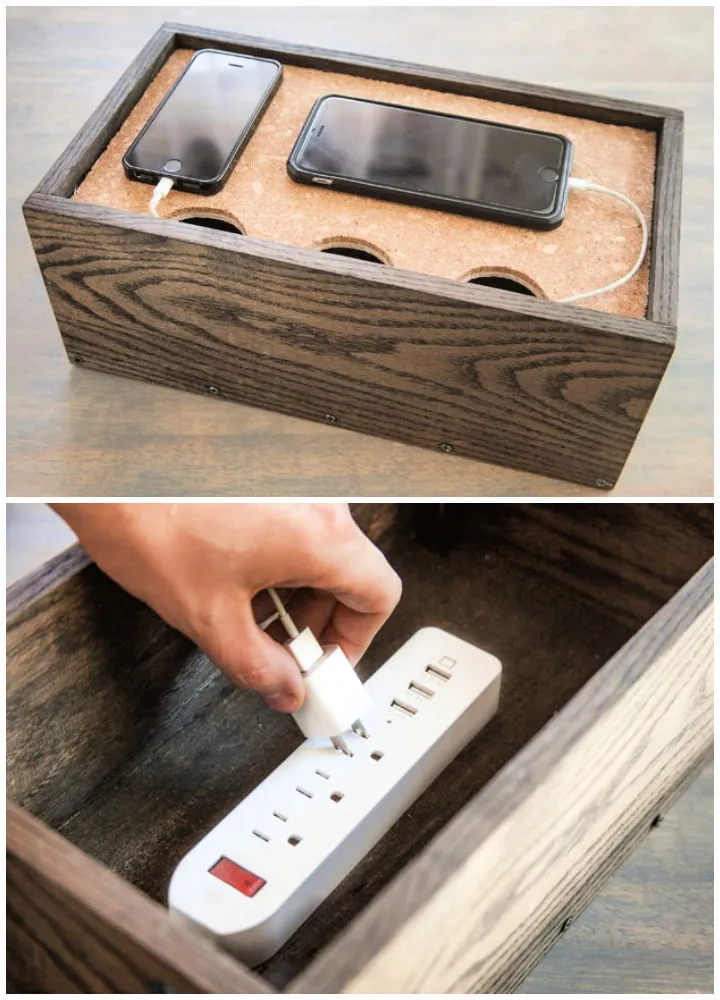
4. How to Create Your Own Charging Station
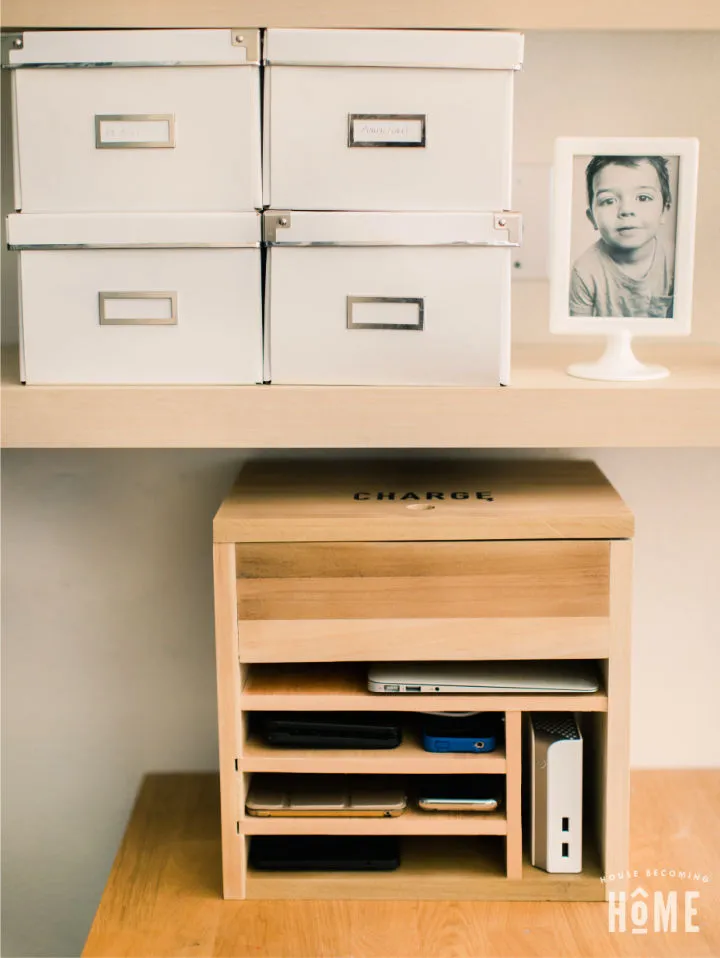
Are you tired of dealing with electronic clutter? Get organized by building your own DIY charging station! This project is perfect for holding all your electronic devices, including laptops, smartphones, and external hard drives. The top compartment allows you to store a large seven-outlet, five-USB port power strip while keeping all the cables hidden.
To build your own charging station, gather the necessary materials and follow these simple steps:
- Cut the wood to the desired size and shape.
- Sand the wood to create a smooth surface.
- Paint or stain the wood to match your home or office decor.
- Attach the power strip to the top compartment of the charging station.
- Drill holes in the back of the charging station to allow for cable management.
- Add any additional features, such as hooks or shelves, to customize your charging station.
Building your own charging station is an easy and affordable way to keep your space tidy and organized. Start your DIY project today and enjoy a clutter-free workspace!
10. DIY Phone Charging Station from Recycled Materials
Looking for a stylish and affordable phone charging station? Why not make your own from scrap materials lying around your home? You can easily create a sleek and personalized charging station that looks just as good as store-bought options. With a little creativity and effort, you can save money and reduce waste by repurposing materials that would otherwise end up in a landfill.
Here are some simple steps to create your own DIY phone charging station:
- Gather materials such as a small wooden box, scrap fabric, and a USB charging port.
- Cut a hole in the top of the wooden box for the charging port to fit through.
- Cover the box with the scrap fabric using glue or a staple gun.
- Insert the charging port through the hole in the top of the box.
- Voila! You now have a personalized charging station for your phone.
Not only will this DIY project save you money, but it also helps to reduce waste and promote sustainability. So get creative and have fun crafting your own phone charging station today!
30. Non-Wireless Phone Charging Station
If you’re looking for a convenient way to charge your iPhone and Apple watch simultaneously, the CNC non-wireless phone charging station is an excellent choice. This charging station is designed to hold both your phone and watch securely while charging, making it a stylish and functional addition to your desk or nightstand.
Some key features of the non-wireless phone charging station include:
- Compatibility with both iPhone and Apple watch
- Custom-designed for a sleek and modern look
- Non-wireless charging capability
- Easy to use and set up
With this charging station, you can keep your devices organized and charged without the hassle of tangled cords or separate charging stations. Plus, it makes a great gift for anyone who loves technology and style.
In summary, the CNC non-wireless phone charging station is a must-have accessory for anyone who wants to keep their iPhone and Apple watch charged and organized in one convenient location.
26. Make Your Own Charging Station

Are you tired of tangled cords and cluttered charging areas? Why not make your own charging station for all of your devices? With just a few materials and some basic tools, you can create a custom charging station that fits perfectly in your home or office.
Whether you need a charging station for your phone, tablet, or other electronic devices, this DIY project is a great way to save money and learn the basics of building something from scratch. Plus, you can customize your charging station to match your décor and personal style.
If you have cordless tools that need charging, you can also make a cordless tool charging station with step-by-step guidelines. These detailed instructions are easy to follow, and you don’t need a big budget for this affordable project. With these simple steps, any novice can build their charging station quickly.
You can even make a cordless tool charging station with two hands! This DIY project gives you the convenience of having all your cordless tools in one place – plus, it only requires one 2’x4′ sheet of 3/4″ plywood and less than $20. See how easy this is to make with a video tutorial, then follow the instructions in this Instructable. Get ready to add more efficiency and organization to your workspace today!
Here are some benefits of making your own charging station:
- Saves money compared to purchasing a pre-made charging station
- Customizable to fit your personal style and décor
- Reduces cable clutter and keeps your charging area organized
- Provides a convenient and central location for all of your devices
- Easy to make with basic materials and tools
So why not take on the challenge and start building your own charging station today? With these simple instructions, you can have a custom charging solution in no time.
25. Counter Top Phone Charging Station

When you’re on the go and need to charge multiple devices without breaking the bank, a DIY phone charging station & tablet holder made from a repurposed picture frame can be the perfect solution. With some crafty know-how and basic supplies, you can easily create a counter top charging station that will keep your devices powered up and organized. Here are some tips to help you create your own charging station:
- Choose a picture frame that fits the size of your devices
- Remove the glass and backing from the frame
- Cut a piece of foam board to fit inside the frame
- Cut notches in the foam board to hold your devices
- Cover the foam board with fabric or decorative paper
- Attach a power strip to the back of the frame
- Plug in your devices and enjoy your new charging station
By repurposing items you already have around your home, you can save money and get creative with solutions to your charging needs. This DIY project is perfect for a double-self-employed couple who needs multiple devices powered on the go.
20. DIY Phone Charging Station
Tired of losing your phone chargers? A DIY phone charging station is just what you need! This simple and stylish project will keep all your devices in one place, so you’ll never have to search for misplaced chargers or cords again. Plus, it’s a great way to reclaim counter space. Here’s what you’ll need to get started:
- Wooden box or tray
- Power strip
- Drill
- Screws
- Paint or stain (optional)
Instructions:
- Use a drill to make holes in the wooden box or tray to fit the power strip.
- Attach the power strip to the box or tray using screws.
- Paint or stain the box or tray (optional).
- Plug in your chargers and organize your devices in the box or tray.
With just a few basic supplies and some creativity, you can make a DIY phone charging station that will simplify your life and keep your devices charged and ready to go.
11. DIY Drill Charging Station

Looking for a way to organize your garage shop and free up valuable workspace? Consider building your own DIY drill charging station. With just a few materials and some creative ideas, you can create a sturdy and reliable piece of furniture that will make your workspace more efficient and effective.
To get started, you’ll need to build a 2×4 mobile workbench base. This will serve as the foundation for your charging station and provide a stable surface for your tools and equipment. Once you’ve built your workbench base, you can then add the charging station components, including a power strip, charging ports, and storage for your drills and other tools.
This easy-to-follow tutorial provides all the materials and instructions you need to build your own custom charging station. With a little time and effort, you can transform your garage shop into a well-organized and functional workspace that you’ll be proud to show off to your friends and colleagues. So why wait? Start building your DIY drill charging station today and take your handyman skills to the next level!
12. Handmade Charging Station

Looking for a unique and practical gift for someone who seems to have everything? Consider making a DIY charging station! These handmade gifts are not only functional, but also stylish and customizable. With the right plans and ideas, you can create a charging station that perfectly fits the recipient’s personality and needs. Plus, making a charging station yourself can be a fun and rewarding project. Check out the DIY plans and inspiration available online to get started on this thoughtful gift idea. And if you’re looking for more handmade gift ideas, consider making a versatile and affordable serving tray.
13. Charging Station Using Shoe Box
Are you tired of dealing with tangled power cords and chargers that clutter your home? A DIY family charging station can be the perfect solution to keep your gadgets organized and charged. With just an hour of your time, you can create an innovative charging station using a shoebox and a few other materials. This simple and affordable solution will ensure that no one in your family has excuses for their device not being charged. Say goodbye to cord clutter and enjoy the peace of mind that comes with a neat and organized charging station.
9. Create Your Own Charging Station
Are you tired of tangled cords and cluttered counters? A DIY charging station may be the solution you need to organize your kitchen. This clever idea can help you keep cords neat and tidy while charging up to two phones and three tablets. Here are some steps to make your own charging station:
- Gather materials such as a wooden box, drill, power strip, and cable ties.
- Drill holes in the back of the box for cords to pass through.
- Attach the power strip to the back of the box.
- Use cable ties to secure cords to the inside of the box.
- Decorate the box as desired.
With a little effort, you can have a more comfortable and organized kitchen.
14. DIY Battery Charging Station
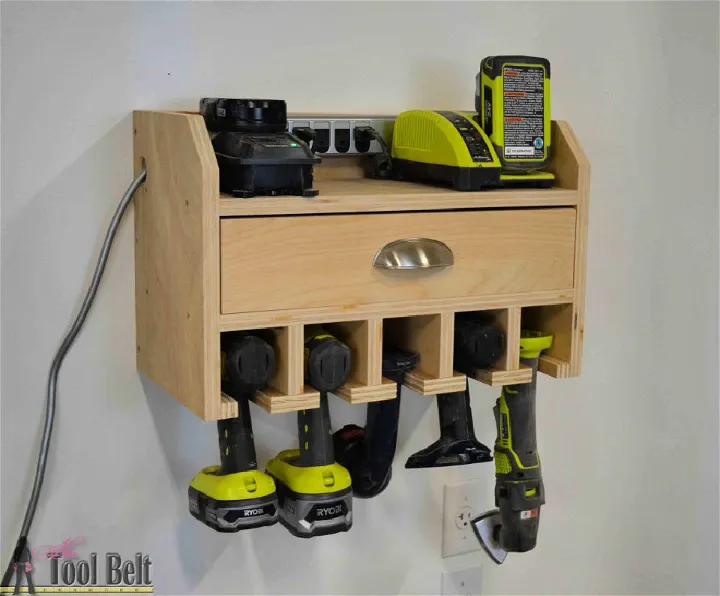
Organize your workspace and keep your tools charged with this simple DIY Battery Charging Station. All you need is 3/4″ plywood, 1/4″ or 5mm plywood, 1 1/4″ screws, wood glue, sandpaper, 3″ screws, and a drawer pull. Follow these easy steps to create your own cordless drill storage and charging station.
Materials:
- 3/4″ plywood
- 1/4″ or 5mm plywood
- 1 1/4″ screws
- Wood glue
- Sandpaper
- 3″ screws
- Drawer pull
Instructions:
- Cut the plywood to size according to the plans.
- Assemble the box with wood glue and screws.
- Sand the edges and corners to smooth them out.
- Attach the drawer pull to the front of the box.
- Cut the slots for the battery chargers in the top of the box.
- Attach the chargers to the underside of the top.
- Mount the box to the wall or workbench.
With this custom-made drill organizer and battery charger, your workspace will be organized and your tools will always be charged and ready to use. Say goodbye to wasted time searching for lost chargers and hello to a more efficient workspace.
3. How to Make a Charging Station
Are you tired of dealing with tangled wires and cluttered charging spaces? With this easy DIY guide, you can create a charging station that is both organized and attractive. Here are the simple steps to follow:
- Gather your supplies from any hardware store
- Cut the plywood into the desired size and shape
- Drill holes for the chargers and cables
- Sand and paint the plywood
- Attach the chargers and cables to the plywood
- Add any finishing touches, such as hooks or decorative elements
By following these steps, you can create a charging station that fits any decor and helps keep your devices organized. This project is perfect for beginner DIYers and can be completed in just a few hours. Say goodbye to wire clutter and hello to an efficient charging space with this convenient charging station project.
15. DIY Cell Phone Charging Station Ideas

Are you tired of tangled cords and messy charging stations? DIY cell phone charging stations can help you keep your devices organized and charged. Here are a few ideas to get you started:
- Mason Jar Charging Station: Use a wooden board, mason jars, and a power strip to create a rustic charging station that can hold multiple devices.
- Shoebox Charging Station: Cover a shoebox in decorative paper and cut holes for cords to create an affordable charging station.
- Hanging Charging Station: Hang a multi-pocket shoe organizer on the wall and use it to store and charge your devices.
With these DIY cell phone charging station ideas, you can create a custom charging station that fits your style and needs. Plus, you’ll never have to worry about cords and devices cluttering up your space again.
2. Wooden Device Charging Station
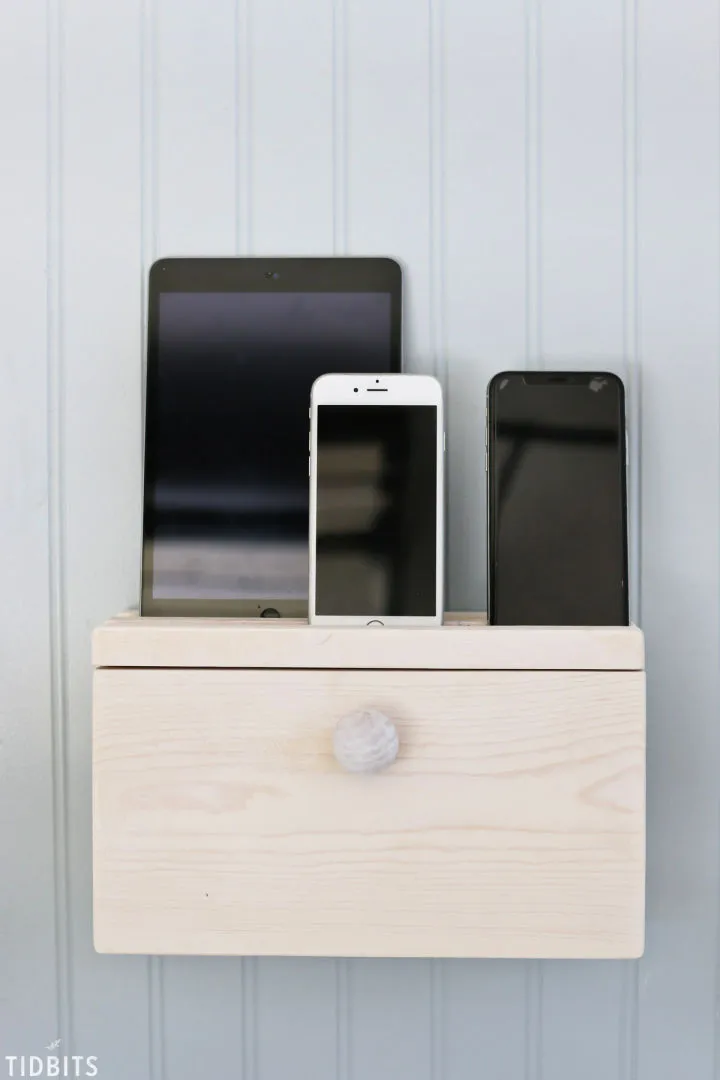
If you’re looking for a stylish and functional way to declutter your home and keep your devices charged, a DIY wooden device charging station is the perfect solution. This easy-to-follow tutorial will guide you through the process of creating an attractive storage solution that looks great and helps keep your devices charged up and ready to go whenever you need them.
To make this charging station, you’ll need a few basic supplies, including a wooden board, drill, saw, and sandpaper. Once you have your supplies, simply follow the step-by-step instructions to create a custom charging station that fits your devices and your style.
Not only does this charging station help keep your home organized and your devices charged, but it also saves you money by eliminating the need for expensive store-bought charging stations. Give your cell phones and devices the perfect place to recharge in style with this creative DIY project.
16. Turn Your Desk Organizer into a Charging Station

If you’re tired of dealing with tangled cords and cluttered counters, why not transform your ordinary desk organizer into a convenient charging station? With just a few basic craft materials and some creativity, you can easily create a neat and organized space for all your electronic devices.
To get started, gather your desk organizer and some glue and paint. Then, follow these simple steps:
- Remove any unnecessary compartments or dividers from your desk organizer to create space for your devices.
- Use paint or decorative paper to personalize your charging station and make it match your decor.
- Add adhesive cable clips or loops to the back of your desk organizer to keep cords tidy and out of the way.
- Use a power strip to plug in all your devices and keep them charged and ready to go.
By turning your desk organizer into a charging station, you’ll be able to keep all your electronic devices in one place and avoid the hassle of dealing with tangled cords and cluttered spaces. So why not give it a try and see how much easier it can make your life?
1. DIY Family Charging Station

Tired of tangled cords and cluttered surfaces? Create a centralized charging station for all your family’s electronics with this easy-to-follow DIY guide. Not only will it keep your devices safely charged, but it will also save space and add a stylish touch to your home décor.
To make your own charging station, follow these simple steps:
- Choose a container or tray that fits your devices and matches your home décor.
- Add a power strip to the bottom of the container or tray.
- Label each cord with a tag or label maker.
- Use adhesive cord clips to keep cords organized and in place.
- Place your devices in the container or tray and plug them into the power strip.
With this DIY charging station, you can say goodbye to clutter and hello to efficient device management. So why wait? Start organizing your family’s electronics today!
17. DIY Farmhouse Charging Station

Looking for a unique and personalized charging station that won’t break the bank? Why not try making your own with a thrifted box? Not only is it a fun DIY project, but it’s also a great way to showcase your creativity. And the best part is, no one else will have one like yours!
To get started, gather your thrifting tools and head to your local thrift store to find a box that catches your eye. Once you have your box, it’s time to transform it into a charging station. Here’s what you’ll need:
- Thrifted box
- Smartphone charger
- Decorative paper
- Mod Podge glue
- Paintbrush
- Ruler
- Pencil
- Utility knife
First, measure your smartphone charger and cut a hole in the box that fits it snugly. Then, cover the box with decorative paper using mod podge glue. You can choose any design or pattern that fits your style, but for a farmhouse look, consider using a floral or plaid print.
Once the glue has dried, your charging station is ready to use! Simply plug in your charger and place your phone on top of the box. Not only is it a functional charging station, but it also adds a touch of farmhouse charm to any room in your home.
So what are you waiting for? Gather your supplies and get crafting today for a one-of-a-kind charging station that’s sure to impress your friends and family.
19. Fabric Phone Charging Station Pattern

Are you tired of untidy and tangled phone charger wires? A DIY phone charging station may be the perfect solution for you. With a fabric phone charging station, you can easily keep your charging station organized and your device safe from damage. These DIY tutorials are easy to follow and help you create an elegant holder that looks great in your home. You won’t have to worry about messy wires again! Check out sewcraftyme’s guide for crafting the perfect DIY phone charger holder and say goodbye to cluttered charging stations.
22. Vintage Suitcase Charging Station

Tired of messy cords and chargers? Transform a vintage suitcase into a DIY charging station with this easy-to-follow project. This affordable and beginner-friendly project is perfect for recycling and organizing your devices. With step-by-step instructions, you can customize the charging station to fit your needs. The best part? The suitcase charging station has multiple ports, allowing everyone to charge their devices at once.
Not only will this project eliminate clutter and bring new life into your home or office, but it also provides a unique and stylish way to charge your devices. Get creative today and turn an old suitcase into an amazing charging station.
23. Homemade Charging Station
Tired of messy wires and disorganized charging stations? With just a few materials found around the house, you can create a stylish and clutter-free charging station. This easy DIY project is perfect for beginners and requires minimal effort for maximum results.
By recycling materials, you can create an affordable charging station that keeps all of your devices in one place. No more searching for cables when you need them most! This charging station is perfect for apartments or small spaces where organization is key. Say goodbye to tangled wires and hello to a neat and tidy space with your very own homemade charging station.
Summary
If you’re looking for DIY charging station ideas, there are plenty of options to choose from. You can repurpose old items like shoeboxes or wooden crates, or create your own custom charging station using materials like PVC pipes or cardboard. Some popular options include using a power strip with USB ports, or creating a charging station with built-in LED lights for a stylish touch. With a little creativity, you can easily create a charging station that fits your needs and style.