If you’re a dog owner, you know how important it is to make sure your furry friend is comfortable and safe. One way to do that is by providing them with a ramp to help them navigate stairs and other obstacles. In this article, you’ll find 20 DIY dog ramp ideas to help you create a customized solution for your pup’s needs. Whether you have a senior dog who needs extra support or a small breed who can’t quite make it up to the couch, there’s a ramp here for you.
DIY Cat Bed
If you want to provide your feline friend with a cozy place to sleep, consider making a DIY cat bed. To start, gather a piece of fleece, scissors, and some polyester stuffing. Measure and cut two circles from the fleece, then sew them together along the circumference, leaving a small opening for stuffing. Turn the circle inside out and measure a smaller circle on it. Fill the center with polyester stuffing and sew it up. Cut an inch-long strip from each corner to aid in turning it inside out. Finally, use a needle and thread to close the opening. Your cat will have a warm and comfortable spot to curl up in no time. Plus, making your own cat bed allows you to customize it to your pet’s preferences and your decor.
No-Sew Cat Bed
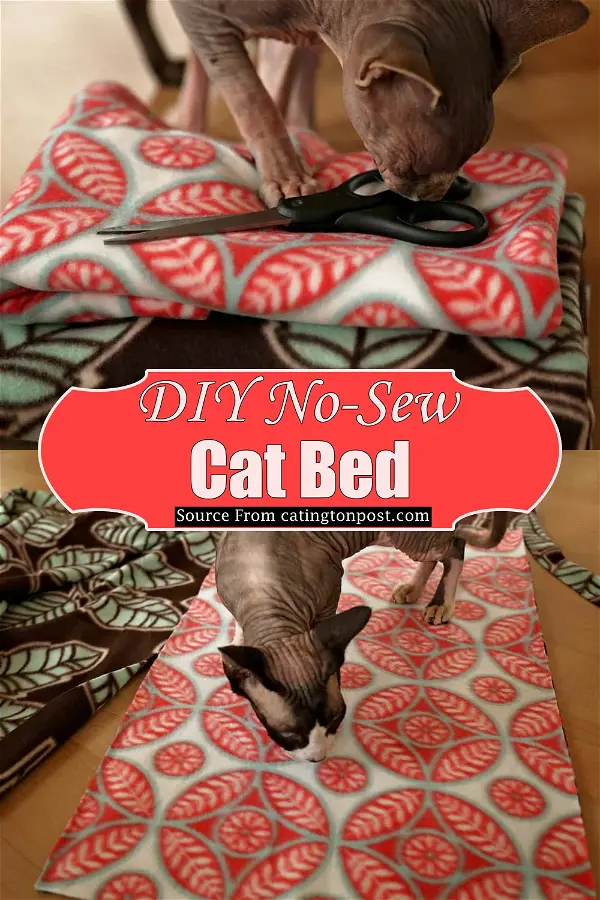
If you’re looking for an easy and affordable way to provide your cat with a warm and cozy place to sleep, a no-sew cat bed is the perfect solution. This project is simple enough for beginners and can be completed in just a few hours.
To make a no-sew cat bed, you will need the following materials:
- A small fleece blanket or piece of fabric
- Scissors
- A ruler or measuring tape
- A marker or pen
Here’s how to make your cat bed:
- Lay your fleece blanket or fabric flat on a table or other flat surface.
- Use your ruler or measuring tape to measure a square or rectangle that is approximately twice the size of your cat.
- Use your marker or pen to draw the square or rectangle onto the fabric.
- Cut along the lines you drew to create your cat bed.
- Fold the edges of the fabric up and over to create a border around the bed.
- Fluff the bed and place it in a warm, cozy spot for your cat to enjoy.
This no-sew cat bed is a great way to provide your cat with a comfortable place to sleep without spending a lot of money or time. Plus, it’s a fun and easy DIY project that even beginners can tackle. Give it a try and see how much your furry friend loves it!
DIY Cat Bed Using Ohhio Braid
If you want to give your cat a cozy and comfortable place to sleep, you can make a DIY cat bed using Ohhio braid. This project is easy to do and won’t cost you a lot of money. Here’s how you can make it:
Materials:
- 100 meters of Ohhio braid
- Scissors
- Large crochet hook
- Tape measure
Instructions:
- Measure and cut 100 meters of Ohhio braid.
- Make a four-stitch chain using the crochet hook.
- Continue making the chain until it is the desired size for your cat bed.
- Once you have reached the desired size, tie off the end of the braid.
- Fold the braid in half and sew the two ends together to create a circular shape.
- Your cat bed is now ready!
This DIY cat bed is perfect for any kitty who loves to curl up and enjoy a good snooze. It is also a great gift for any cat lover. With just a few simple steps, you can provide your furry friend with a comfortable space to relax and sleep.
How To Make A DIY Cat Bed
Making a DIY cat bed is a fun and easy project that can save you money and keep your furry friend comfortable. To start, you will need a few simple materials, including a cardboard box, an old t-shirt, two hangers, scissors, and duct tape.
First, cut off the lid of the cardboard box and discard it. Then, cut off the twirly part of the hangers and bend them into inverted U-shapes. Place the two hangers in the box in a crisscross pattern, with the hooks facing up.
Next, take your old t-shirt and cut off the sleeves and collar. Lay the shirt flat and place the box in the center. Pull the sides of the shirt up and over the box, tucking them in tightly around the edges. Use duct tape to secure the shirt in place.
Your DIY cat bed is now complete! Place it in a cozy spot and watch as your furry friend happily snuggles up in their new bed. This project is a great way to upcycle old materials and provide your cat with a comfortable and stylish place to rest.
DIY Iron Throne Cat Bed
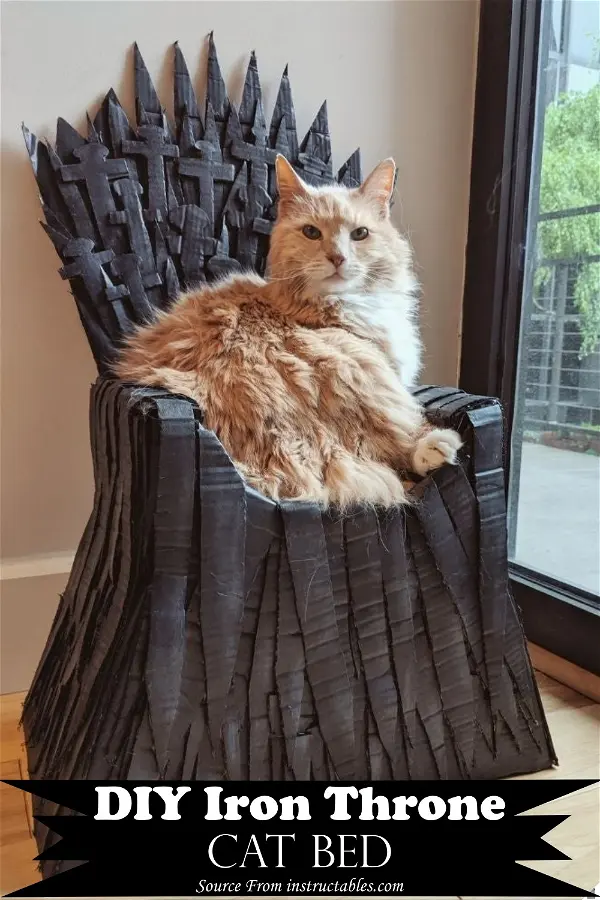
If you’re a Game of Thrones fan and a cat lover, this DIY Iron Throne Cat Bed is a perfect project for you. With a few common materials such as cardboard, acrylic paint, a hot glue gun, a craft knife, and a hot glue stick, you can create a cozy and stylish bed for your furry friend.
To start, take a cardboard box and strengthen its structure with hot glue. Cut the sides and top of the lid to assemble the back of the throne. Cut out a ton of swords, then glue them to the back of the throne. For a more attractive look, paint it with a nice color of your choice. Allow it to dry for some time, and your Iron Throne Cat Bed is ready for use.
Your cat will definitely appreciate this unique and comfortable bed. Plus, it will add a touch of fantasy to your home decor. Get creative and make your own Iron Throne Cat Bed today!
DIY Deluxe Cat Bed

If you’re a cat owner, you know how much your furry friend loves to sleep in high places. Crafting a deluxe cat bed can solve this problem and make your cat feel secure and pampered. The best part? You can create it yourself with just a few materials.
To make your own DIY deluxe cat bed, you’ll need a printer with good quality printers, a lot of paper, and the pattern which you can easily find online. Once you have the pattern, simply print it out, cut out the pieces, and assemble them like a big puzzle. The process is easy and very cheap, and the end result will be a comfortable and secure bed for your cat.
By providing your cat with a deluxe bed, your furry friend will have a cozy place to sleep and relax, and they’ll be less likely to climb on high shelves or other dangerous places. With just a little effort, you can create a comfortable and stylish bed for your feline companion.
How To Make A Cat Bed
Making a comfortable bed for your cat is an easy DIY project that requires only a few materials. If you have an old box lying around, you can use it to make a cozy bed for your feline friend. Here’s how you can do it:
Materials Needed:
- Cardboard box
- Scissors
- Blanket or pillow
- Shirt or any fabric
Steps:
- Cut off the four covers of the box and remove any tape or glue residue.
- Cut the shirt or fabric to fit the bottom of the box.
- Tie the shirt or fabric at the bottom of the box, making sure it is secure.
- Fold the two arms of the shirt or fabric by the side of the box.
- Place a soft blanket or pillow inside the box.
- Encourage your cat to try out the new bed.
Remember, cats can be picky creatures, so if your cat doesn’t take to the new bed right away, don’t force them. Try again later when your cat is asleep or experiment with different materials until you find the perfect bed that your cat will love. Making a bed for your cat is a simple way to show your love and care for your furry friend.
DIY Cat Bed Made Of Jeans
If you’re looking for a fun and easy DIY project for your cat, consider making a cat bed out of old jeans! This project is not only cost-effective but also eco-friendly since you’re repurposing old clothes.
To start, gather a pair of old denim jeans and some butty-shaped foam rubber. Cut the legs of the jeans and wear each of the butty-shaped foam rubber inside them. Then, tie the remaining sleeve of the legs to form two legs for your bed. You can add a cushion or blanket on top for extra comfort.
Your cat will love their new bed, and you’ll love how easy it was to make. Plus, it’s a great way to upcycle old clothes and reduce waste. Give it a try and see how much your cat enjoys their new cozy spot!
DIY Basket Cat Bed

If you want to provide your cat with a comfortable and affordable bed, you can make a DIY Basket Cat Bed. This bed is perfect for cats that cannot fit inside standard beds. First, purchase a basket from the store at an affordable price. Then, make a cushion with the same shape as the basket. You can use soft materials like foam or cotton to make the cushion. To make the bed more comfortable, you can add some toys and extra bedding. This will make your cat feel more at home and entertained while they sleep.
The DIY Basket Cat Bed is also a great way to prevent fleas and other insects from bothering your cat. By providing a comfortable and clean bed, you can show your love to your cat and ensure they have a good night’s sleep. Plus, making this bed is easy and affordable, so you can create a cozy space for your pet without breaking the bank.
DIY Quick Cat Bed
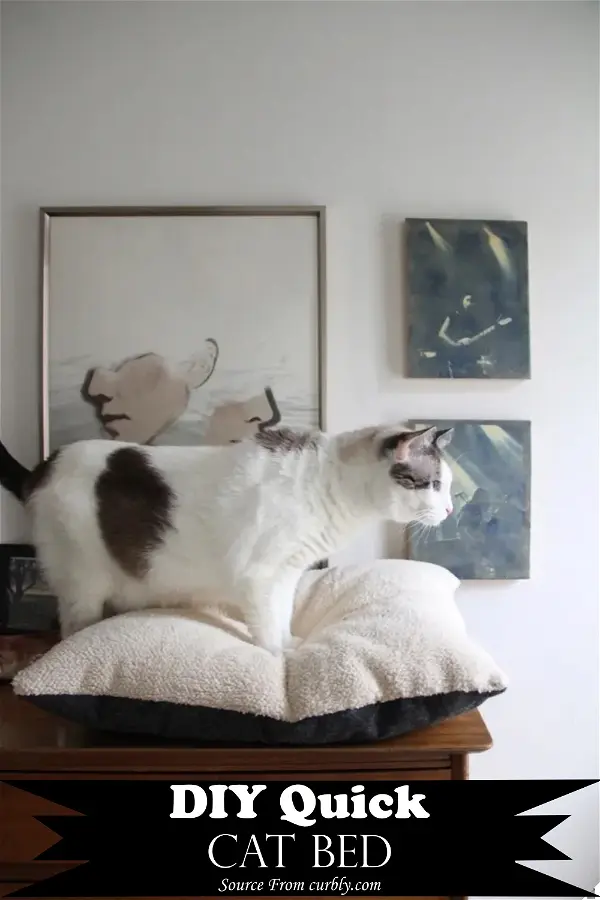
If you’re looking for a cozy and stylish bed for your furry friend, the DIY Quick Cat Bed is a great option. This project is simple and can be customized to any size and fabric of your choice. In just an afternoon, you can create a warm and comfortable bed that your cat will love.
To start, gather the materials you’ll need: stuffing, a sewing machine, thread, and scissors. Determine the size you want your cat bed to be and cut out two pieces of fabric to that size. Sew the edges together, leaving a small opening for the stuffing. Once you’ve turned the bed inside out, fill it with stuffing and close up the hole by hand or with a needle and thread.
This DIY cat bed is a fun and easy project that will provide your furry friend with a cozy place to rest. Plus, it’s a great way to use up any extra fabric you have lying around. Give it a try and see how much your cat enjoys their new bed!
DIY Cat Bed From Old Sweatshirt
If you’re looking for a cheap and easy way to make a cozy bed for your furry friend, try repurposing an old sweatshirt. Here’s how to do it:
- Find an old sweatshirt that you no longer wear. Make sure it’s large enough to accommodate your cat.
- Turn the sweatshirt inside out and sew the armholes shut.
- Stuff the body of the sweatshirt with old towels or blankets until it’s nice and fluffy.
- Sew the bottom of the sweatshirt shut.
- Flip the sweatshirt right side out and fluff up the stuffing.
- Decorate the bed with your cat’s favorite toys or a cover in their favorite color.
If you’re concerned about the safety of your cat, you can use a pillowcase filled with stuffing instead of a sweatshirt. This DIY cat bed is a fun activity to do with your kids and will provide your cat with a cozy spot to rest and play.
How to Make a Cat Bed
Making a cozy cat bed is an easy and fun project that you can do with things you already have at home. Here’s how to do it:
- Gather materials: You’ll need old sheets, pillowcases, and any fabric scraps you have lying around. Soft pillows will also make the bed more comfortable for your cat.
- Cut the fabric: Cut the sheets and pillowcases into smaller pieces, about 12 inches by 12 inches. You can use a rotary cutter or scissors.
- Sew the pieces together: Sew the pieces together with a sewing machine or by hand, leaving a small opening to stuff the bed.
- Stuff the bed: Use the fabric scraps to fill in any gaps and make sure there are no loose threads. Add the soft pillows to make the bed more comfortable.
- Finish the bed: Sew the opening closed and fluff the bed.
Your cat bed is now ready for your furry friend to enjoy! It’s a simple project that’s perfect for beginners and will provide your cat with a cozy spot to nap.
How to Build a Cat Bed
Building a cat bed can be a fun and rewarding DIY project for any cat owner. To get started, you will need to gather the necessary materials and tools, including wood, sandpaper, nails or screws, and cat-friendly features such as scratching posts or soft material.
First, cut the wood into the appropriate sizes and shapes for your cat bed. Sand down any rough edges or splinters to ensure a smooth surface for your cat to rest on. Next, attach a bottom to the frame of the bed using nails or screws.
To make your cat bed more comfortable, consider adding scratching posts or places for your cat to rest their head. This will encourage your cat to use the bed and feel more at home. Finally, cover any exposed parts of the wood with fabric or soft material to ensure maximum comfort for your furry friend.
By following these simple steps, you can create a cozy and personalized bed for your cat that they will love to use.
DIY Hanging Cat Bed

If you’re looking for a fun and functional DIY project for your furry friend, a hanging cat bed is a great choice. With just a few basic materials and some woodworking skills, you can create a cozy and stylish spot for your cat to relax.
To make a hanging cat bed, you’ll need the following materials: wood, fabric, rope or chain, a ruler, pliers, nails, a hammer, wood glue, and a staple gun. Start by building the frame for the bed, using the wood and your woodworking skills. Once the frame is complete, cut your rope or chain into four equal pieces and secure them through the holes in the frame using pliers and a hammer.
Next, lay your fabric over the frame and secure it in place using nails and a hammer. Once the fabric is secure, fill any remaining holes with wood glue and allow it to dry. Finally, use your staple gun to secure the fabric in place and ensure that your cat bed is sturdy and safe.
With just a few hours of work, you can create a unique and functional hanging cat bed that your furry friend will love.
DIY Cat Bed With No Money
If you want to create a cozy and comfortable bed for your cat without spending any money, you can easily make one yourself. All you need is a small wooden or plastic crate that is big enough for your cat to fit inside comfortably.
To make the bed, you will also need a piece of fabric that is larger than the crate itself. This includes the bottom of the crate as well. The fabric should hang down several inches below the crate when finished, so your cat can easily step into it from the top and move around inside without any trouble.
Here are the steps to create your DIY cat bed:
- Begin by cleaning the crate thoroughly and removing any rough edges or splinters.
- Cut the fabric to the appropriate size, leaving enough extra fabric to hang down below the crate.
- Attach the fabric to the crate using glue or a staple gun, making sure it is securely attached.
- Allow the glue to dry completely before placing the bed in a cozy spot for your cat to enjoy.
By following these simple steps, you can create a unique and comfortable bed for your feline friend without spending any money.
DIY Reversible Cat Bed
If you’re looking for a warm and cozy bed for your cat, this DIY reversible cat bed is a perfect choice. It’s a simple sewing project that only requires two circles of fabric and some quilting batting.
To make this bed, you’ll need to cut two circles of fabric and batting. The size of the circles will depend on the size of your cat. Once you have your circles cut, place them right sides together with the batting in between. Pin the layers together and sew around the edge, leaving a small opening for turning.
After sewing, turn the bed right side out through the opening and stuff it with more batting. Then, hand-sew the opening closed. You now have a cozy and reversible cat bed that your furry friend will love.
When choosing fabrics for this project, keep in mind that slippery fabrics may not be the best choice as your cat may slide out of bed. You can use any fabric you like for this project, and since it’s reversible, it doesn’t matter which side you use as the outside or inside of the bed.
Overall, this DIY reversible cat bed is a simple and practical project that will provide your cat with a warm and cozy place to sleep.
DIY Stargate Cat Bed
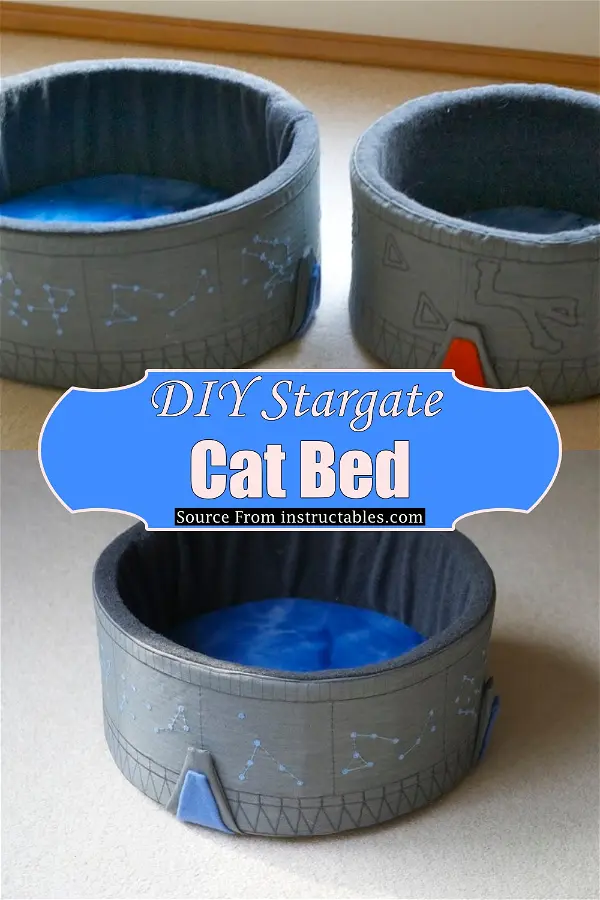
If you are a cat or dog lover, you will love this DIY Stargate Cat Bed. This project is perfect for anyone who wants to give their furry friend a cozy and unique place to sleep. The best part is that it is easy to make and can be completed in just a few hours.
To get started, you will need to print out the template provided in the link above. Next, trace the patterns onto fleece fabric and cut them out following the traced lines. Once you have all of the pieces cut out, use a hot glue gun to fix them together.
The end result will be a cute and cozy cat bed that will make your pet feel like it is in a real stargate. You can even hang it on the wall to add a unique touch to your home decor. This project is not only fun to make, but it will also help you bond with your furry friend as they enjoy their new bed.
Overall, this DIY Stargate Cat Bed is a great project for anyone who loves to create and wants to give their pet a special place to sleep. So why not give it a try and see how much your pet will love their new bed?
DIY Cat Tent
If you’re a cat owner, you can easily build a comfortable cat tent for your feline friend. Cat tents are perfect for cats that love to hide or sleep in enclosed spaces. They also provide a safe haven for cats that tend to scratch furniture or bedding. By building your own cat tent, you can customize it to your cat’s liking and save money on expensive cat toys.
To make a cat tent, you will need an old T-shirt and some wire hangers. Follow these simple steps:
- Straighten out the wire hangers and bend them into a circular shape.
- Insert the hangers into the sleeves of the T-shirt and bend them to form an arch shape.
- Secure the ends of the hangers together to create a dome shape.
- Place a cushion or blanket inside the T-shirt to create a cozy spot for your cat to rest.
You can adjust the size of the tent to fit your cat’s needs. If your cat is larger, use a bigger T-shirt and longer wire hangers. You can also add decorations or toys to the tent to make it more inviting for your cat.
Building a cat tent is an easy and affordable way to provide your cat with a comfortable and safe space to relax.
DIY Cat Nap Basket

If you have a furry feline friend who loves to nap, a DIY Cat Nap Basket is a perfect addition to your home decor. Creating your own basket is not only cost-effective but also allows you to customize it to your liking. Here are the steps to create your own cozy basket for your kitty:
- Measure the stuffing of the cushion and mark where you will sew eight pieces of batting in a zigzag manner using a fabric pencil.
- Cut one piece of batting at a time to avoid damaging the material.
- Leave a small opening for the batting to pass through.
- Once you have sewn all eight pieces of batting, stuff the cushion with your desired filling.
- Sew the opening closed and attach the cushion to the basket.
- Finally, add any additional decor or toys to the basket to make it your cat’s favorite spot.
By following these simple steps, you can create a cozy and personalized Cat Nap Basket for your furry friend. Click here for more detailed instructions and inspiration.
DIY No-Sew Cat Bed
If you’re looking for a cheap and easy way to create a cozy spot for your feline friend, a DIY no-sew cat bed may be just what you need. Not only will you save money by making it yourself, but you’ll also have the freedom to choose the colors and materials that best suit your home decor. Plus, your cat will love having a special spot to call their own.
To make a no-sew cat bed, you’ll need two different colors of fleece, stuffing from a rectangle-shaped piece of batting, cardboard, and a pair of scissors. Start by cutting out a circle from one piece of fleece and gluing it to the cardboard base. Then, frame the base with the other piece of fleece and cut out the side walls, leaving a hole in the middle for your cat to climb in and out of.
Once you’ve assembled the bed, fill it with the batting stuffing and add a small blanket for extra comfort. Your cat will love snuggling up in their cozy new bed, and you’ll love the satisfaction of having made it yourself. So why not try making a DIY no-sew cat bed today?
DIY Cat Bed From Cardboard
If you want to make your cat happy and save money, making a cat bed from cardboard is an easy and affordable option. To get started, you will need cardboard, a staple gun, a hot glue gun, scissors, polyester wadding, fabrics, and felt. Follow these simple steps to make a cozy bed for your furry friend:
- Cut the cardboard into the desired shape and size for your cat bed.
- Use the staple gun to attach the cardboard pieces together.
- Cover the cardboard with polyester wadding.
- Cut fabric to fit the cardboard and staple it to the cardboard.
- Use the hot glue gun to attach felt to the edges of the cardboard to give it a finished look.
This project should take about an hour or less to complete, and it’s a great way to personalize your cat’s sleeping area. Just remember to use caution when using power tools like staple guns and hot glue guns. With a little effort, you can create a comfortable and stylish cat bed that your furry friend will love.
DIY Multi-purpose Cat Bed Description

Looking for a budget-friendly and easy-to-make cat bed? The DIY Multi-purpose Cat Bed is the perfect solution for you! This project only takes about an hour to complete and can be made with materials that are easily accessible at your local craft store or lying around your house.
This bed is versatile and can be used as a stand-alone piece or as an addition to your cat’s cage. It’s a great alternative to expensive cat trees and provides a cozy spot for your furry friend to rest.
The materials used for this project are inexpensive and the instructions are easy to follow. The bed can be customized to fit your cat’s personality and style.
Don’t let your cat take over your lap anymore, make them their own bed! Click the link provided to get started on this fun and practical DIY project.
DIY iMac Cat Bed

Looking for a new and unique bed for your furry friend? Why not try making a DIY iMac cat bed! This project is perfect for those who want to recycle and reuse old computer parts. With a little bit of creativity and some basic tools, you can transform an old iMac into a cozy and stylish bed for your cat.
To start this project, you will need to clean the outer shell of the iMac and remove the top of the monitor. Next, lay down a layer of foam padding on top of the iMac shell and secure it with hot glue or strong packing tape. This will serve as a comfortable resting place for your cat’s head while they sleep.
One of the benefits of this project is the ability to customize the exterior casing of the iMac. You can change the original color with spray paint to match your home decor or your cat’s personality. The transparent shell allows you to see your cat while they sleep and adds a unique touch to your home.
Overall, this project is a low-cost and eco-friendly way to create a comfortable and personalized bed for your furry friend. So why not give it a try and see how your cat enjoys their new iMac cat bed!
Stuffed Cat Bed DIY

Looking for a simple DIY project to make a cozy bed for your feline friend? Look no further than this easy stuffed cat bed. Not only does it make a great gift for your cat-loving friends, but it’s also a great way to get started on your sewing journey.
To make this bed, you will need a 17″ circle of fabric, quilting batting, and scissors. Begin by sewing together the ends of a long rectangle of batting to make it into a circle. Use this to frame the base circle. Then, cut a circle of fabric to match the size of the batting circle. Place the batting circle in the center of the fabric circle and fold the edges of the fabric up and over the batting, securing them in place with pins. Sew the edges of the fabric together, leaving a small opening to stuff the bed with batting. Once the bed is stuffed to your desired level of fluffiness, sew the opening closed and voila! Your cat now has a cozy new bed to snuggle up in.
For a visual guide on how to make this stuffed cat bed, click here.
Summary
Looking for a cozy bed for your furry friend? DIY cat beds are a fun and affordable way to provide your cat with a comfortable place to rest. From repurposing old sweaters to building elaborate structures, there are endless possibilities for creating a unique and stylish bed for your feline companion. With a little creativity and some basic crafting skills, you can make a cat bed that both you and your cat will love.